Instances
Instances are a great starting point for taking advantage of self service features and spinning up both VMs and containers. In HPE Morpheus Software it may be advisable to cover the definition of a few terms used within the application so as to reduce confusion. These concepts are also covered in greater detail in the Provisioning Concepts section.
- Instance
A set of containers or virtual machines that can correlate to a single horizontally-scalable entity or a service suite, like a database. It is important to note that an Instance can contain one or more containers/VMs depending on the Instance type and configuration.
- Container
Typically a docker container provisioned via a HPE Morpheus Software Docker host.
- Virtual Machine
A virtualized compute server provisioned onto various hypervisor hosts.
The top of the main Instances page shows overall statistics for the listed Instances, including count, status, and resource utilization. You can search for Instances by name, or filter by group, instance type, or category.
Note
Instances listed are determined by group access and role permissions. When filtered to show Instances of “All Statuses”, any Instances which are in a state of pending removal due to a delayed delete policy in place are not shown under this filter. Instead you must filter for “Pending Removal” to see these Instances and prevent deletion, if desired.
The Instance list contains important information about each instance, including the instance name, environment tag, instance type icon, IP address and port info, Instance version, the number of virtual machines or containers in the instance, the group the instance is in, and the cloud or clouds the instance is in.
Creating Instances
The Instance catalog is the one-stop shop for selecting items to be provisioned and pieced together. It contains not only basic container and VM options but also tailored services for SQL databases, NoSQL databases, cache stores, message busses, web servers, and even full-fledged apps. The list contains a lot of items to choose from and they are represented to the user based on what provisioning engines are enabled and integrated in the HPE Morpheus Software environment.
To get started, simply click the + Add button in the upper right of the section. A modal will display allowing the catalog to be searched. Once an item is selected it is just a matter of following the steps through the wizard.
Tip
The Instance catalog can be customized via role-based access control (RBAC) thereby restricting access to non-sanctioned catalog items, as well as added to via the Library section. It is completely customizable.
Note
For storage-specific provisioning workflows, see the integration guide for your storage platform. For example, HPE Alletra MP Storage includes a walkthrough of creating Instances on HPE Alletra MP datastores.
The next step will ask for a Group and Cloud to be selected. The Group is an abstract representation that can contain multiple cloud integrations. Clouds can be in multiple Groups and Groups are also useful for using RBAC to restrict provisioning access and set retainment policies. If the environment is new and these do not yet exist, it may be advisable to refer to one of our starter guides, such as the Getting started with HPE Morpheus Software and VMware guide. The wizard continues by allowing us to choose a name for the Instance as well as an environment.
For cluster-backed provisioning, cluster Group permissions filter the targets available after the Group is selected. Cluster Service Plan permissions then filter plan choices for that target; role access, plan active state, provision type, and layout or image minimums also apply. Default permission behavior is not an explicit allow-list and does not mean the cluster is preselected. See Cluster Permissions and Provisioning Impact.
Note
Currently the Environment option is mostly useful for presenting the user with informative metadata around the Instance when coming back to it later.
The Environment value is stored as the Instance context and can be displayed and filtered as metadata. Administrators can require a value through Provisioning Settings, and naming policies can reference it as ${instance.instanceContext}. The Environment record itself does not grant access; use Roles and resource permissions for access control.
Moving on, it is now time to configure the Instance. Depending on the Instance Configuration that is chosen, fields will change. This can include cloud-specific fields (i.e. Datastore for VMware or Network). There will also be options like setting an initial user account. Some of these fields are optional and will be represented as such.
For VMware Clouds, storage-type and network-interface-type selectors are shown only when the corresponding Cloud settings are enabled and the provider exposes choices. See Advanced. Selector availability is provider-specific and can differ between initial provisioning and reconfiguration.
For HVM VMs, expand Advanced Options on the Configure step to set provider-specific firmware, boot, security, graphics, memory, identity, and virtualization controls. The fields shown depend on the selected layout and whether the VM is being provisioned or reconfigured. See VM Advanced Options for the current field inventory, defaults, dependencies, and availability matrix. In particular, QEMU Arguments is available during provisioning and reconfiguration; its value is tokenized and passed to QEMU when the VM definition is generated, so invalid or conflicting arguments can prevent startup.
There is no universal Instance Port field. A field with that label is supplied by a selected Instance type or connection workflow and its meaning follows that context. For example, the MySQL Existing layout uses Host and Port to connect to the existing MySQL service; the default port is 3306. A Windows server connection form can also label its WinRM connection port as Port and defaults it to 5985. Neither field opens a guest firewall port or publishes an application endpoint. Confirm the selected layout and the field group before setting it; do not apply a port value from one Instance type to another.
Configuration options provided in this screen are very powerful. An example is MySQL where a Master/Slave or Master/Master layout can be selected. These configurations will automatically deploy two MySQL VMs or containers and link them together to provide replication. These types of configurations exist for a wide range of Instance types and are optimized for high performance and scale. It is even possible to provision entire sharded MongoDB clusters.
One last step before the Instance can be provisioned is the Automation step. This wizard step may or may not appear depending on the capabilities of the Instance type or previous configurations in the account. It is here one can easily select a post-provisioning workflow to run (see more on Tasks and Workflows elsewhere in HPE Morpheus Software documentation), assign a load balancer, or even configure the backup job that gets created.
Now that the steps are completed for provisioning the selected Instance type, simply review your selections and complete. The Instance will automatically show up in the Instances list and its provisioning state will be represented. Depending on what was provisioned this step can range from seconds to minutes (typically a container configuration will be rather quick if the Instance type has previously been provisioned before).
Converting Discovered Resources to Managed Instances
When creating new cloud integrations (or updating existing ones), users may opt for HPE Morpheus Software to onboard any existing resources that currently reside in the Cloud. For example, these may be virtual machines that exist on vCenter hosts prior to integration with HPE Morpheus Software, EC2 instances pre-existing on an Amazon AWS account, or virtual machines that are running on a KVM host. With the Add/Edit Cloud modal open, mark INVENTORY EXISTING INSTANCES for HPE Morpheus Software to automatically onboard these resources. Not only will HPE Morpheus Software inventory these instances at the time the cloud is integrated (or updated), it will also continue to poll the target cloud every five minutes (by default) for newly added or removed servers. Users can see these discovered servers by looking in . Depending on the type of resource, it may appear on the Virtual Machines tab, the Containers tab, or another tab. Additionally, we can see a list of discovered servers on Cloud detail pages (Infrastructure > Clouds > Selected Cloud). Just click on the tabs for VMs, Containers or Hosts tab. Discovered resources will be indicated as such whereas containers which are associated with a managed Instance will be marked as a “Managed”.
Additionally, HPE Morpheus Software allows users to convert discovered resources into managed Instances. Begin from the server detail page ( > selected machine) and from the ACTIONS menu select “Convert to Managed”. At this point, we must make a number of selections:
Assign to the primary Tenant or one of the Subtenants
Select a Group (this dropdown contains a filtered list of Groups which the associated Cloud is in)
Username and password for a seeded account
Opt to install HPE Morpheus Software Agent or not (HPE Morpheus Software Agent Key Features)
Select the Instance Type which should be associated with the new Instance containing this VM
Select a version number for the Instance (such as 20.04 for a basic Ubuntu Instance)
Select a Layout, Instance Types often have multiple Layout configurations
Identify the operating system
Select a Plan (this dropdown contains a filtered list of plans which correlate to the size of the VM)
Finally, click EXECUTE. Once this process is completed, the server will be indicated as “Managed” in the servers list. Additionally, a new Instance will appear on the Instances List page (). We can now work with it in the same way we can work with any other Instance, such as by adding it to an App or expanding the Instance horizontally with added nodes.
Instance Details
The instance detail page is where you can view and fully manage an instance. To get to an instance detail page, navigate to , and click on an Instance. Please note Instance details and actions will differ between Instance types and user permissions.
There are several sections within an Instance page that provide useful capabilities to the user.
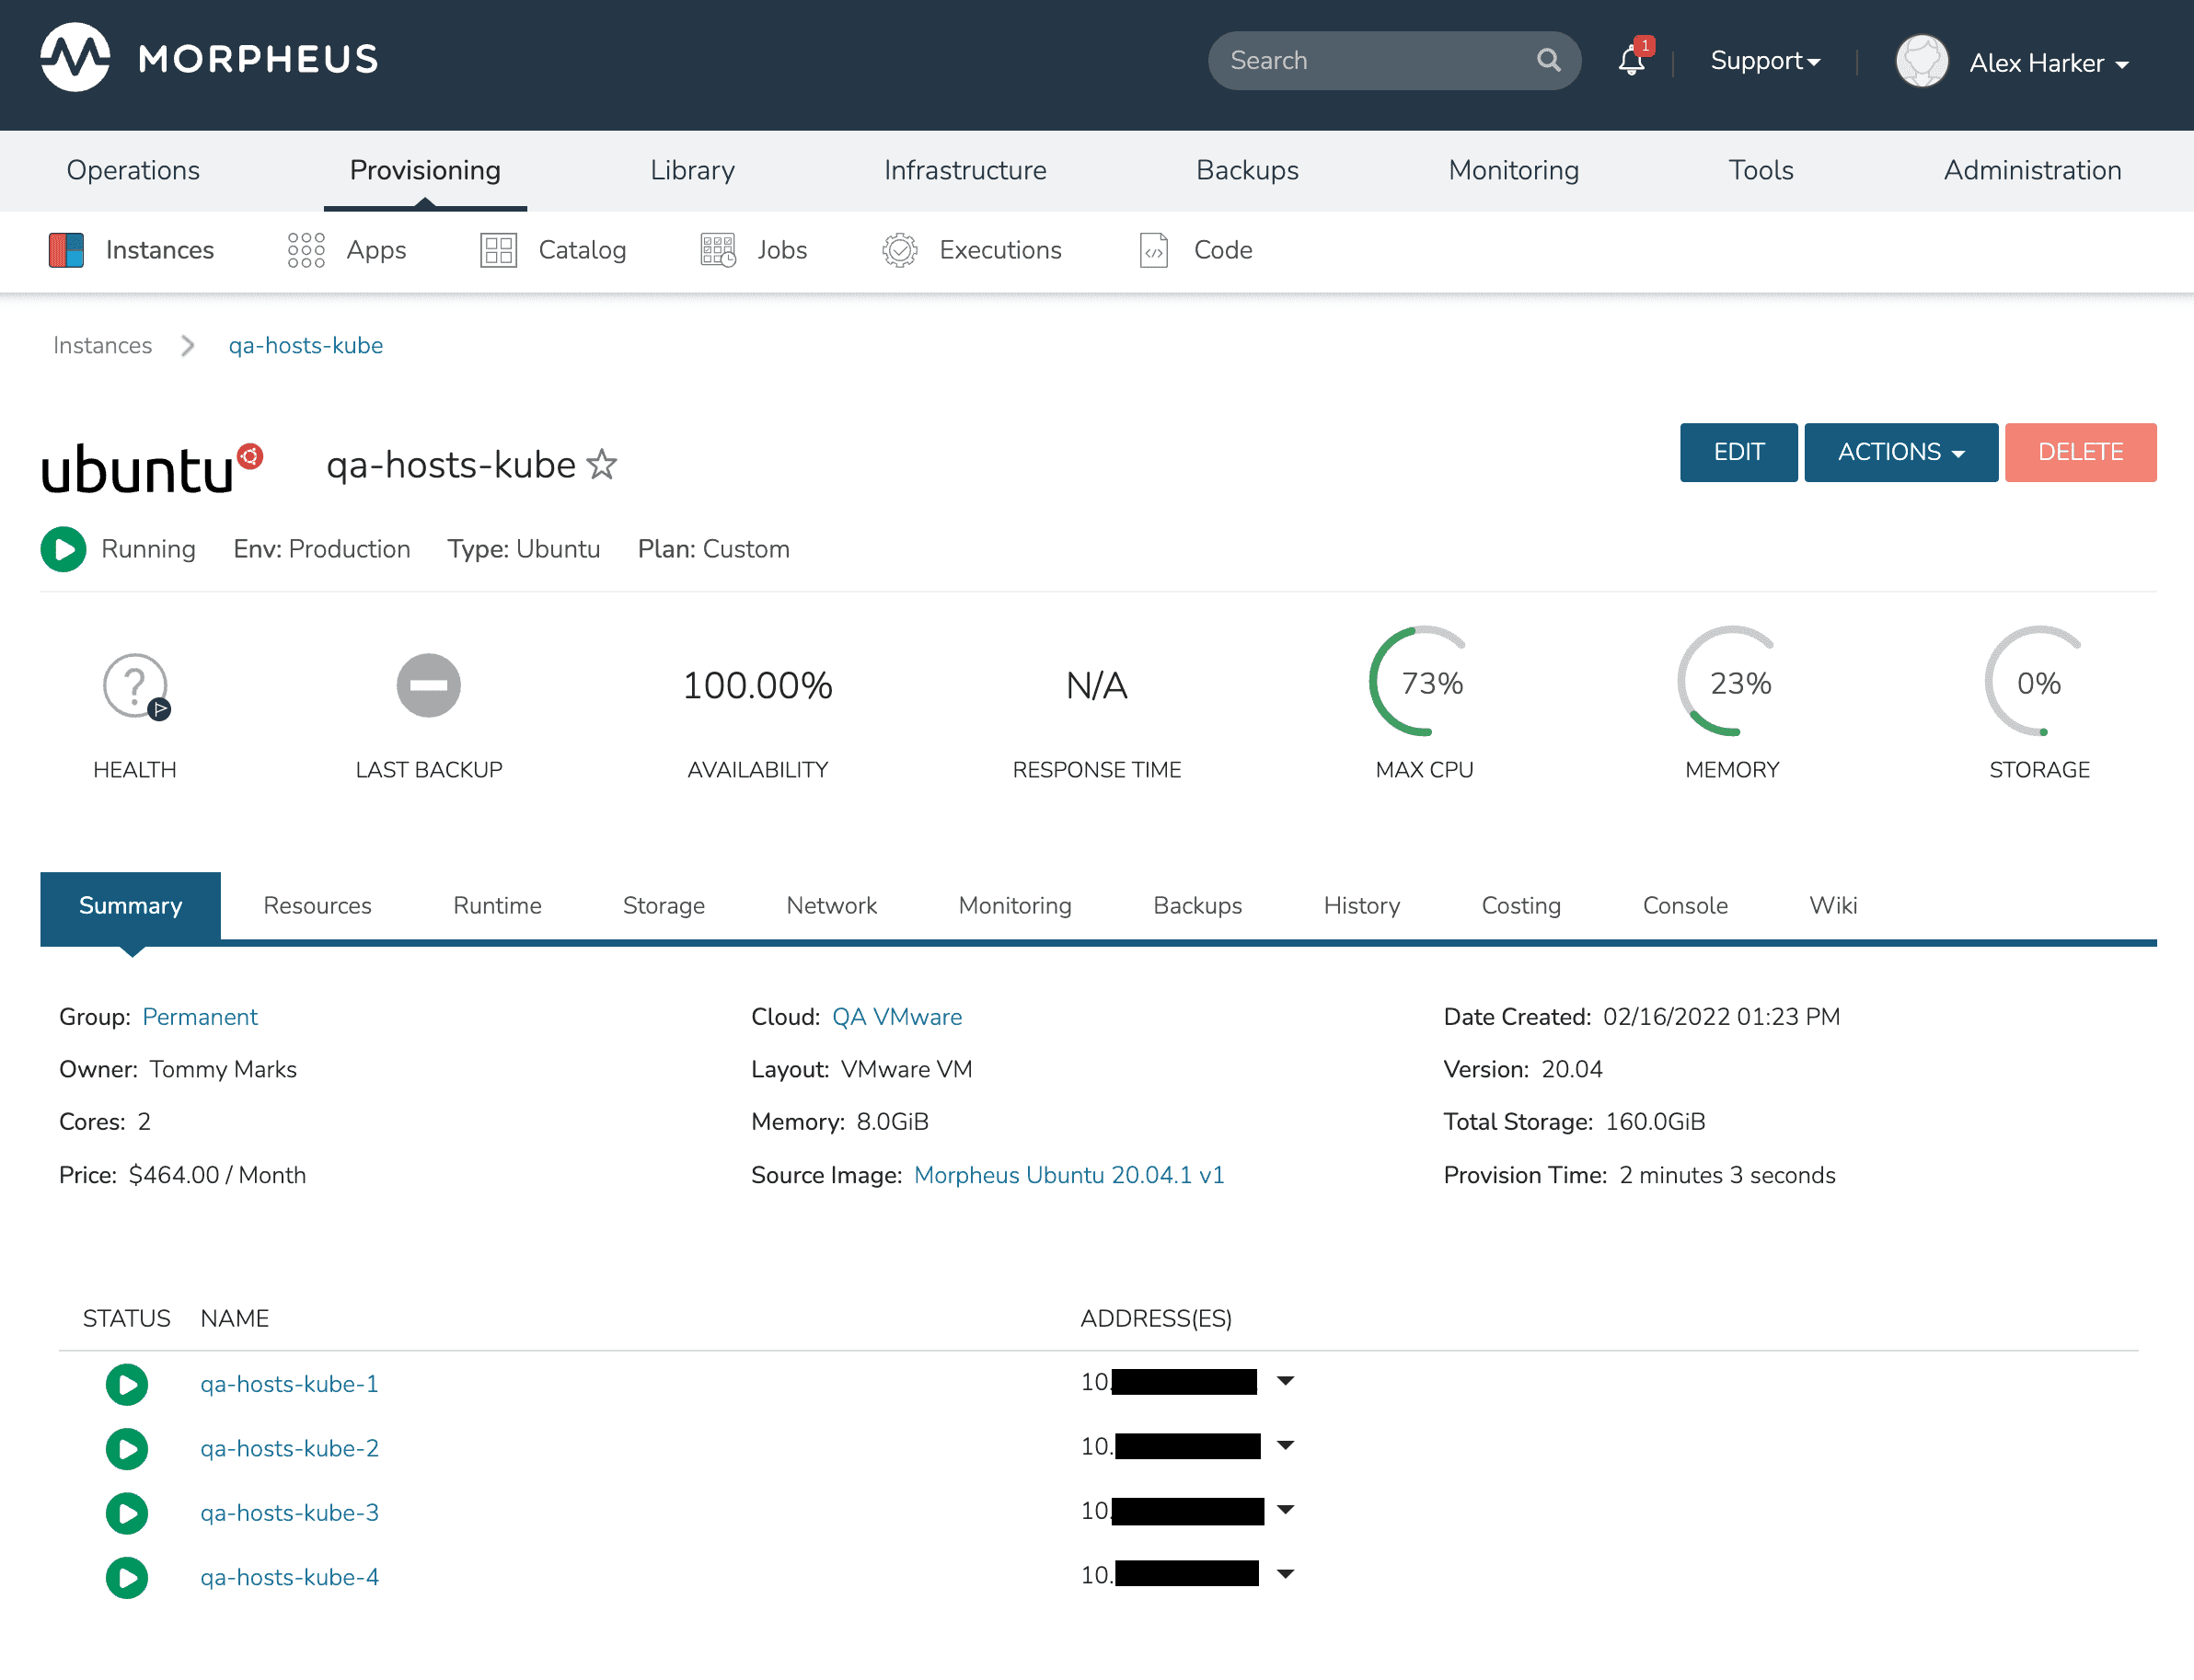
- Summary
Basic information, stats and status information
Availability: The Instance availability is the percentage of time the Instance is up. When stopping Instances, the option is given to mute monitoring if you wish for intentional down time not to count against the availability
Response Time: If listed as “N/A” (Not Applicable), the Instance does not have any Checks set against it or does not have any Checks set against it that report a response time. Agent Checks, for example, do not report a response time. Some Checks, such as Docker Checks for Docker containers, require HPE Morpheus Software to ping the container which reports a response time.
- Deploy
Track deployment history for instance types that support deployments or manually kick off a deployment (only visible for Instance Types that support deployments)
- Settings
Some Instance Types support custom configuration settings (for example, MySQL presents the my.ini)
- Resources
VMs, containers, or other resources associated with the Instance are listed here. Some Instance Types, such as XaaS Instances, will not have resources and the tab is not displayed
- Runtime
View the environment variables presented to the Instances or exported to the Instances via Apps (more on this in the Apps section). Users may also see Imported environment variables that may be referenced by the running Instance.
For Instances that support load balancing and auto scaling, configure auto scaling thresholds and load balancer settings in the Scale subsection that pertain to a particular Instance.
The software subsection will show any tracked software which is Installed as part of the provisioning process and is being tracked.
- Storage
See storage information associated with the Instance including the list of volumes and controllers which are associated with each machine that makes up the Instance.
- Network
Useful for configuring network interfaces for your VMs or security groups which allow access to the Instance.
- Monitoring
Quick summary of the monitoring system and all checks that were configured to test the state of the Instance. Stats views (memory, cpu, etc.) can be zoomed out to a 90-day view if desired (in global settings, ensure your stats retention setting will support this). Logs and guidance for the individual Instance are also shown in their respective subtabs.
- Backups
Quick backup dashboard. Useful for viewing historical backups and snapshots as well as adding new backup jobs. For layouts that support snapshots, users with Snapshots: Full permission can start one from Actions > Create Snapshot; see Managing Instances.
- History
See historical information related to automation which has been run against the Instance. This is useful for examining automation which was run as part of a phase of a Provisioning Workflow. Users can also drill into the Workflows to examine individual Tasks, including viewing the output from these Tasks to confirm success or troubleshoot issues.
- Costing
Invoices pertaining to the Instance are displayed here. See the Instance level or host level invoices along with individual line items. In the History subtab view historical pricing data to monitor trends. In the Prices subtab view any prices which have been created and used to build a metered costing profile for the workload.
- Console
Access the Instance or container via a client-less Console supporting SSH, RDP, VNC, or even hypervisor-level remote consoles.
- Wiki
View the Wiki page for this Instance or edit the existing Wiki page (which may currently be blank). The content field supports markdown formatting, see the main Wiki section of HPE Morpheus Software documentation for additional details.
Managing Instances
Instance actions allow you to perform numerous management tasks on instances. The actions available depend on the instance type, hypervisor, roles permissions, and instance state.
- Edit
Edit the Name, Description, Environment, Group, Metadata, Tags, and Owner for the Instance.
- Delete
Deletes the Instance.
Important
Deleting an Instance will delete the actual VM’s or Containers and cannot be undone, unless a Delayed Removal policy has been applied prior to the Deletion. To delete Instances without deleting associated VM’s, delete the Instances VM record(s) from the Infrastructure section with “Remove Infrastructure” deselected and select “Remove Associated Instances” in the VM delete modal options. This will delete the records in HPE Morpheus Software but leave the infrastructure in place.
Tip
You can change the owner of an instance easily by selecting the edit button and entering a new owner in the corresponding field.
Actions
Available options in the Actions dropdown can include:
- Suspend
Puts the VM in a suspended state without shutting down the OS.
- Stop/Start/Restart Service
Stops, Starts or Restarts the service associated with the Instance Type.
- Stop/Start/Restart Server
Stops, Starts, or Restarts the Virtual Machine. For HVM/KVM and other provision types that support enhanced shutdown, Stop Server opens a shutdown-type selector. Graceful Shutdown is the default and allows the guest operating system to shut down cleanly. Force Stop (immediate power-off) bypasses the guest shutdown process and should be used only when the VM is unresponsive. HVM graceful shutdown waits up to five minutes and leaves the VM running if the guest does not stop; it does not automatically force power-off. The selector also supports bulk Instance and VM stops.
- Import as Image
Clones and exports VM in its current state to target Storage provider and adds Virtual Image Record with metadata matching the source Instance’s configuration.
- Clone to Image
Clones and converts VM in its current state to image in the source Cloud and adds Virtual Image Record with metadata matching the source Instance’s configuration.
- Lock/Unlock Instance
A locked instance cannot be deleted until it is unlocked.
- Reconfigure
The Reconfigure action allows service plan, disk, cpu, ram, networks and storage controller changes. Available options depend on the instance type and service plan configuration. Some resize actions require an instance restart.
- Move
Relocates HVM/KVM VMs to another host or HVM cluster in the same Cloud. Cross-cluster moves map datastores and networks on the destination cluster. This is not a VMware-to-HVM conversion. See VM Migration & Failover.
- Clone
Creates a new Instance from the Instance at its current state.
- Backup
Immediately executes a backup of the Instance. Only available for Instances with backups enabled.
- Create Snapshot
Creates a point-in-time snapshot when the selected Instance layout supports snapshots. The action is shown only when the Instance is not pending removal and the user has Snapshots: Full permission; it is disabled while the Instance is busy. Enter a snapshot name and optional description, submit the action, and monitor the resulting process. View completed snapshots on the Instance Backups tab. Storage behavior and consistency depend on the provider; for HVM, see Snapshots.
- Run Workflow
Presents workflow options and then immediately runs selected Workflow on the Instance. Workflows can be created in the section.
- Run Script
Presents Script options and immediately executes selected Script on the Instance. Scripts can be created in the Library section.
- Apply Template
Presents Template options and immediately applies selected Template to the Instance. Templates can be created in the Library section.
- Add Node
Adds an additional node to the configuration. Additional options and configurations are required in the add node wizard depending on instance configuration and type.
- Eject Disk
Ejects attached disk/iso.
- Add Slave
Adds a database slave in the Instance.
- Change Master
Changes the database Master node in an Instance.
- Clone to Template (VMware)
Creates a new VMware Template from the Instance with corresponding HPE Morpheus Software Virtual Image record.
Tip
Scrolling down in the Actions dropdown may be necessary to see all options.
Performing Instance Actions
Select the Provisioning link in the navigation bar.
Click the Instance from the list of instances you wish to perform an action on.
Click the Actions drop down button and select an Action.
Notes
Every Instance has a Wiki section for adding useful information about the Instance. Wiki can be added by selecting the Wiki tab button on the bottom of Instance Detail pages. Instances with associated VMware VM’s will bi-directionally sync HPE Morpheus Software Instance Wiki content and VMware VM Notes. See the Wiki Section for more details.
Tip
Markdown Syntax is supported in Wikis.