3 Node HA Install Example
Distributed App Nodes with Externalized MySQL Database
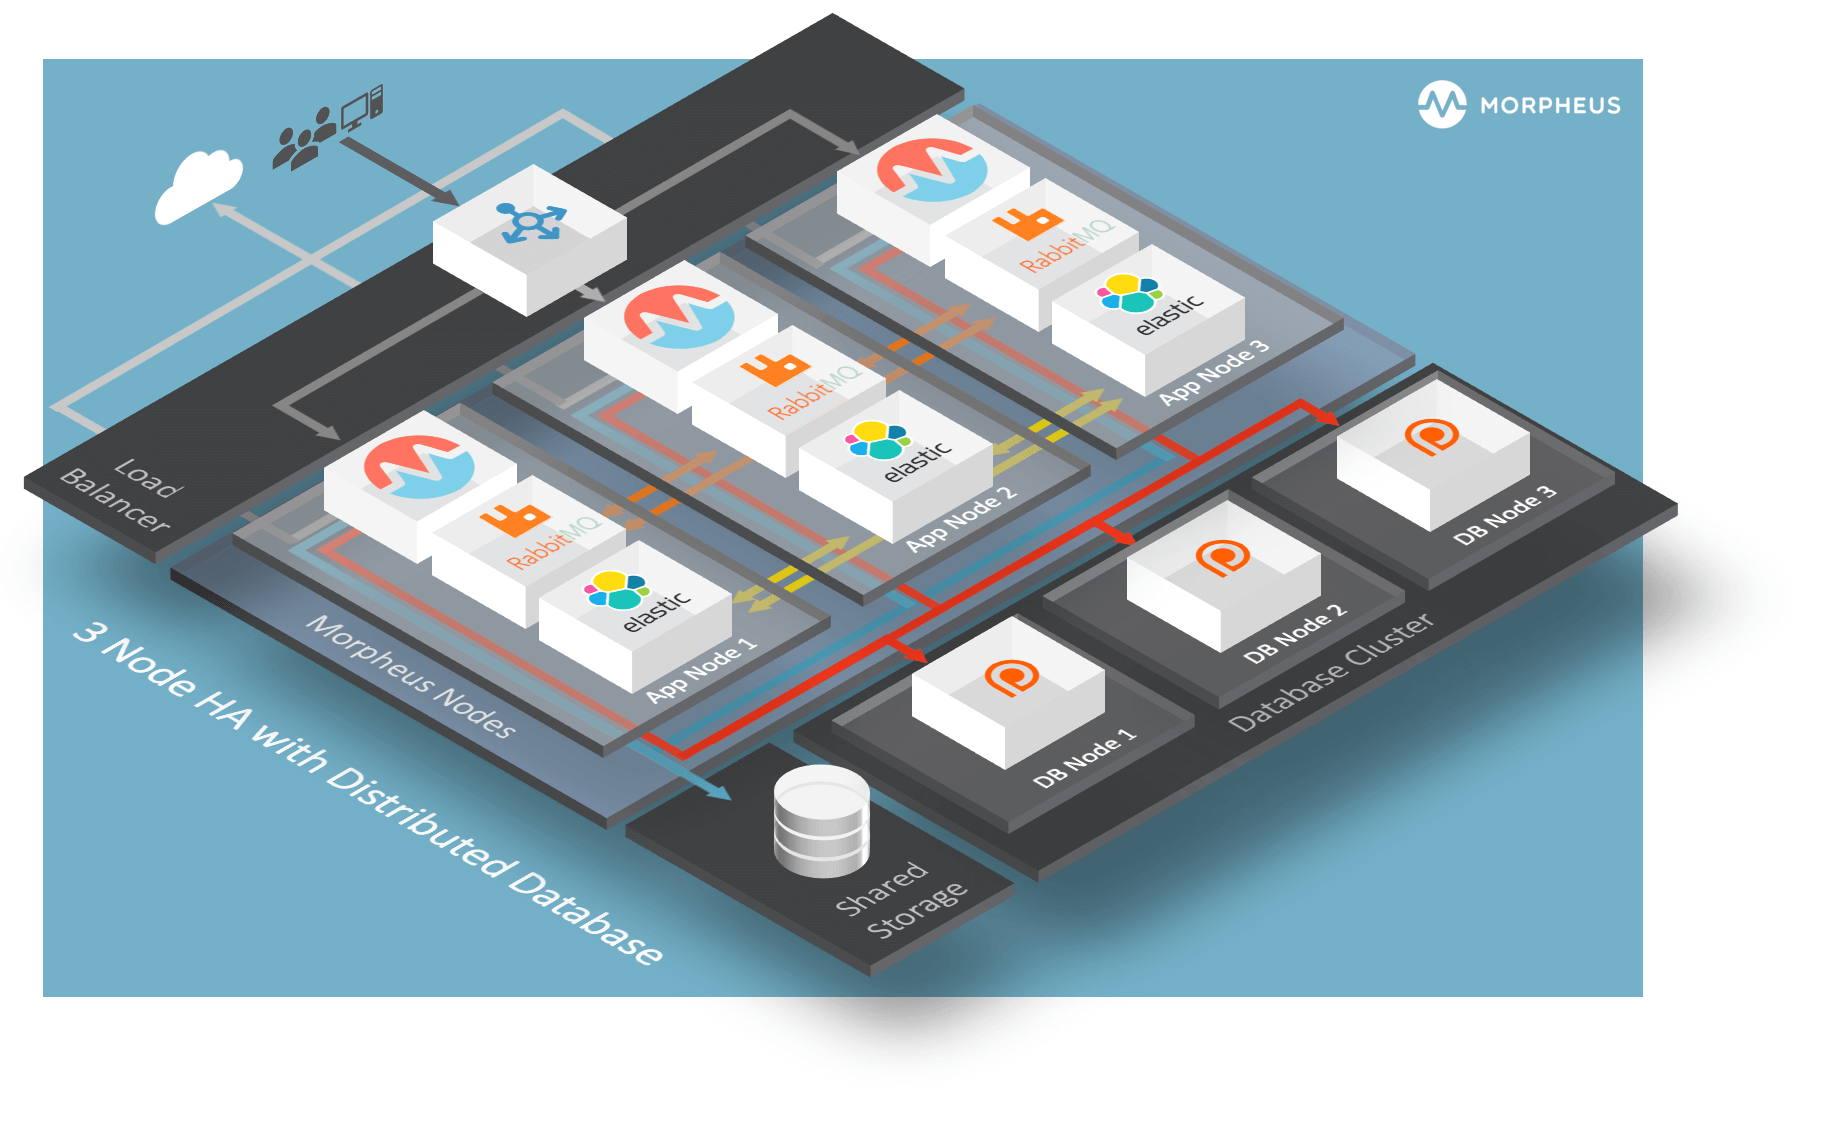
A common and recommended HA Morpheus deployment consists of three app nodes using embedded services and an external MySQL DB cluster (minimum of 3 nodes).
Important
HA environments installed without engagement from Morpheus are not eligible for support. The provided configuration serves as a sample only and requirements may vary. Please reach out to your account manager to discuss deploying a HA environment to meet the requirements for support.
Assumptions
This guide assumes the following:
App nodes can resolve each others short names
All app nodes have access to shared storage mounted at
/var/opt/morpheus/morpheus-ui.This configuration is designed to tolerate the complete failure of a single node but not more. Specifically, the Elasticsearch tier requires MORE than 50% of the nodes to be up and clustered at all times. However, you can always add more nodes to increase resilience.
You have a load balancer available and configured to distribute traffic between the app nodes. Load Balancer Configuration
Default Paths
HPE Morpheus Software follows several install location conventions. Below is a list of the system paths.
Important
Altering the default system paths is not supported and may break functionality.
Installation Location:
/opt/morpheusLog Location:
/var/log/morpheusMorpheus-UI:
/var/log/morpheus/morpheus-uiNginX:
/var/log/morpheus/nginxCheck Server:
/var/log/morpheus/check-serverElastic Search:
/var/log/morpheus/elasticsearchRabbitMQ:
/var/log/morpheus/rabbitmq
User-defined install/config:
/etc/morpheus/morpheus.rb
MySQL requirements for Morpheus HA
The requirements are as follows:
An external MySQL service. The 8.4 LTS family can be configured; confirm the formally certified version and service variant for the installed HPE Morpheus Software release.
MySQL cluster with at least 3 nodes for redundancy.
Morpheus application nodes have connectivity to MySQL cluster.
Note
Morpheus does not create primary keys on all tables. If you use a clustering technology that requires primary keys, you will need to leverage the invisible primary key option in MySQL 8
Configure Morpheus Database and User
External MySQL configuration is supported, including the 8.4 LTS family. Confirm the formally certified version and service variant for the installed HPE Morpheus Software release, and review MySQL before creating the schema. 8.4 or greater is not an unconditional support statement.
Create the Database you will be using with HPE Morpheus Software. Login to mysql node:
[root@node: ~]  mysql -u root -p
  # password: `enter root password`

mysql> CREATE DATABASE morpheus CHARACTER SET utf8mb4 COLLATE utf8mb4_general_ci;

mysql> show databases;
Next create your HPE Morpheus Software database user. This is the user the HPE Morpheus Software app nodes will auth with mysql.
mysql> CREATE USER 'morpheus'@'%' IDENTIFIED BY 'morpheusDbUserPassword';Next Grant your new HPE Morpheus Software user permissions.
mysql> GRANT ALL PRIVILEGES ON morpheus.* TO 'morpheus'@'%' with grant option;

mysql> GRANT SELECT, PROCESS, SHOW DATABASES, RELOAD ON *.* TO 'morpheus'@'%';

mysql> FLUSH PRIVILEGES;

mysql> exit
App Node Installation
Requirements
Ensure the firewall (or security group) allows HPE Morpheus Software outbound access to the various backend services:
mySQL Port to External DB
3306/tcp
Ensure the firewall (or security group) allows HPE Morpheus Software inbound from agents and users:
HTTPS Port
443/tcp
RabbitMQ Ports
4369 (epmd - inter node cluster discovery)
5671 (TLS from nodes to RabbitMQ)
5672 (non-TLS from nodes to RabbitMQ)
15671 (HTTPS API)
15672 (HTTP API)
25672 (inter node cluster communication)
61613 (STOMP - non-TLS)
61614 (STOMP - TLS)
Elasticsearch Ports
9200 (API access)
9300 (inter node cluster communication)
Installation
First begin by downloading and installing the requisite HPE Morpheus Software packages to ALL HPE Morpheus Software app nodes.
HPE Morpheus Software packages can be found in the Downloads section of the Morpheus Hub
RHELL/CentOS
[root@node: ~] wget https://example/path/morpheus-appliance-ver-1.el8.x86_64.rpm
[root@node: ~] rpm -ihv morpheus-appliance-appliance-ver-1.el8.x86_64.rpm
Ubuntu
[root@node: ~] wget https://example/path/morpheus-appliance_ver-1.amd64.deb
[root@node: ~] dpkg -i morpheus-appliance-appliance_ver-1.amd64.deb
Do NOT run reconfigure yet. The HPE Morpheus Software configuration file must be edited prior to the initial reconfigure.
Next you will need to edit the HPE Morpheus Software configuration file
/etc/morpheus/morpheus.rbon each node.Note
In the configuration below, the UID and GID for the users and groups are defined for services that will be embedded. This ensures they are consistent on all nodes. If they are not consistent, the shared storage permissions can become out of sync and errors will appear for plugins, images, etc. If not specified, Morpheus will automatically find available UIDs/GIDs starting at 999 and work down. Availability of UIDs and GIDs can be seen by inspecting
/etc/passwdand/etc/grouprespectively. Change the UIDs and GIDs below based on what is available.You can find additional configuration settings here
Node 1
appliance_url 'https://morpheus.localdomain'
elasticsearch['es_hosts'] = {'192.168.104.01' => 9200, '192.168.104.02' => 9200, '192.168.104.03' => 9200}
elasticsearch['node_name'] = '192.168.104.01'
elasticsearch['host'] = '0.0.0.0'
rabbitmq['host'] = '0.0.0.0'
rabbitmq['nodename'] = 'rabbit@node01'
mysql['enable'] = false
mysql['host'] = {'127.0.0.1' => 6446}
mysql['morpheus_db'] = 'morpheus'
mysql['morpheus_db_user'] = 'morpheus'
mysql['morpheus_password'] = 'morpheusDbUserPassword'
user['uid'] = 899
user['gid'] = 899
# at the time of this writing, local_user is not valid as an option so the full entry is needed
node.default['morpheus_solo']['local_user']['uid'] = 898
node.default['morpheus_solo']['local_user']['gid'] = 898
elasticsearch['uid'] = 896
elasticsearch['gid'] = 896
rabbitmq['uid'] = 895
rabbitmq['gid'] = 895
guacd['uid'] = 894
guacd['gid'] = 894
Node 2
appliance_url 'https://morpheus.localdomain'
elasticsearch['es_hosts'] = {'192.168.104.01' => 9200, '192.168.104.02' => 9200, '192.168.104.03' => 9200}
elasticsearch['node_name'] = '192.168.104.02'
elasticsearch['host'] = '0.0.0.0'
rabbitmq['host'] = '0.0.0.0'
rabbitmq['nodename'] = 'rabbit@node02'
mysql['enable'] = false
mysql['host'] = {'127.0.0.1' => 6446}
mysql['morpheus_db'] = 'morpheus'
mysql['morpheus_db_user'] = 'morpheus'
mysql['morpheus_password'] = 'morpheusDbUserPassword'
user['uid'] = 899
user['gid'] = 899
# at the time of this writing, local_user is not valid as an option so the full entry is needed
node.default['morpheus_solo']['local_user']['uid'] = 898
node.default['morpheus_solo']['local_user']['gid'] = 898
elasticsearch['uid'] = 896
elasticsearch['gid'] = 896
rabbitmq['uid'] = 895
rabbitmq['gid'] = 895
guacd['uid'] = 894
guacd['gid'] = 894
Node 3
appliance_url 'https://morpheus.localdomain'
elasticsearch['es_hosts'] = {'192.168.104.01' => 9200, '192.168.104.02' => 9200, '192.168.104.03' => 9200}
elasticsearch['node_name'] = '192.168.104.03'
elasticsearch['host'] = '0.0.0.0'
rabbitmq['host'] = '0.0.0.0'
rabbitmq['nodename'] = 'rabbit@node03'
mysql['enable'] = false
mysql['host'] = {'127.0.0.1' => 6446}
mysql['morpheus_db'] = 'morpheus'
mysql['morpheus_db_user'] = 'morpheus'
mysql['morpheus_password'] = 'morpheusDbUserPassword'
user['uid'] = 899
user['gid'] = 899
# at the time of this writing, local_user is not valid as an option so the full entry is needed
node.default['morpheus_solo']['local_user']['uid'] = 898
node.default['morpheus_solo']['local_user']['gid'] = 898
elasticsearch['uid'] = 896
elasticsearch['gid'] = 896
rabbitmq['uid'] = 895
rabbitmq['gid'] = 895
guacd['uid'] = 894
guacd['gid'] = 894
Note
The configurations above for
`mysql['host']shows a list of hosts, if the database has multiple endpoints. Like other options in the configuration,mysql['host']can be a single entry, if the database has a single endpoint:mysql['host'] = 'myDbEndpoint.example.comormysql['host'] = '10.100.10.111'Important
The elasticsearch node names set in
elasticsearch['node_name']must match the host entries in elasticsearch[‘es_hosts’].node_nameis used fornode.nameandes_hostsis used forcluster.initial_master_nodesin the generated elasticsearch.yml config. Node names that do not match entries in cluster.initial_master_nodes will cause clustering issues.Important
The rabbitmq[‘node_name’] in the Node 1 example above is rabbit@node01. The shortname for the server of node01 must be resolvable by DNS or /etc/hosts of all other hosts, same for node02 and node03. FQDNs cannot be used here
Mount shared storage at
/var/opt/morpheus/morpheus-uion each App node if you have not already done so. Create the directory if it does not already exist. For an existing appliance with files on local storage, do not mount an empty target over the source; follow Shared Storage and obtain the release-specific migration sequence from HPE Support.Reconfigure on all nodes
All Nodes
[root@node: ~] morpheus-ctl reconfigureHPE Morpheus Software will come up on all nodes and Elasticsearch will auto-cluster. RabbitMQ will need to be clustered manually after reconfigure completes on all nodes.
Clustering Embedded RabbitMQ
Select one of the nodes to be your Source Of Truth (SOT) for RabbitMQ clustering (Node 1 for this example). On the nodes that are NOT the SOT (Nodes 2 & 3 in this example), begin by stopping the UI and RabbitMQ.
Node 2
[root@node2 ~] morpheus-ctl stop morpheus-ui
[root@node2 ~] source /opt/morpheus/embedded/rabbitmq/.profile
[root@node2 ~] rabbitmqctl stop_app
[root@node2 ~] morpheus-ctl stop rabbitmq
Node 3
[root@node3 ~] morpheus-ctl stop morpheus-ui
[root@node3 ~] source /opt/morpheus/embedded/rabbitmq/.profile
[root@node3 ~] rabbitmqctl stop_app
[root@node3 ~] morpheus-ctl stop rabbitmq
Then on the SOT node, we need to copy the secrets for RabbitMQ.
Begin by copying secrets from the SOT node to the other nodes.
Node 1
root@node1: ~$ cat /etc/morpheus/morpheus-secrets.json

 "rabbitmq": {
   "morpheus_password": "***REDACTED***",
   "queue_user_password": "***REDACTED***",
   "cookie": "***REDACTED***"
 },
Node 2
[root@node2 ~] vi /etc/morpheus/morpheus-secrets.json

  "rabbitmq": {
    "morpheus_password": "***node01_morpheus_password***",
    "queue_user_password": "***node01_queue_user_password***",
    "cookie": "***node01_cookie***"
  },
Node 3
[root@node3 ~] vi /etc/morpheus/morpheus-secrets.json

"rabbitmq": {
  "morpheus_password": "***node01_morpheus_password***",
  "queue_user_password": "***node01_queue_user_password***",
  "cookie": "***node01_cookie***"
},
Then copy the erlang.cookie from the SOT node to the other nodes
Node 1
root@node1: ~$ cat /opt/morpheus/embedded/rabbitmq/.erlang.cookie

# 754363AD864649RD63D28
Node 2
[root@node2 ~] vi /opt/morpheus/embedded/rabbitmq/.erlang.cookie

# node01_erlang_cookie
Nodes 3
[root@node3 ~] vi /opt/morpheus/embedded/rabbitmq/.erlang.cookie

# node01_erlang_cookie
Once the secrets and cookie are copied from node01 to nodes 2 & 3, run a reconfigure on nodes 2 & 3.
Node 2
[root@node2 ~] morpheus-ctl reconfigureNode 3
[root@node3 ~] morpheus-ctl reconfigureNext we will join nodes 2 & 3 to the cluster.
Important
The commands below must be run at root
Node 2
[root@node2 ~] morpheus-ctl stop rabbitmq
[root@node2 ~] morpheus-ctl start rabbitmq
[root@node2 ~] source /opt/morpheus/embedded/rabbitmq/.profile
[root@node2 ~] rabbitmqctl stop_app

# Stopping node 'rabbit@node02' ...

[root@node2 ~] rabbitmqctl join_cluster rabbit@node01

# Clustering node 'rabbit@node02' with 'rabbit@node01' ...

[root@node2 ~] rabbitmqctl start_app

# Starting node 'rabbit@node02' ...
Node 3
[root@node3 ~] morpheus-ctl stop rabbitmq
[root@node3 ~] morpheus-ctl start rabbitmq
[root@node3 ~] source /opt/morpheus/embedded/rabbitmq/.profile
[root@node3 ~] rabbitmqctl stop_app

# Stopping node 'rabbit@node03' ...

[root@node3 ~] rabbitmqctl join_cluster rabbit@node01

# Clustering node 'rabbit@node03' with 'rabbit@node01' ...

[root@node3 ~] rabbitmqctl start_app

# Starting node 'rabbit@node03' ...
Note
If you receive an error
unable to connect to epmd (port 4369) on node01: nxdomain (non-existing domain)make sure to add all IPs and short (non-fqdn) hostnames to the/etc/hostsfile to ensure each node can resolve the other hostnames.Next reconfigure Nodes 2 & 3
Node 2
[root@node2 ~] morpheus-ctl reconfigureNode 3
[root@node3 ~] morpheus-ctl reconfigureThe last thing to do is start the HPE Morpheus Software UI on the two nodes that are NOT the SOT node.
Node 2
[root@node2 ~] morpheus-ctl start morpheus-uiNode 3
[root@node3 ~] morpheus-ctl start morpheus-uiConfirm the UI is available by refreshing your browser and waiting for the loading screen to finish. Only if the UI does not become available or the loading screen stalls, inspect the logs on the node you just started:
morpheus-ctl tail morpheus-uiSuccessful startup typically shows the HPE Morpheus Software ascii logo with the install version and start time in
/var/log/morpheus/morpheus-ui/current.
Embedded Elasticsearch
Morpheus clusters Elasticsearch automatically.
Load Balancer
Configure your load balancer to distribute traffic between the app nodes.
You can see some examples here: Load Balancer Configuration