Deploying Morpheus with the HPE Installer (Recommended)
The HPE Morpheus Manager Installer is a graphical wizard that deploys Morpheus Enterprise or VM Essentials to an HPE HVM host in minutes. It handles the entire deployment process including image upload, VM creation, network configuration, and post-deployment verification.
The installer is available on the HVM ISO file in two versions:
macOS:
Morpheus_Manager_Installer-x64-<version>.dmgWindows:
Morpheus_Manager_Installer-x64-<version>.zip
Note
Deployment duration depends on image size, source method, network throughput, host storage, and first-boot processing. Use the phase and log output described below to judge progress rather than relying on a fixed duration.
Important
A local QCOW2 deployment does not require internet access, but the deployed Manager’s Ubuntu base OS still requires an HPE-approved APT source for ongoing updates. Before production use, plan either approved repository access or an internal mirror. See Morpheus Manager Base OS Updates.
Prerequisites and Assumptions
Before using the installer, ensure the following:
Each HVM host has an IP address, netmask, and gateway already configured
You have SSH access (port 22) to the target HVM host from your workstation
You have HTTPS access (port 443) to the HVM host for post-deployment verification
The SSH user has sudo privileges to run
virsh,hvmcli, and manage HVM resourcesYou have the HPE VM Essentials QCOW2 image ready (available on the HVM ISO or as an HTTP URL)
You know the network configuration details for the Morpheus VM. The Netmask value must use dotted-decimal notation (for example,
255.255.224.0), not a CIDR prefix or address such as/19or172.16.32.0/19
Starting the Installer
Mount or extract the HVM ISO file on your workstation
Locate the installer for your platform:
macOS: Open the
.dmgfile and launch the HPE Morpheus Manager Installer applicationWindows: Extract the
.zipfile and run the installer executable
The installer opens with the Prerequisites screen
Step 1: Prerequisites
The Welcome screen provides an overview of how the deployment works:
Configure — Enter SSH credentials, network settings, and VM configuration through the wizard
Upload & Deploy — The installer uploads the QCOW2 image and runs
hvmclito create and configure the VMVerify & Access — Cloud-init configures the VM, and the installer verifies the application is ready
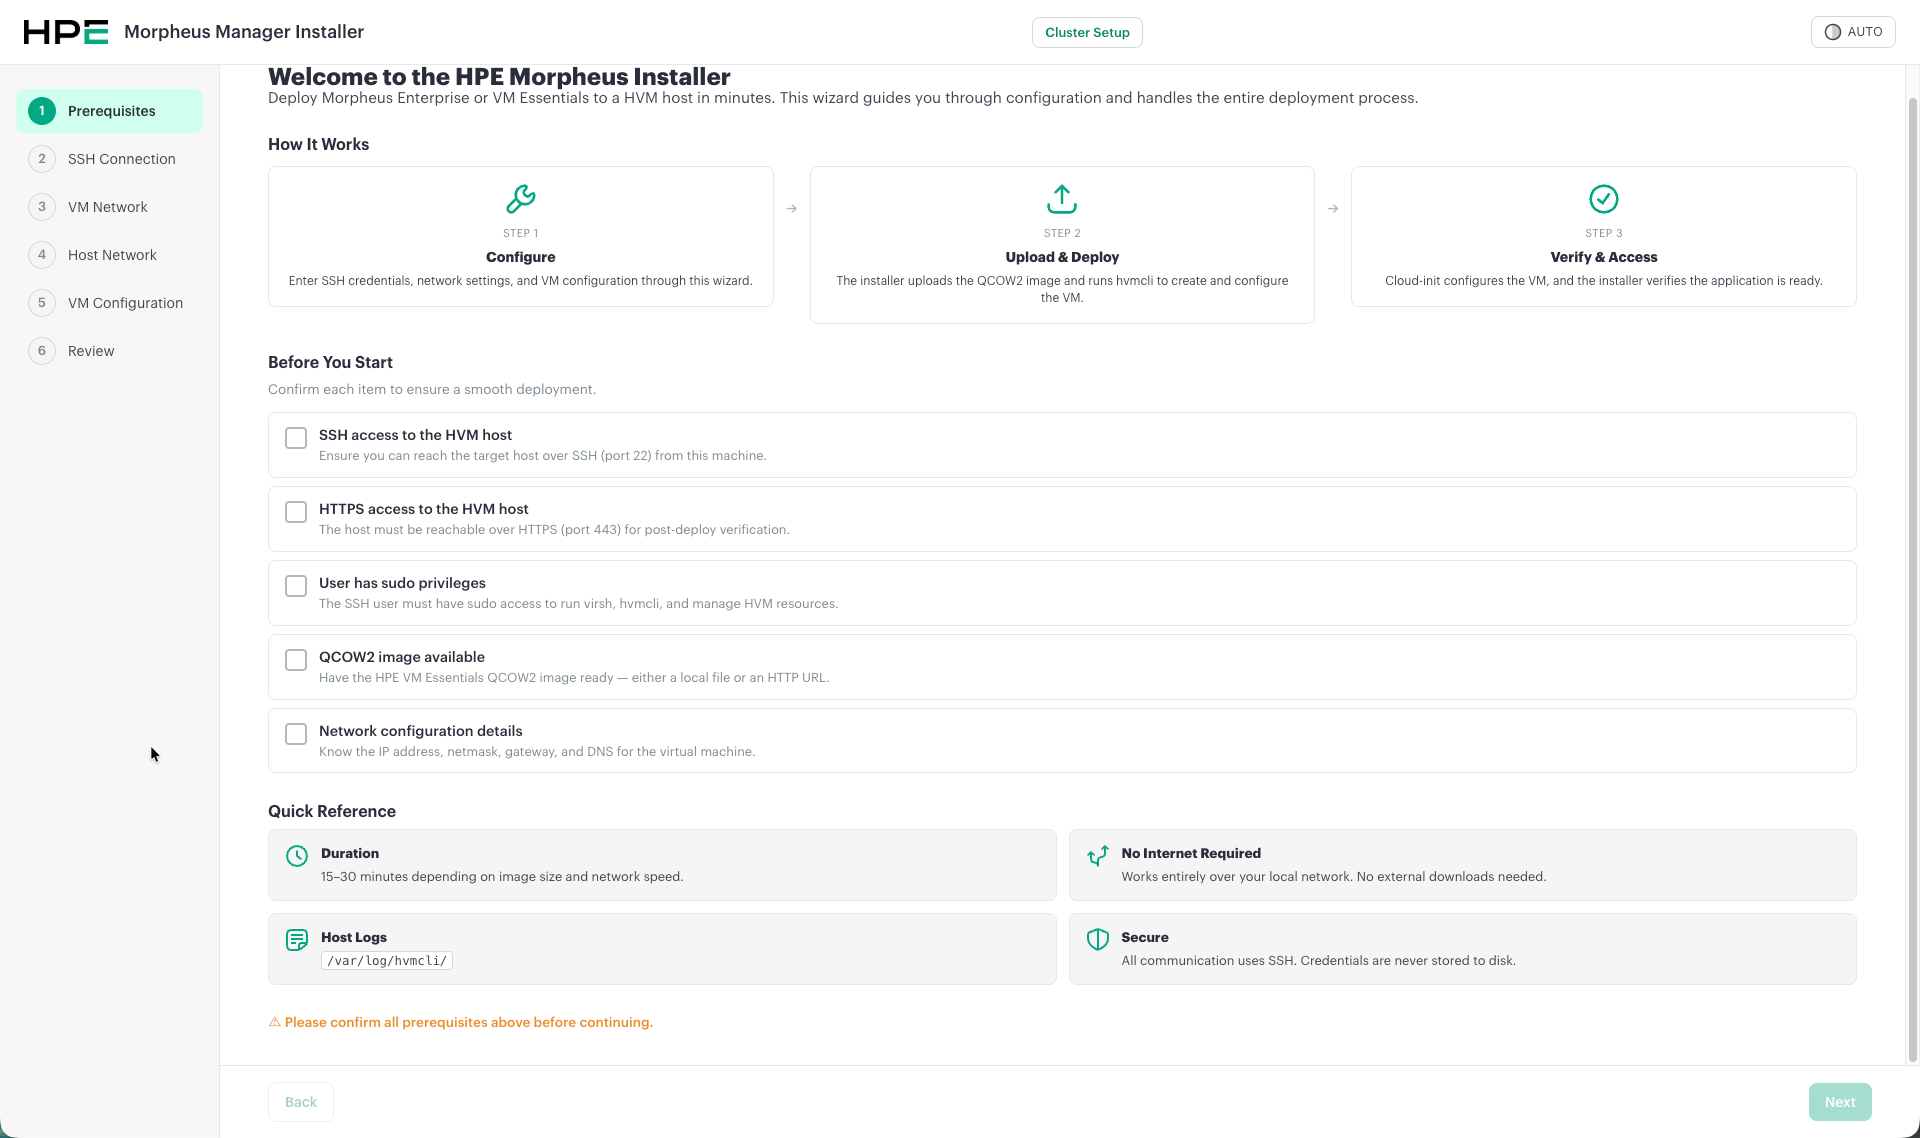
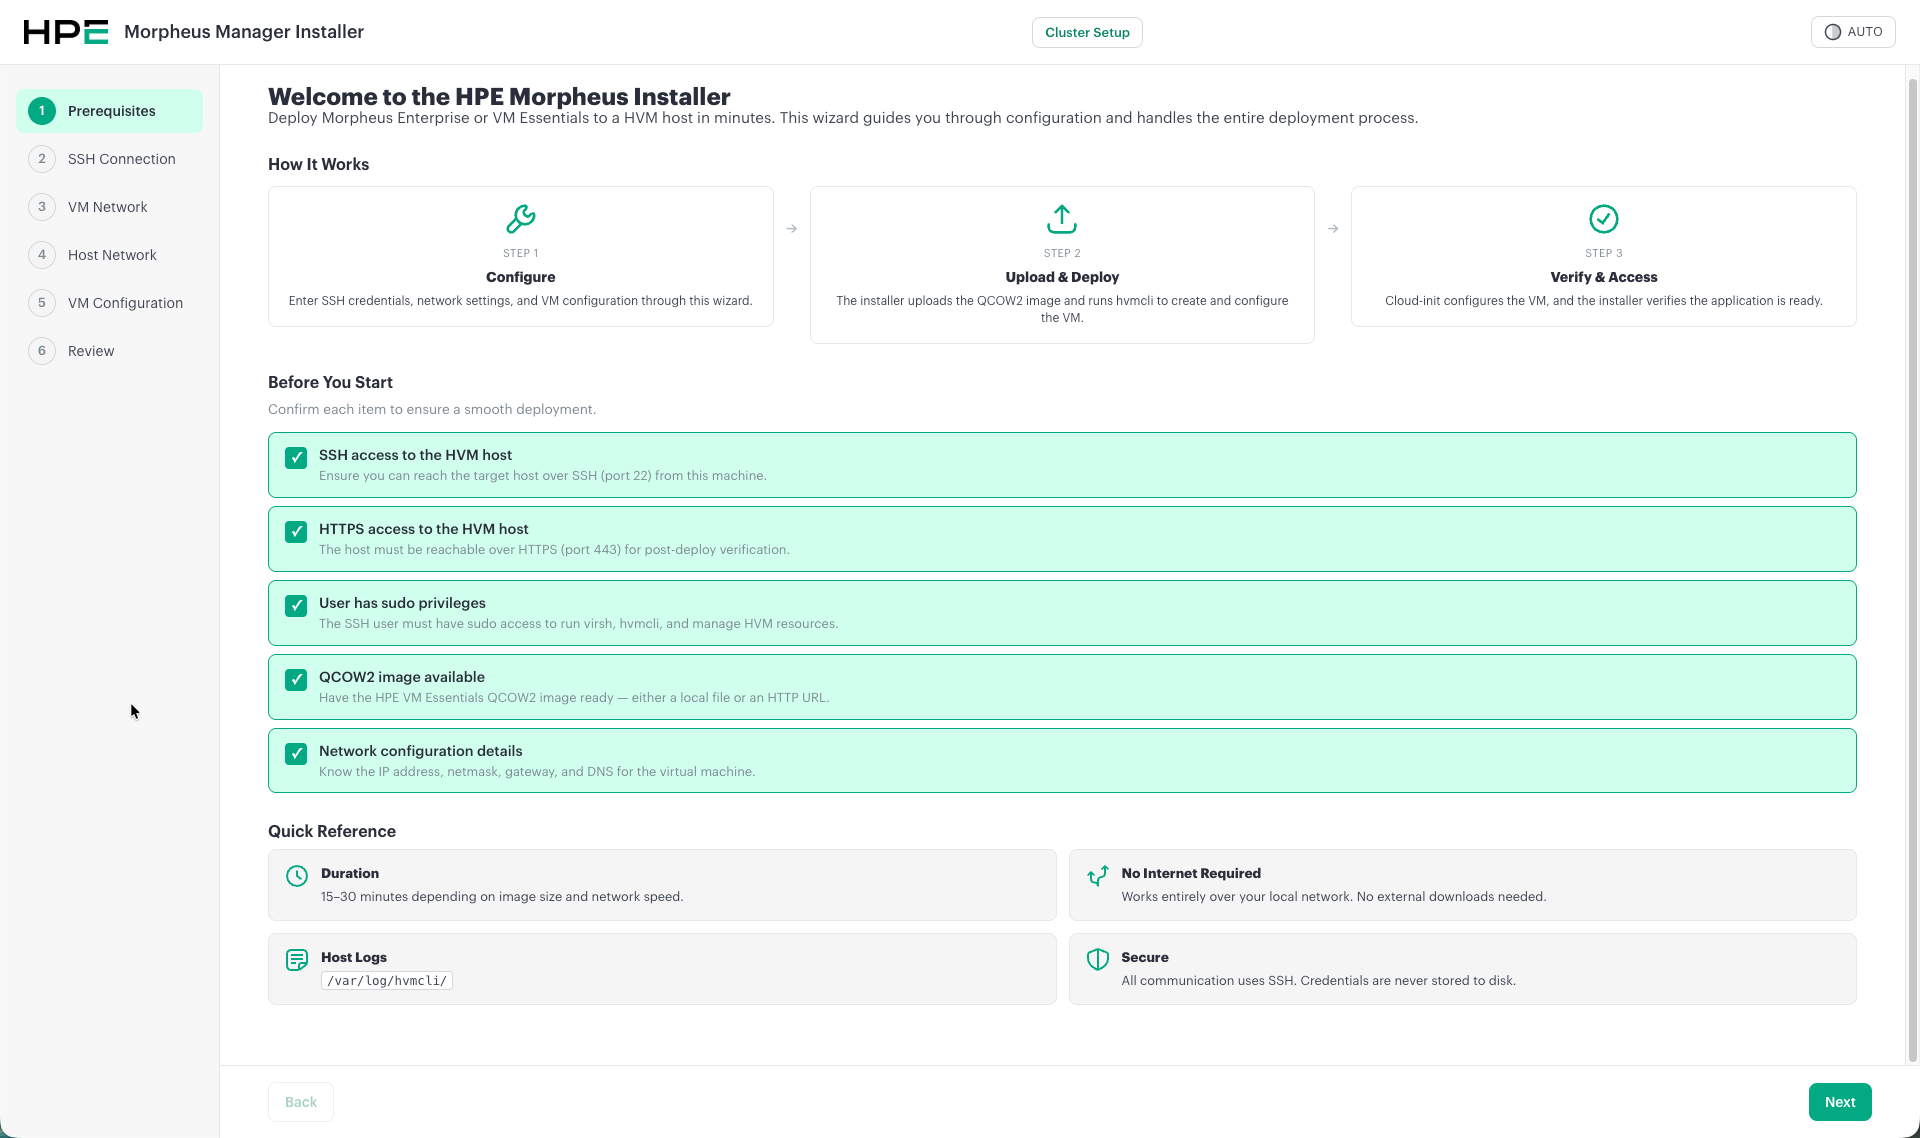
Before continuing, confirm each prerequisite in the Before You Start checklist:
SSH access to the HVM host — Ensure you can reach the target host over SSH (port 22) from this machine
HTTPS access to the HVM host — The host must be reachable over HTTPS (port 443) for post-deploy verification
User has sudo privileges — The SSH user must have sudo access to run
virsh,hvmcli, and manage HVM resourcesQCOW2 image available — Have the HPE VM Essentials QCOW2 image ready — either a local file or an HTTP URL
Network configuration details — Know the IP address, netmask, gateway, and DNS for the virtual machine
Once all items are confirmed, click Next.
Step 2: SSH Connection
Configure the SSH connection to the target HVM hypervisor host where the Morpheus VM will be deployed.
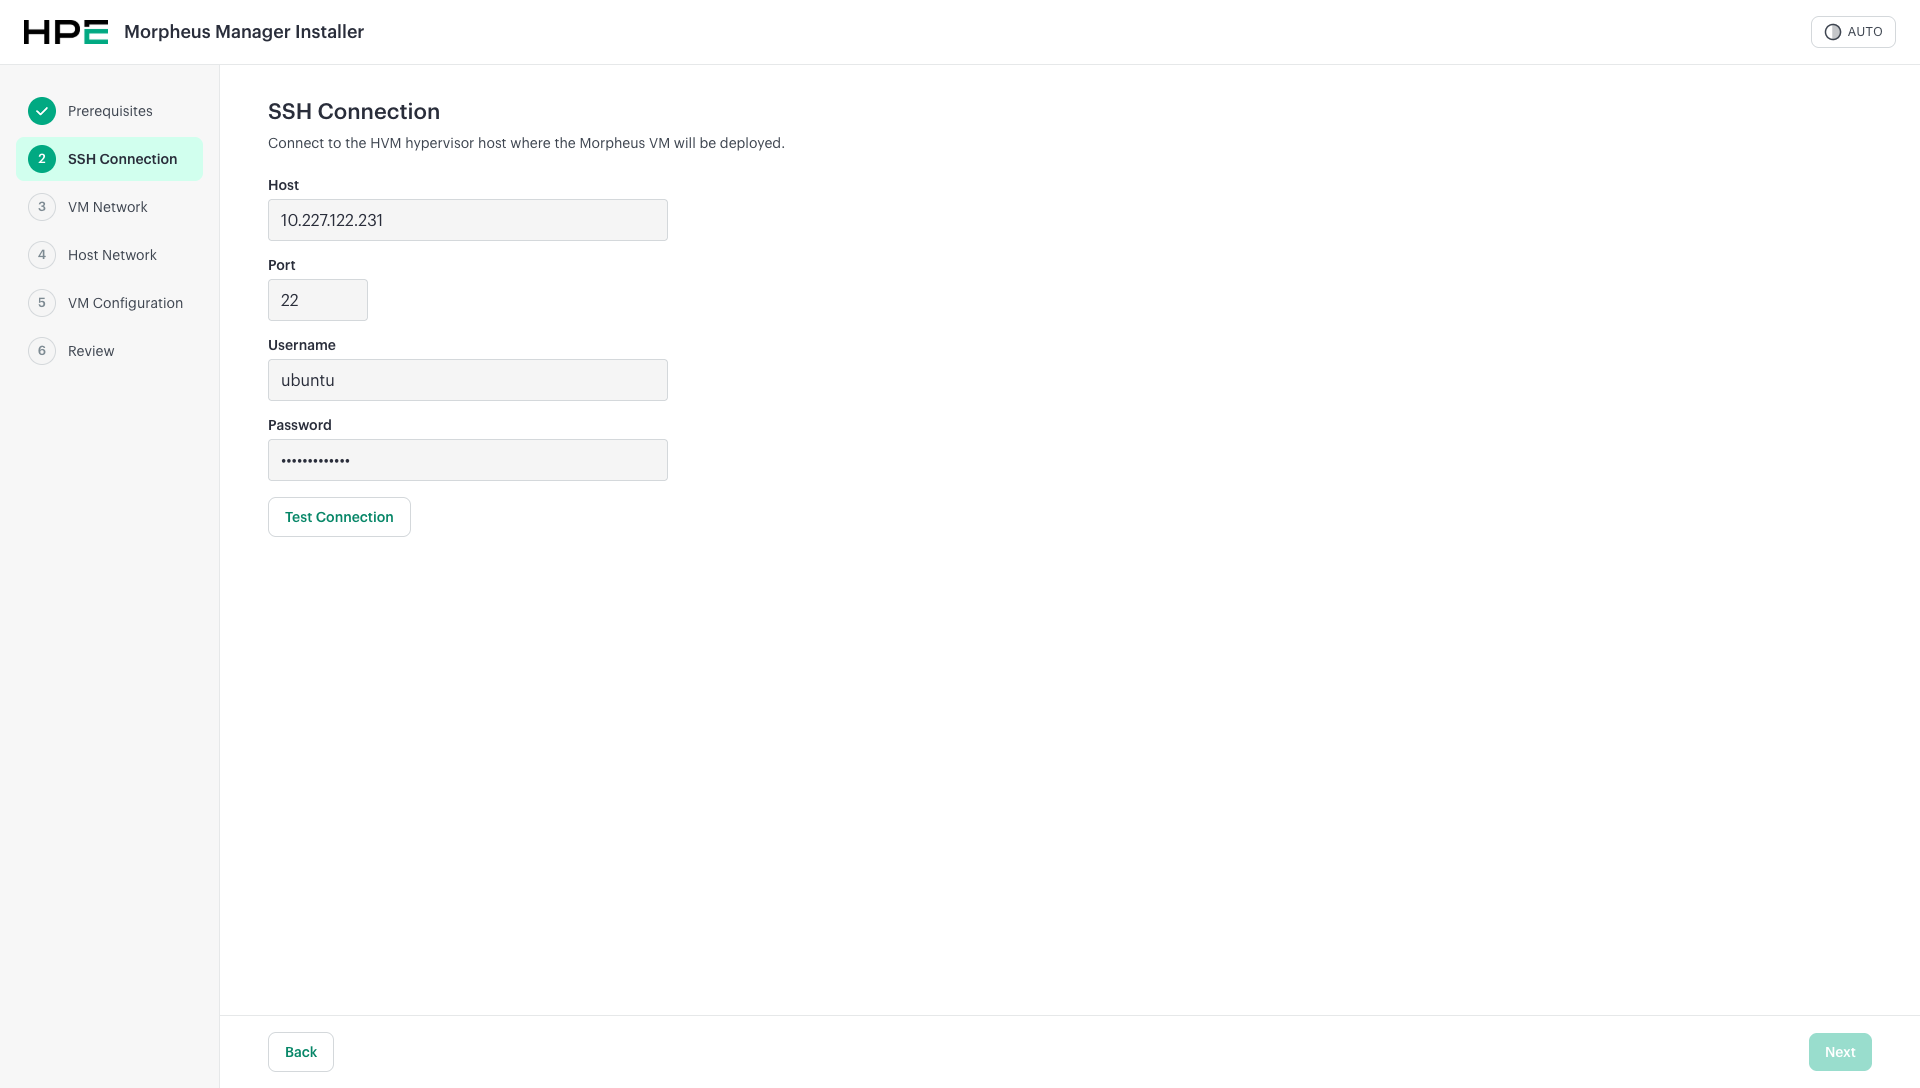
Host — The IP address or hostname of the HVM host
Port — SSH port (default:
22)Username — SSH user (e.g.,
ubuntu)Password — Enter the password for the SSH user
Click Test Connection to verify connectivity. The installer will:
Establish an SSH connection to the host
Verify the host-key fingerprint (you must accept it on first connection)
Detect the existing management virtSwitch on the host
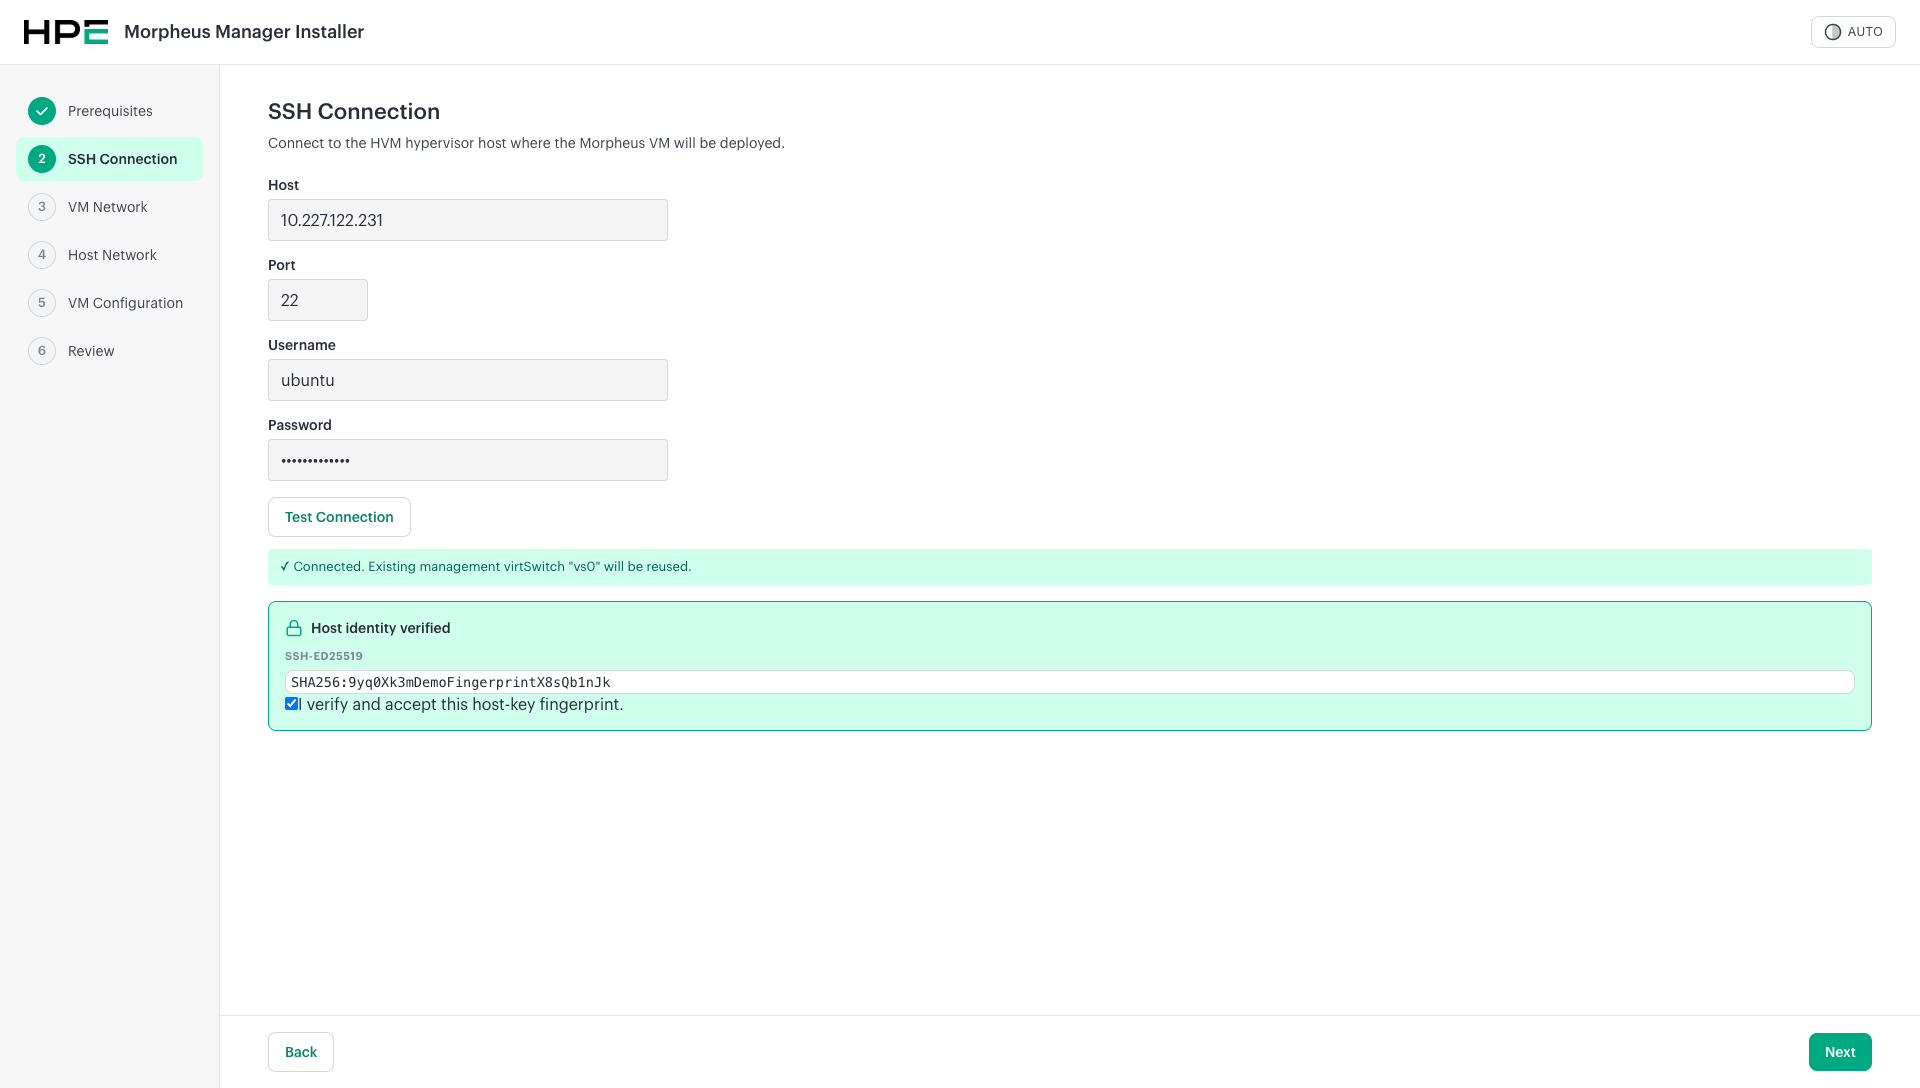
Once connected and the host identity is verified, click Next.
Step 3: VM Network
Configure the static network settings for the Morpheus appliance VM. This is the IP address that will be assigned to the Morpheus VM itself.
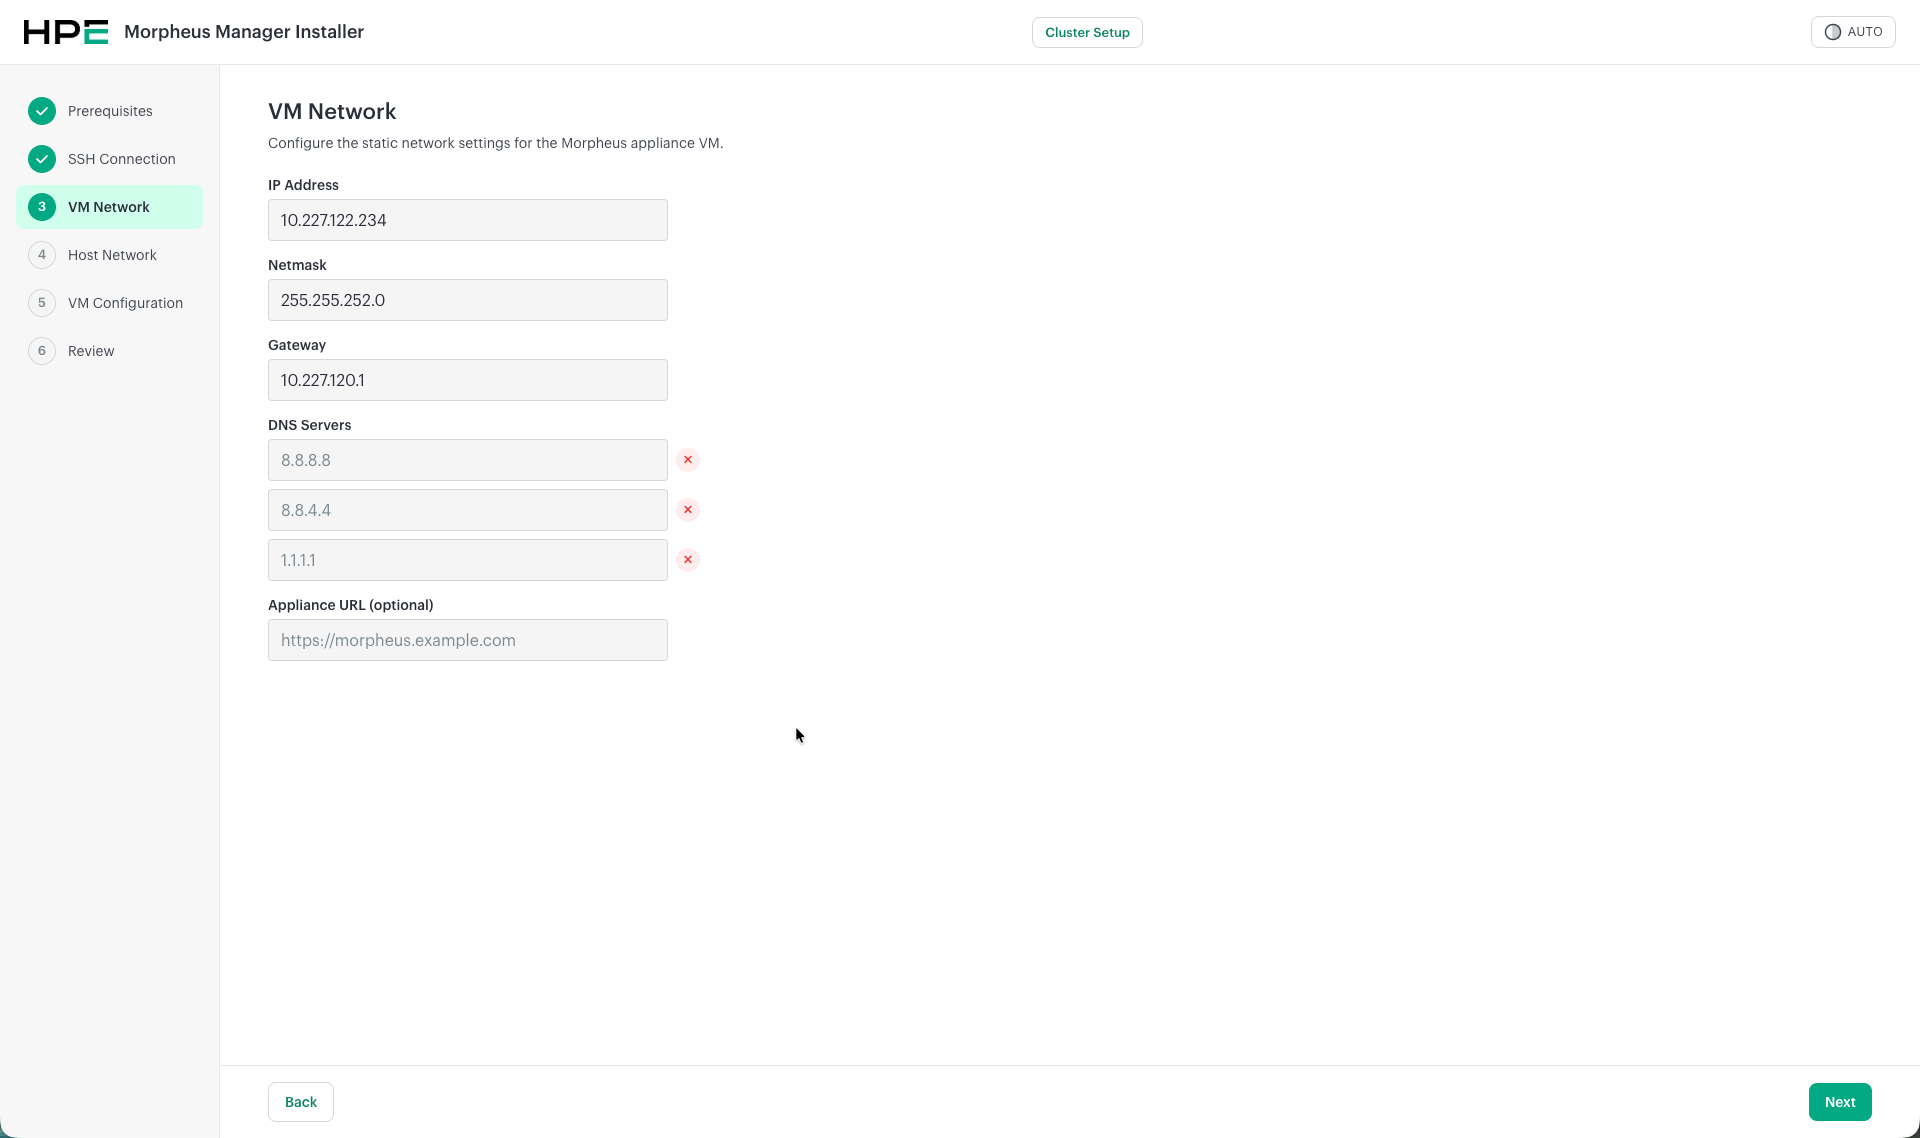
IP Address — Static IP address for the Morpheus VM
Netmask — Subnet mask in dotted-decimal notation (for example,
255.255.252.0). Do not enter CIDR notation (for example,/22or192.168.0.0/22)Gateway — Default gateway for the VM
DNS Servers — One or more DNS servers (click the x to remove entries, or add more as needed)
Appliance URL (optional) — Custom URL for accessing the Morpheus appliance (e.g.,
https://morpheus.example.com)
Click Next to proceed.
Warning
The Manager installer can accept a CIDR-formatted Netmask without rejecting the field, but the Manager deployment can subsequently fail. Return to VM Network configuration and enter the equivalent dotted-decimal mask before retrying. This differs from HVM host and hvmcli address inputs that are documented with CIDR notation.
Step 4: Host Network
Configure the host management uplink. A management virtSwitch is created on the host before deployment (or reused if one already exists).
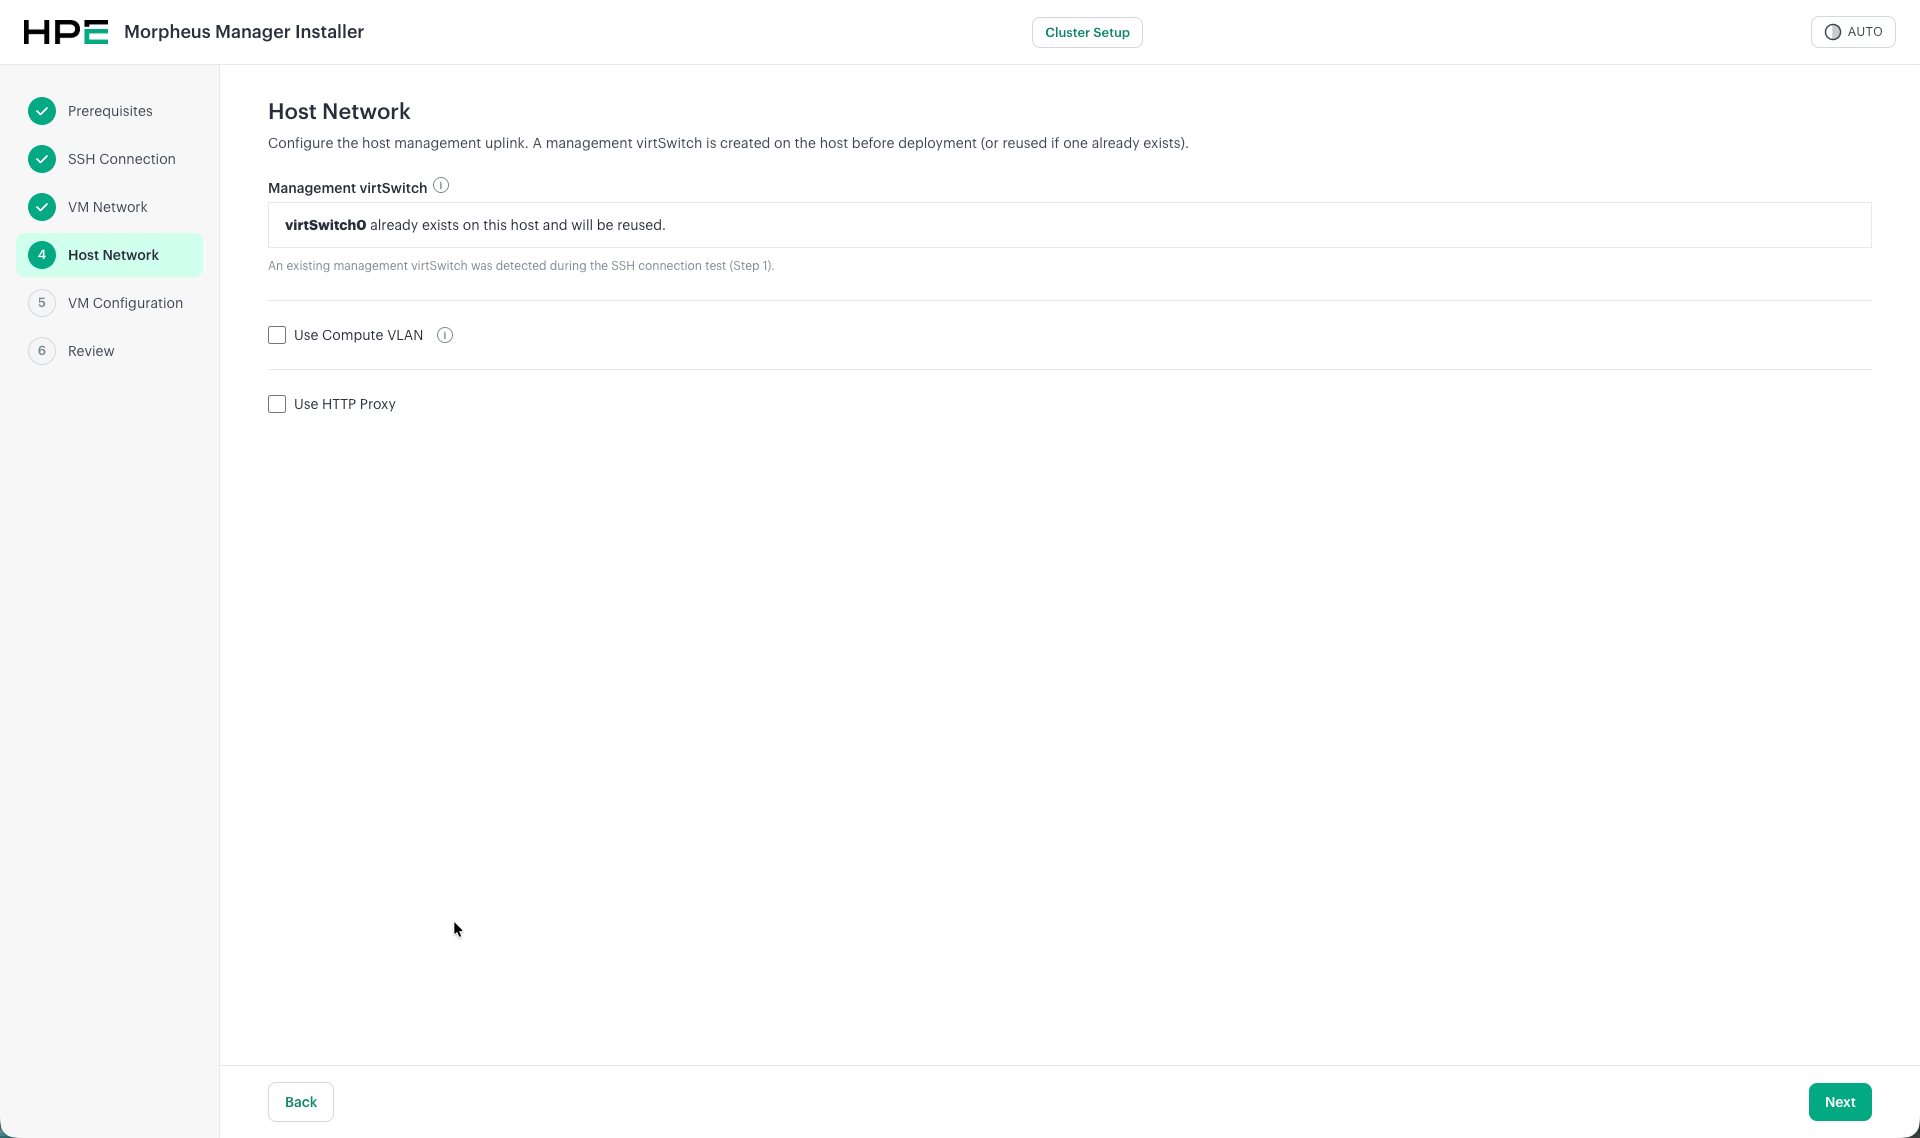
Management virtSwitch — Displays the detected management virtSwitch (e.g.,
vs0 already exists on this host and will be reused)
Optional settings:
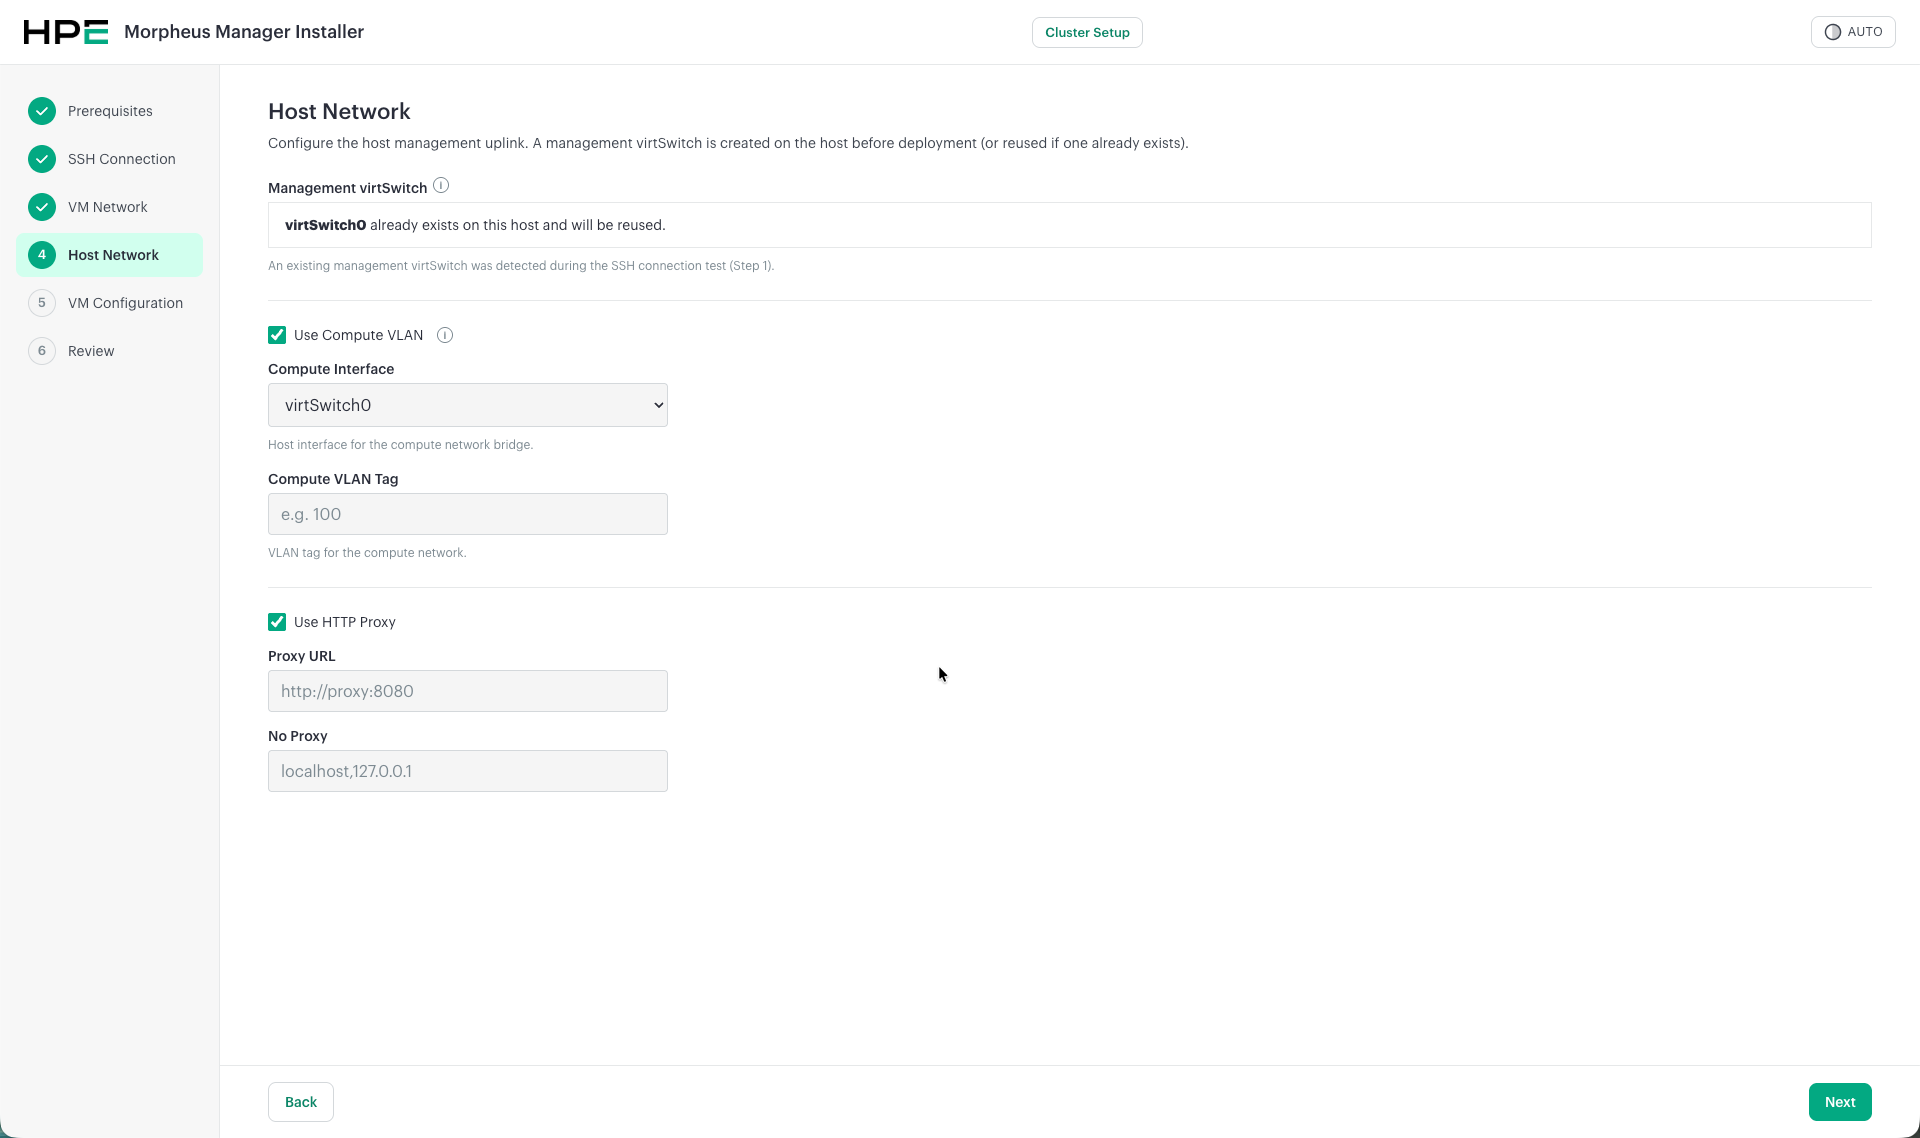
Use Compute VLAN — Enable if you want the Morpheus appliance VM to be deployed on a specific VLAN. When a VLAN ID is provided, the Morpheus appliance will be deployed using this VLAN for its network connectivity. When checked:
Compute Interface — Select the host interface for the compute network bridge
Compute VLAN Tag — The VLAN ID to use for the Morpheus appliance network
Use HTTP Proxy — Enable if the environment requires an HTTP proxy. When checked:
Proxy URL — The proxy server URL (e.g.,
http://proxy:8080)No Proxy — Comma-separated list of hosts to bypass the proxy (e.g.,
localhost,127.0.0.1)
Click Next to proceed.
Step 5: VM Configuration
Configure the Morpheus appliance virtual machine settings.
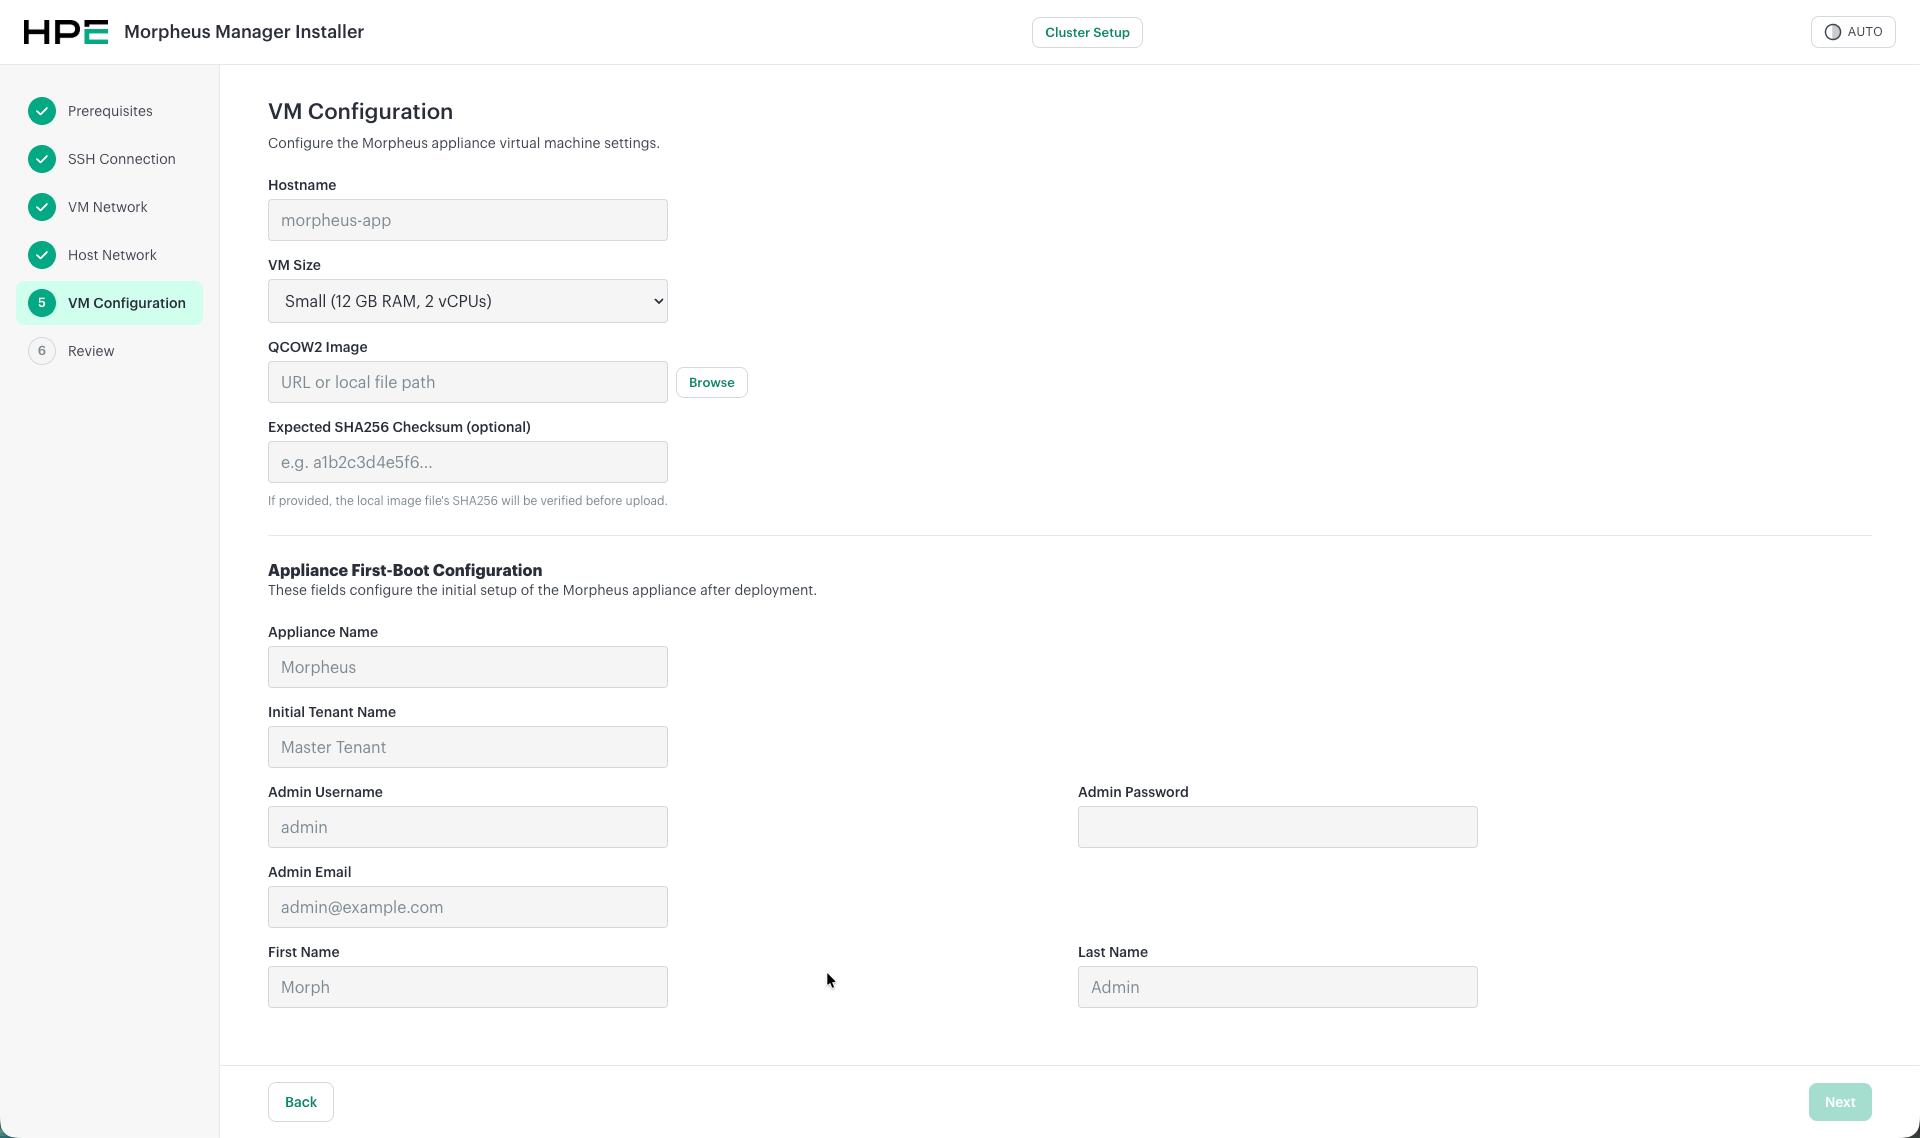
VM Settings:
Hostname — The hostname for the Morpheus VM (e.g.,
morpheus-app)VM Size — Select a VM sizing profile:
Small (12 GB RAM, 2 vCPUs)
Medium
Large
Choose a profile based on the expected managed hosts, VMs, total objects, enabled integrations, and workload. The profiles do not establish a fixed number of HVM clusters that a Manager can manage. For published limits and guidance on values that are not published, see HPE VM Essentials Maximums. Contact HPE for a workload-specific sizing review before committing to a large deployment.
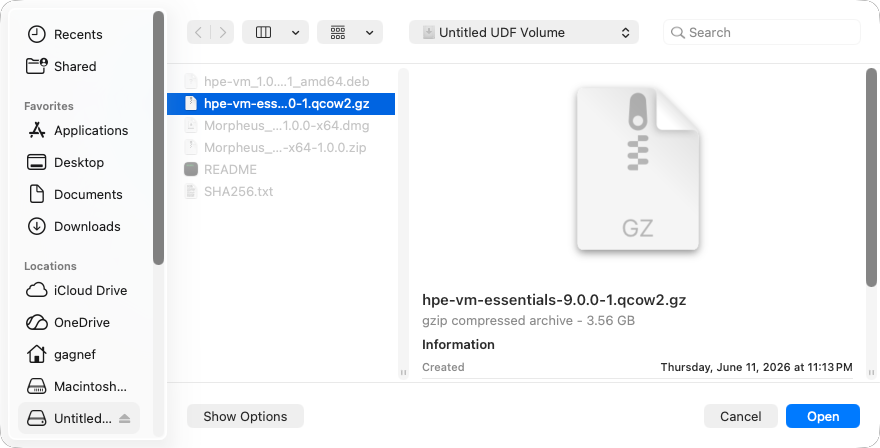
QCOW2 Image — Path to the HPE VM Essentials QCOW2 image. Use the Browse button to locate the file on the ISO volume (e.g.,
hpe-vm-essentials-9.0.0-1.qcow2.gz), or enter an HTTP URLExpected SHA256 Checksum (optional) — If provided, the local image file’s SHA256 will be verified before upload
For a local path, the workstation remains in the image-transfer path until upload completes. For a URL, the target host must be able to resolve and reach the source. URL use can avoid a slow workstation or VPN path, but it does not guarantee a shorter transfer. Use a trusted source and provide the publisher’s SHA256 checksum when available.
Appliance First-Boot Configuration:
These fields configure the initial setup of the Morpheus appliance after deployment:
Appliance Name — Name of the Morpheus appliance (e.g.,
Morpheus)Initial Tenant Name — Name of the initial tenant (e.g.,
Master Tenant)Admin Username — Administrator username (e.g.,
admin)Admin Password — Password for the administrator account
Admin Email — Email address for the administrator
First Name / Last Name — Administrator’s name
Click Next to proceed to the review step.
Step 6: Review & Preflight Check
The final step before deployment. The installer runs preflight checks to validate your configuration and displays a summary.
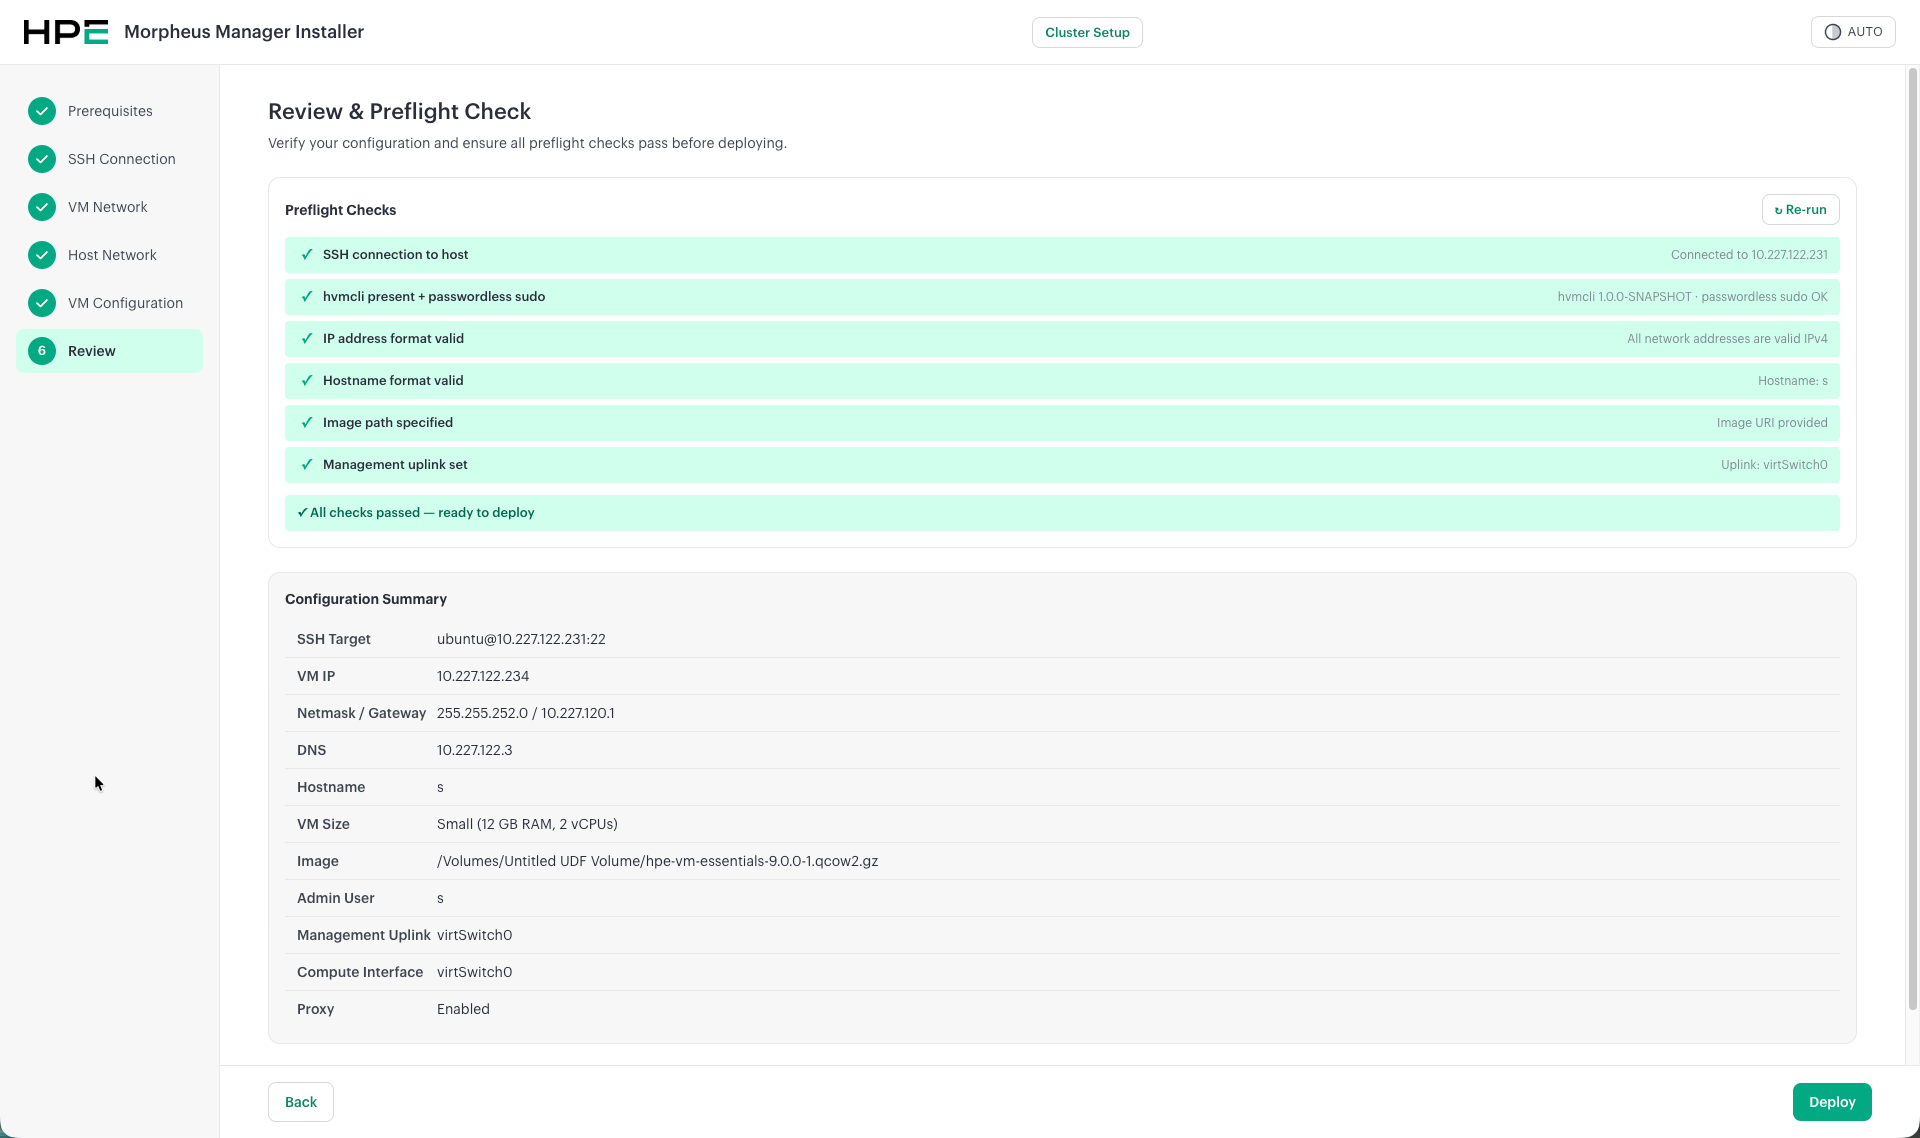
Preflight Checks:
SSH connection to host
hvmclipresent + passwordless sudoIP address format valid
Hostname format valid
Image path specified
Management uplink set
All checks must pass (shown in green) before you can deploy. If any check fails, click Re-run to retry or go back to correct the configuration.
Configuration Summary:
Review the full configuration summary including SSH target, VM IP, netmask/gateway, DNS, hostname, VM size, image path, admin user, management uplink, compute interface, and proxy settings.
When satisfied, click Deploy to start the deployment.
Deployment Progress
Once deployment begins, the installer displays a real-time progress view showing each step:
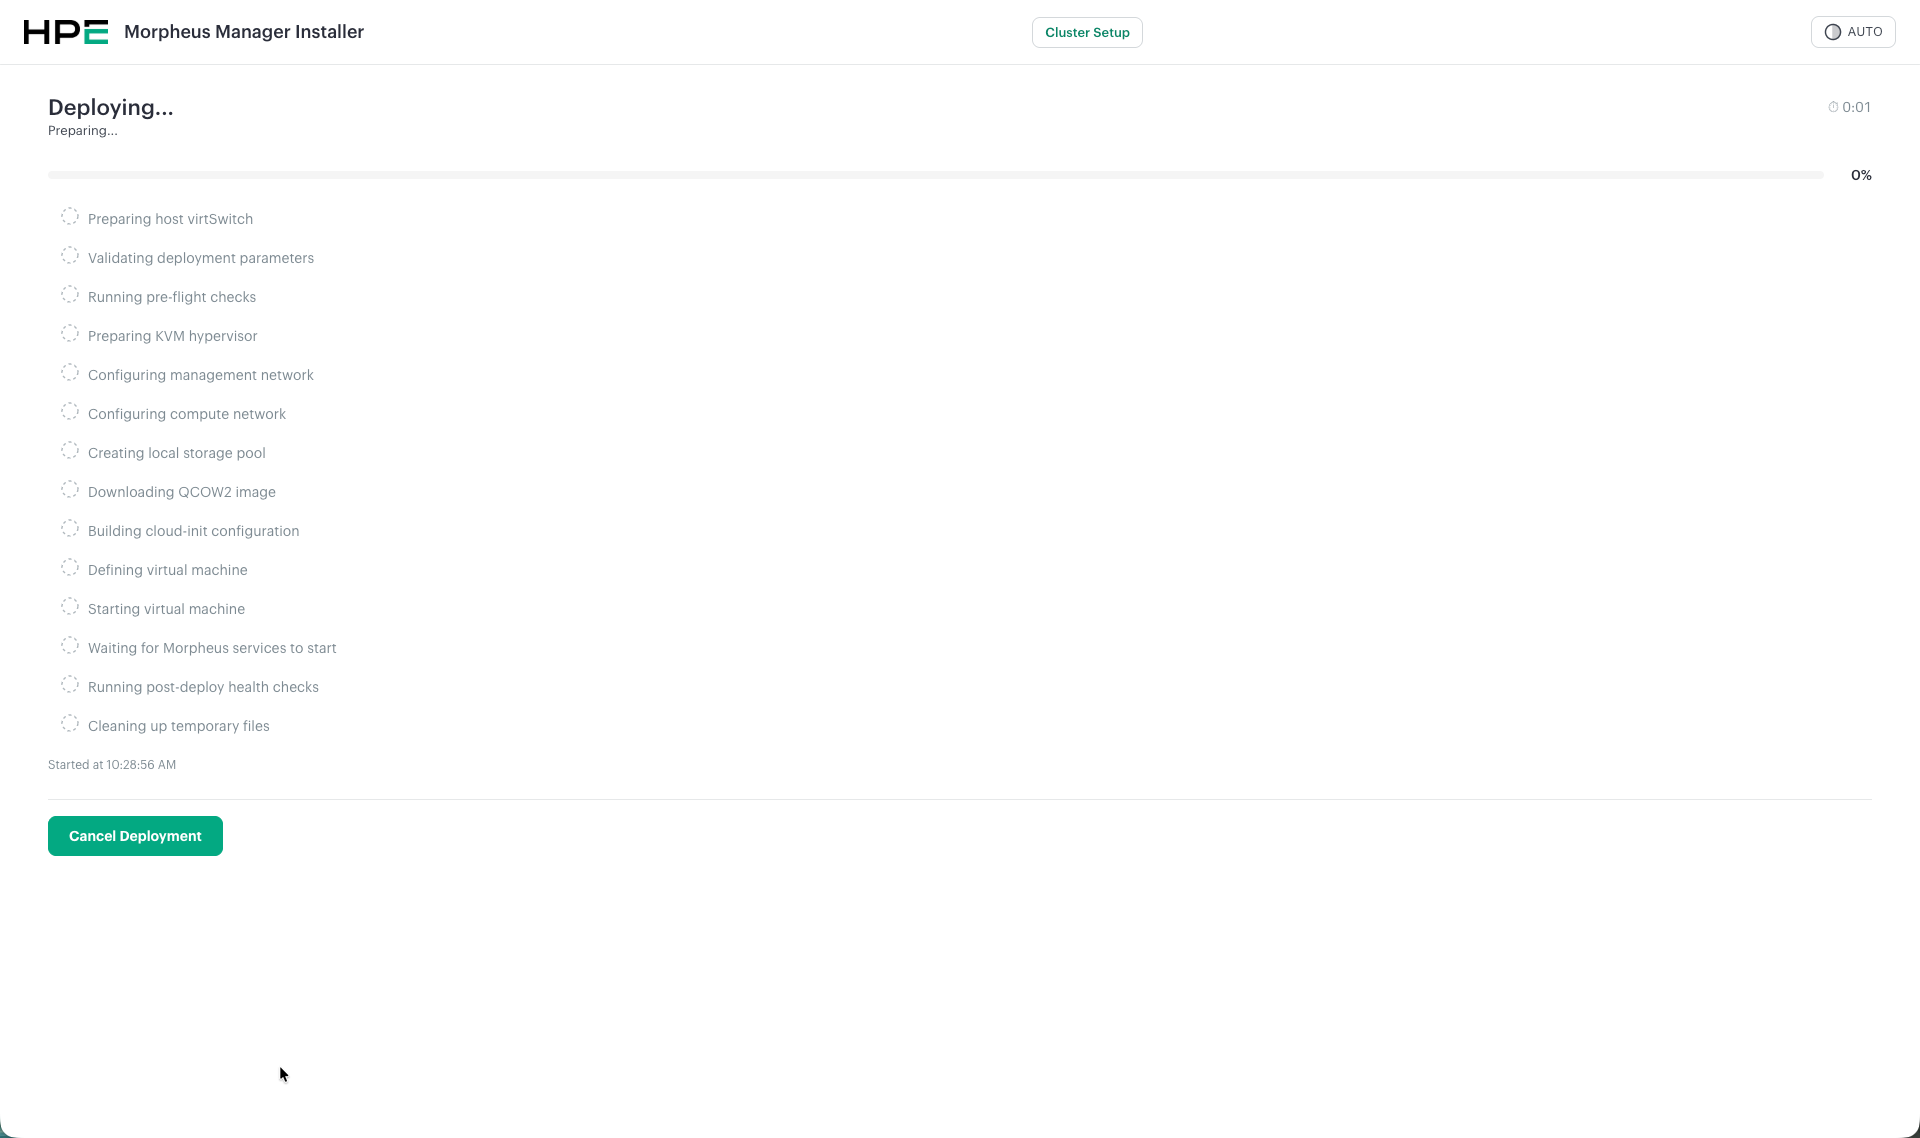
The deployment steps include:
Preparing host virtSwitch
Validating deployment parameters
Running pre-flight checks
Preparing KVM hypervisor
Configuring management network
Configuring compute network
Creating local storage pool
Downloading QCOW2 image
Building cloud-init configuration
Defining virtual machine
Starting virtual machine
Waiting for Morpheus services to start
Running post-deploy health checks
Cleaning up temporary files
A Cancel Deployment button is available if you need to abort the process.
Note
The license applied automatically during initial Morpheus setup supports an evaluation-scale HVM cluster of up to 3 nodes. To build an HVM cluster larger than 3 nodes, add a valid license on the Morpheus appliance first. See Settings.
Troubleshooting a Failed Deployment
If the deployment encounters an error, the installer clearly indicates which step failed and provides troubleshooting options.
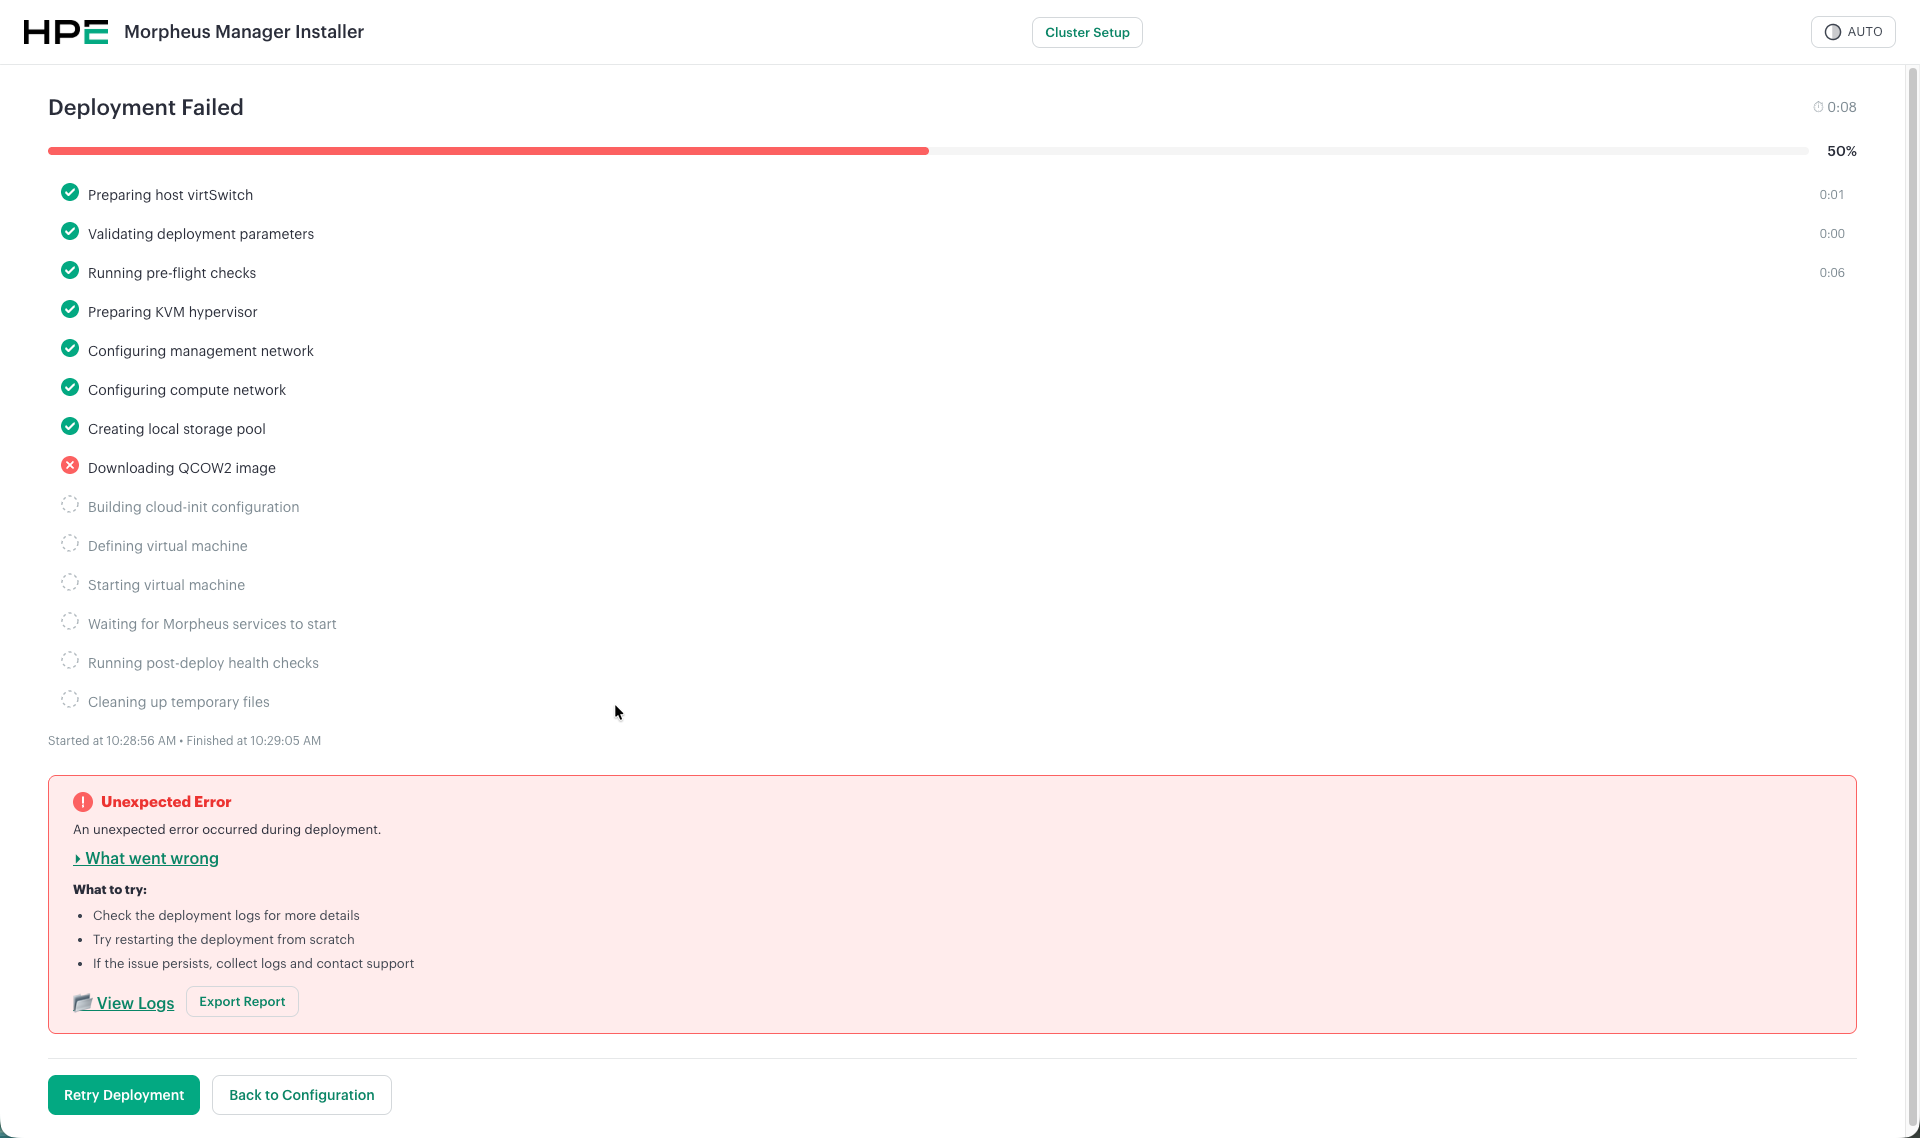
Click What went wrong (or Hide details) to expand error details showing the specific error message.
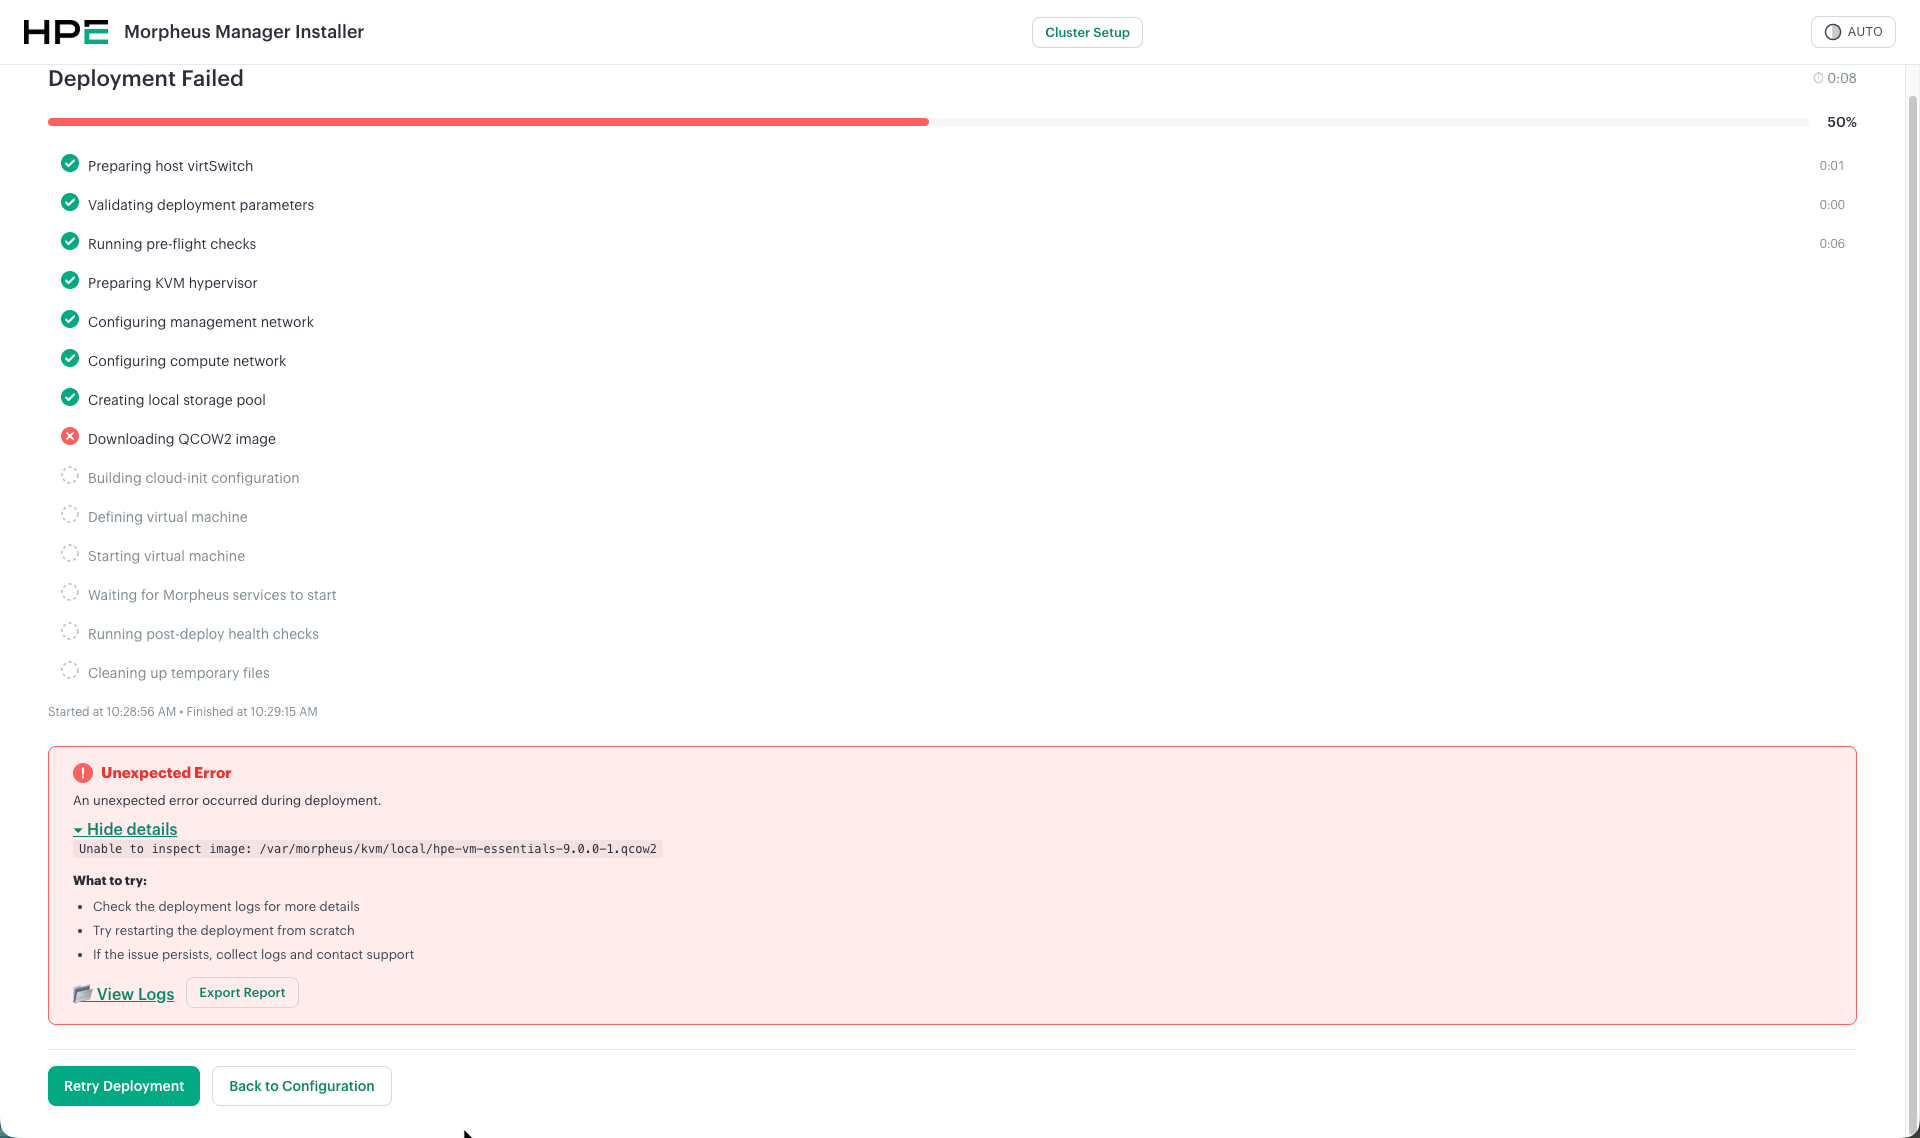
What to try:
Check the deployment logs for more details
Try restarting the deployment from scratch
If the issue persists, collect logs and contact support
Available actions:
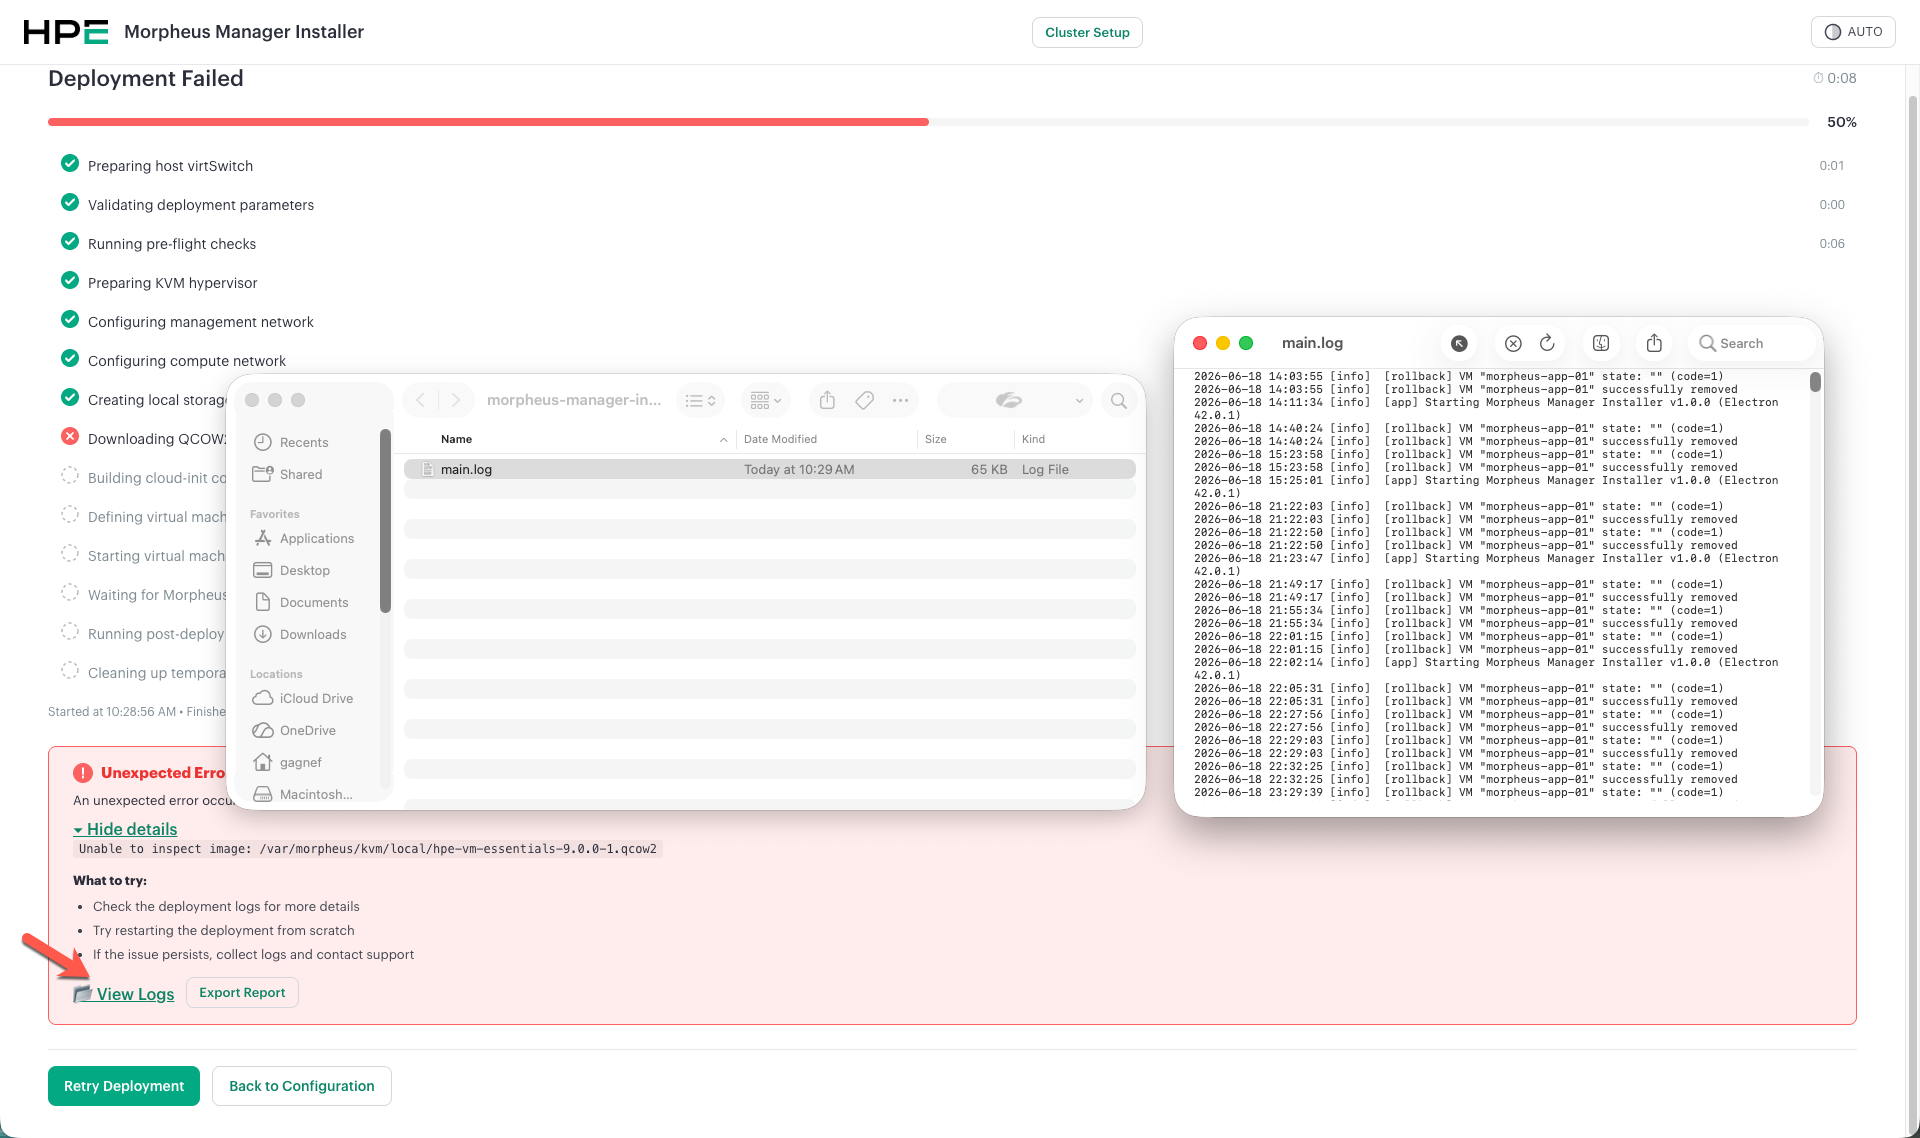
View Logs — Opens the local log directory containing
main.logwith detailed deployment traceExport Report — Exports a deployment report for support purposes
Retry Deployment — Retry the deployment from the beginning
Back to Configuration — Return to the configuration wizard to adjust settings
Tip
Host-side logs are also available at /var/log/hvmcli/ on the HVM host for additional troubleshooting.
Large Image Uploads and Timeout
The installer UI has a 60-minute timeout for the image upload step. For very large QCOW2 images or slow network connections, the upload may exceed this limit.
Pre-staging the image manually:
If you anticipate the upload will take longer than 60 minutes, you can manually transfer the QCOW2 image to the host beforehand. The installer uploads images to:
/var/lib/libvirt/images/
To have the installer skip the upload and discover a pre-existing image on the host, place the file at:
/var/lib/libvirt/images/<filename>.qcow2
The installer checks the file size using stat -c '%s' /var/lib/libvirt/images/<filename> — if the file exists and has the same size as the local source file, the upload step is skipped automatically.
Example — manually uploading via SCP:
scp hpe-vm-essentials-9.1.0-1.qcow2 ubuntu@<hvm-host>:/var/lib/libvirt/images/
Note
Ensure the filename on the host matches exactly what the installer expects (i.e., the same filename you selected in the QCOW2 Image field). The size comparison must also match — do not rename or truncate the file.
Installer Data Locations
The HPE Morpheus Manager Installer stores configuration, logs, and state data locally on the workstation. If you need to start fresh (e.g., clear saved settings, reset SSH trust, or troubleshoot a corrupted state), you can delete these files.
macOS:
Path |
Contents |
|---|---|
|
Configuration and state files (see below) |
|
Application log files (daily rotation, 10 MB max per file) |
Windows:
Path |
Contents |
|---|---|
|
Configuration and state files (see below) |
|
Application log files (daily rotation, 10 MB max per file) |
Stored Files:
File |
Purpose |
|---|---|
|
Saves the last-used deployment settings (SSH host, IP, network config, VM size, etc.) so they are pre-populated on next launch. Passwords are not stored. |
|
Saves cluster wizard settings (cluster name, datastore config). Secrets are redacted before persisting. |
|
Tracks whether the last cluster deployment succeeded (used for resume/retry logic). |
|
Stores SSH host fingerprints for HVM hosts you have connected to. Used to detect host key changes (similar to |
|
Stores trusted TLS certificate fingerprints for Morpheus appliances with self-signed or untrusted certificates. |
Resetting the Installer:
To completely reset the installer to a clean state:
macOS:
rm -rf ~/Library/Application\ Support/Morpheus\ Manager\ Installer/
rm -rf ~/Library/Logs/Morpheus\ Manager\ Installer/
Windows (PowerShell):
Remove-Item -Recurse -Force "$env:APPDATA\Morpheus Manager Installer"
Tip
If you are only experiencing SSH host key warnings (e.g., after re-imaging a host), you can delete just known_hosts.json rather than resetting everything.