Cisco ACI
Overview
Cisco Application Centric Infrastructure (ACI) is a software-defined networking (SDN) solution that provides centralized automation and policy-driven application profiles. HPE Morpheus Software offers a comprehensive integration with Cisco ACI as both a network and security integration, enabling inventory of existing ACI configurations and creation of new networking constructs directly from the HPE Morpheus Software UI.
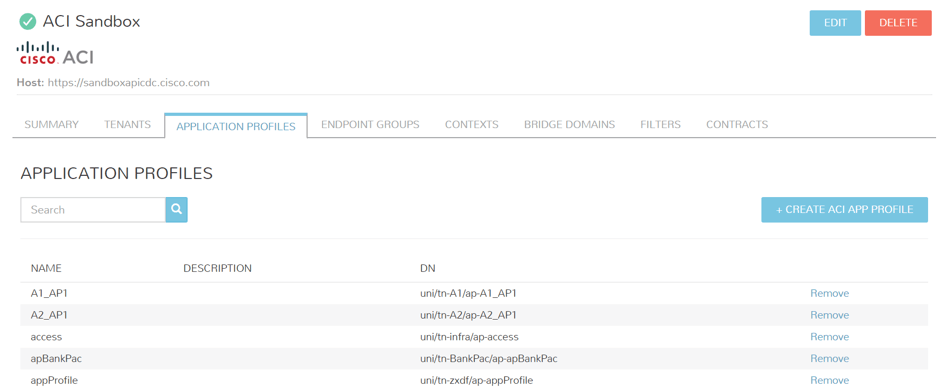
The HPE Morpheus Software ACI integration provides management of:
Tenants
Application Network Profiles (ANPs)
Endpoint Groups (EPGs)
Contexts (VRFs)
Bridge Domains
Filters
Contracts
Note
HPE Morpheus Software syncs with ACI APIC every 5 minutes. HPE Morpheus Software connects to ACI APIC over port 443.
Prerequisites
Before configuring the Cisco ACI integration:
A Cisco ACI fabric with APIC controller(s) is operational and accessible from the HPE Morpheus Software appliance
An APIC user account with appropriate read/write permissions is available
Network connectivity exists between HPE Morpheus Software and the APIC controller on port 443
(Optional) A VMware vCenter Cloud is configured in HPE Morpheus Software for provisioning into ACI-managed networks
Add ACI Network Integration
Navigate to
Infrastructure > Network > IntegrationsClick + ADD >
Networking>Cisco ACIComplete the following fields:
- NAME:
ACI Integration name in HPE Morpheus Software (this is unique to HPE Morpheus Software and not part of authentication)
- URL:
ACI fabric URL (e.g.,
https://apicdc.company.com)- USERNAME:
ACI
aaaUsername attribute- PASSWORD:
ACI
aaaUserpwd attribute- TENANT:
Populates upon successful authentication; tenant selection is optional
Click ADD NETWORK INTEGRATION
Configure Cloud Network Mode
For the ACI integration to be available during provisioning, it must be associated with one or more Clouds:
Navigate to
Infrastructure > CloudsSelect an existing VMware vCenter Cloud
Click EDIT
Expand the Advanced Options section
Select the ACI integration in the
NETWORK MODEdropdownClick SAVE CHANGES
ACI Integration Detail View
After adding the integration, clicking on it reveals a detail view with the following tabs:
- Summary
Overview of the ACI integration status, connection health, and high-level inventory counts.
- Scopes (Tenants)
View and manage ACI tenants. Tenants provide top-level organizational isolation in the ACI fabric.
- Networks (Bridge Domains)
Bridge Domains define Layer 2 forwarding domains and are associated with tenants and subnets.
- Application Profiles
ANPs group EPGs that are related to a particular application deployment.
- Endpoint Groups
EPGs are logical groupings of endpoints (VMs, containers, bare-metal servers) that share the same network and security policies.
- Contexts (VRFs)
VRFs define unique Layer 3 forwarding and application policy domains within a tenant.
- Filters
Filters define the traffic classification criteria (protocol, ports) used in contracts.
- Contracts
Contracts define the security policies between EPGs, specifying which traffic is allowed.
Instance Provisioning with ACI
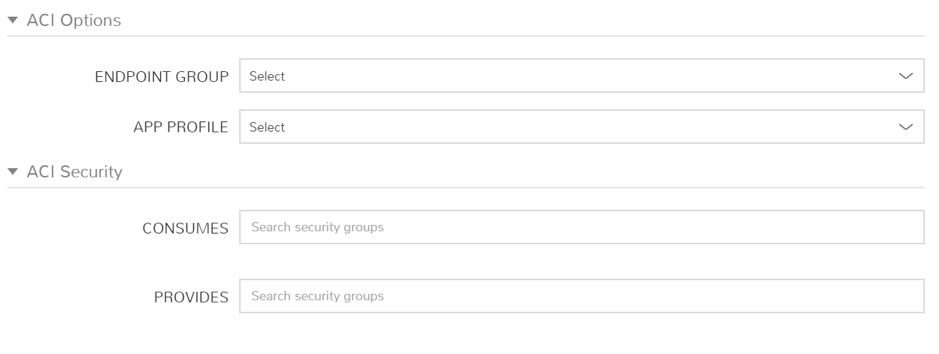
Once ACI is integrated with a Cloud, it becomes available during instance provisioning:
During provisioning, in the Configure section, ACI-specific options appear
From the EPG dropdown, select an existing EPG or create a new one
From the ANP dropdown, select an existing Application Network Profile or create a new one
Under ACI Security, search for and select contracts to consume or provide
Complete provisioning
The provisioned instance will be associated with the selected EPG and have the specified contracts applied. This can be verified on the instance detail page or via the REST API and CLI.
Blueprint Configuration
ACI constructs can be defined within App Blueprints:
Define the ANP and EPG for each tier of the application
Variables can be used for EPG and ANP names (useful for templated deployments)
Use blueprints for dev/test isolation from production networks
Support hybrid configurations based on VMM domains in APIC
Creating ACI Objects
Tenants
Navigate to the ACI integration detail > Scopes tab
Click + ADD
Provide the tenant name and optional description
Click SAVE
Bridge Domains
Navigate to the ACI integration detail > Networks tab
Click + ADD
Configure the bridge domain name, associated tenant, and subnet
Click SAVE
Contracts
Navigate to the ACI integration detail > Contracts section
Click + ADD
Configure the contract name, scope, subjects, and associated filters
Click SAVE
Filters
Navigate to the ACI integration detail > Filters section
Click + ADD
Define the filter entries (protocol, source/destination ports)
Click SAVE
Troubleshooting
Issue |
Resolution |
|---|---|
Integration fails to authenticate |
Verify the APIC URL and credentials. Ensure the user has API access and is not locked out. |
Tenants not populating |
Check that the authenticated user has visibility to the desired tenants in the APIC RBAC configuration. |
EPGs not available during provisioning |
Ensure the Cloud’s NETWORK MODE is set to the ACI integration. Verify the EPGs exist within a tenant accessible to the integration user. |
Sync appears stale |
The sync job runs every 5 minutes. Force a refresh from the integration actions menu if needed. |