Identity Sources
Administration > Tenants > (Selected Tenant) > Identity Sources Administration > Users > Identity Sources
Overview
HPE Morpheus Software can integrate with many of the most common identity source technologies, such as Active Directory, Okta, and many others. These can be configured via the Identity Sources button on any Tenant detail page (Administration > Tenants > Selected Tenant) or on the Users list page (Administration > Users). These integrations map roles within these sign-on tools to equivalent roles in HPE Morpheus Software so at first log in users are assigned the appropriate role.
Active Directory
Overview
Active Directory is Microsoft’s primary authentication service. It is widely used in enterprise organizations and even in Microsoft cloud services. While Active Directory also supports LDAP protocol support (which HPE Morpheus Software can integrate with as well), HPE Morpheus Software includes a dedicated identity integration type specifically for Active Directory. By integrating Active Directory, HPE Morpheus Software administrators can fully offload the work of managing the user lifecycle to Active Directory. Creating new users, applying roles to users, updating basic user data, disabling users, and more can be handled in Active Directory and automatically filtered down to HPE Morpheus Software. This section includes an example integration walkthrough as well as additional details on the integration feature set.
Note
Caution should be used when integrating more than one Active Directory identity source with the same HPE Morpheus Software Tenant. You must ensure the users on each identity source are unique users or that the two domains use different naming conventions for users.
How It Works
In HPE Morpheus Software, identity sources (if used) are configured per Tenant. In order to see an identity integration or create a new one, navigate to a Tenant detail page (Administration > Tenants > Selected Tenant) and click IDENTITY SOURCES. From this page we can add a new identity source or click the pencil (✎) icon next to an existing identity source to view or edit it. Any configured identity source will apply to just one Tenant and they cannot be shared. One scenario where this is especially useful is in an MSP appliance where each Tenant is a siloed environment for a specific customer. The customer’s own existing Active Directory server and groups can be leveraged to build HPE Morpheus Software user accounts with correct role mapping automatically.
When configuring an Active Directory integration in HPE Morpheus Software, AD groups are mapped to HPE Morpheus Software roles. When the user logs in for the first time, HPE Morpheus Software adds the new user account with correct name, email address, and applies one or more roles depending on configuration. Going forward, HPE Morpheus Software will sync down any changes to the user, including any role changes based on changes to the user’s associated AD groups or updated passwords. Additionally, disabling a user in AD will prevent them from accessing HPE Morpheus Software.
Important
HPE Morpheus Software will connect over port 389 for non-secure LDAP and port 636 for secure LDAP. Ensure that HPE Morpheus Software is able to talk to the AD server on the proper port.
Example Integration
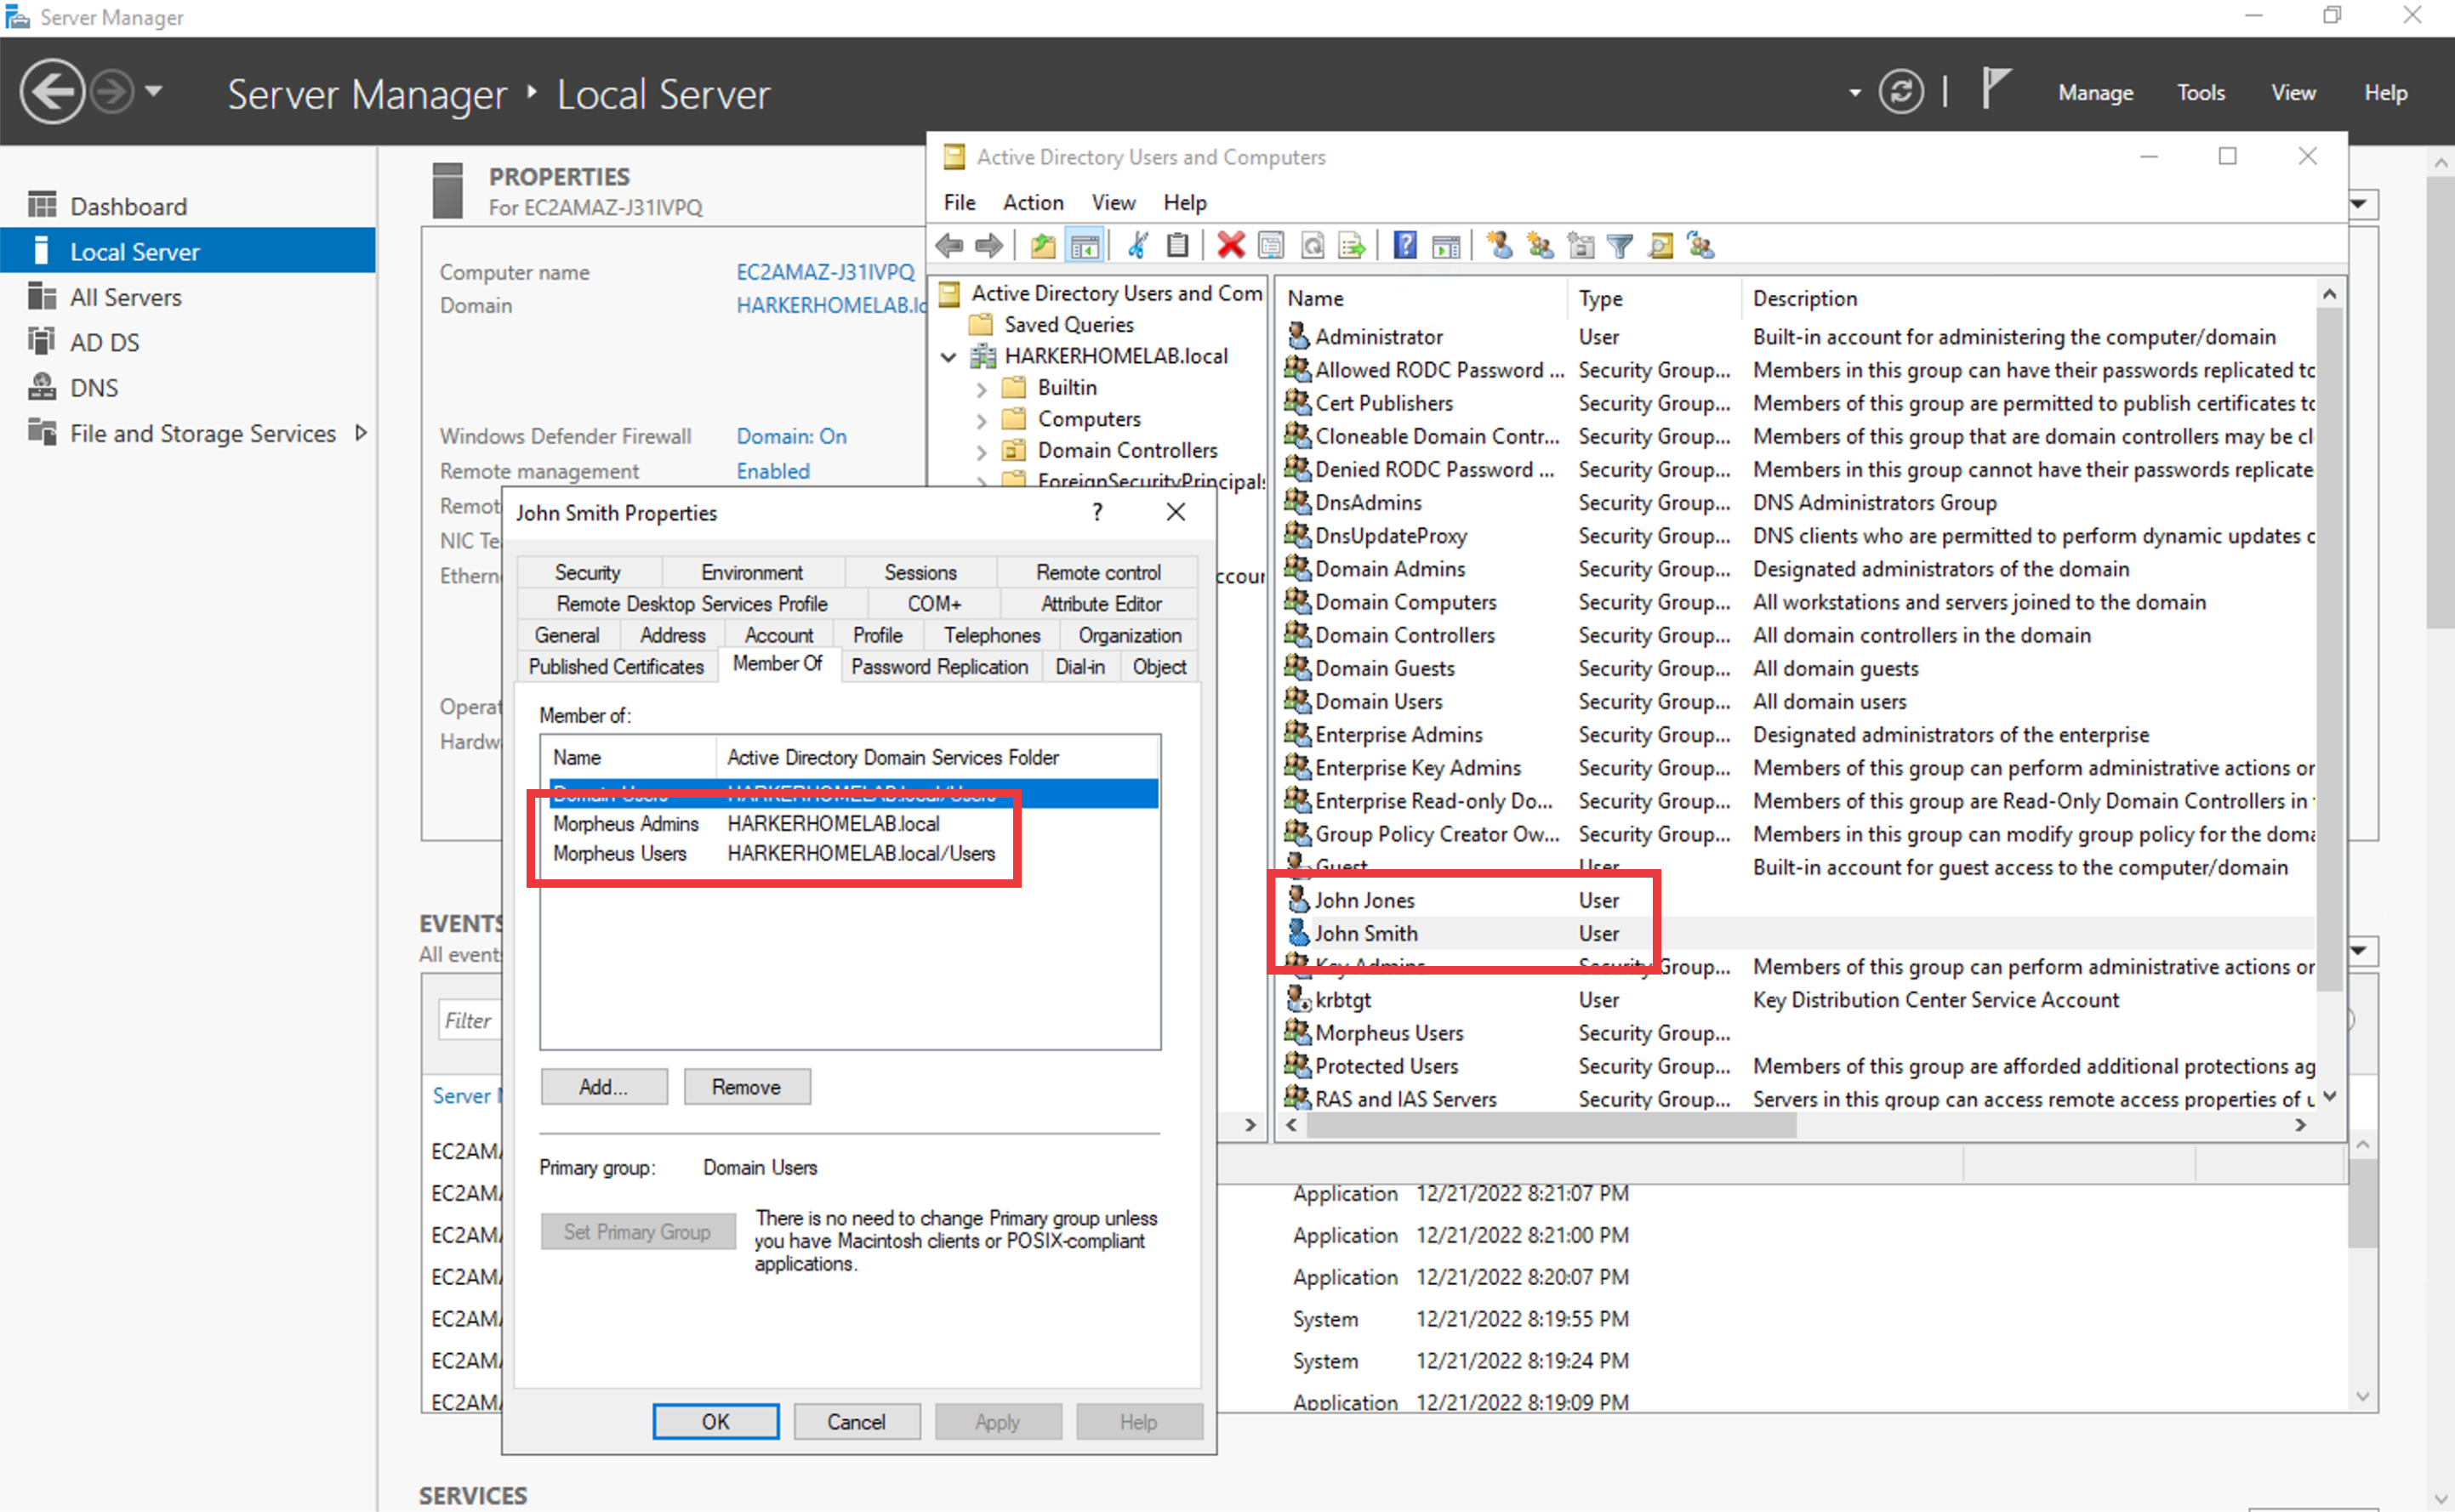
In a simple example, we have an Active Directory server which has two groups relevant to HPE Morpheus Software, “Morpheus Users” and “Morpheus Admins.” We will configure HPE Morpheus Software so that only users in the “Morpheus Users” group can access HPE Morpheus Software in any capacity. Users who are also in the “Morpheus Admins” group will take on the System Admin role in HPE Morpheus Software. We’ll see later when the integration is configured how HPE Morpheus Software roles can be mapped to AD groups. In the same AD server, I have two users. John Smith is in groups “Morpheus Users” and “Morpheus Admins”. John Jones is only in the “Morpheus Users” group.
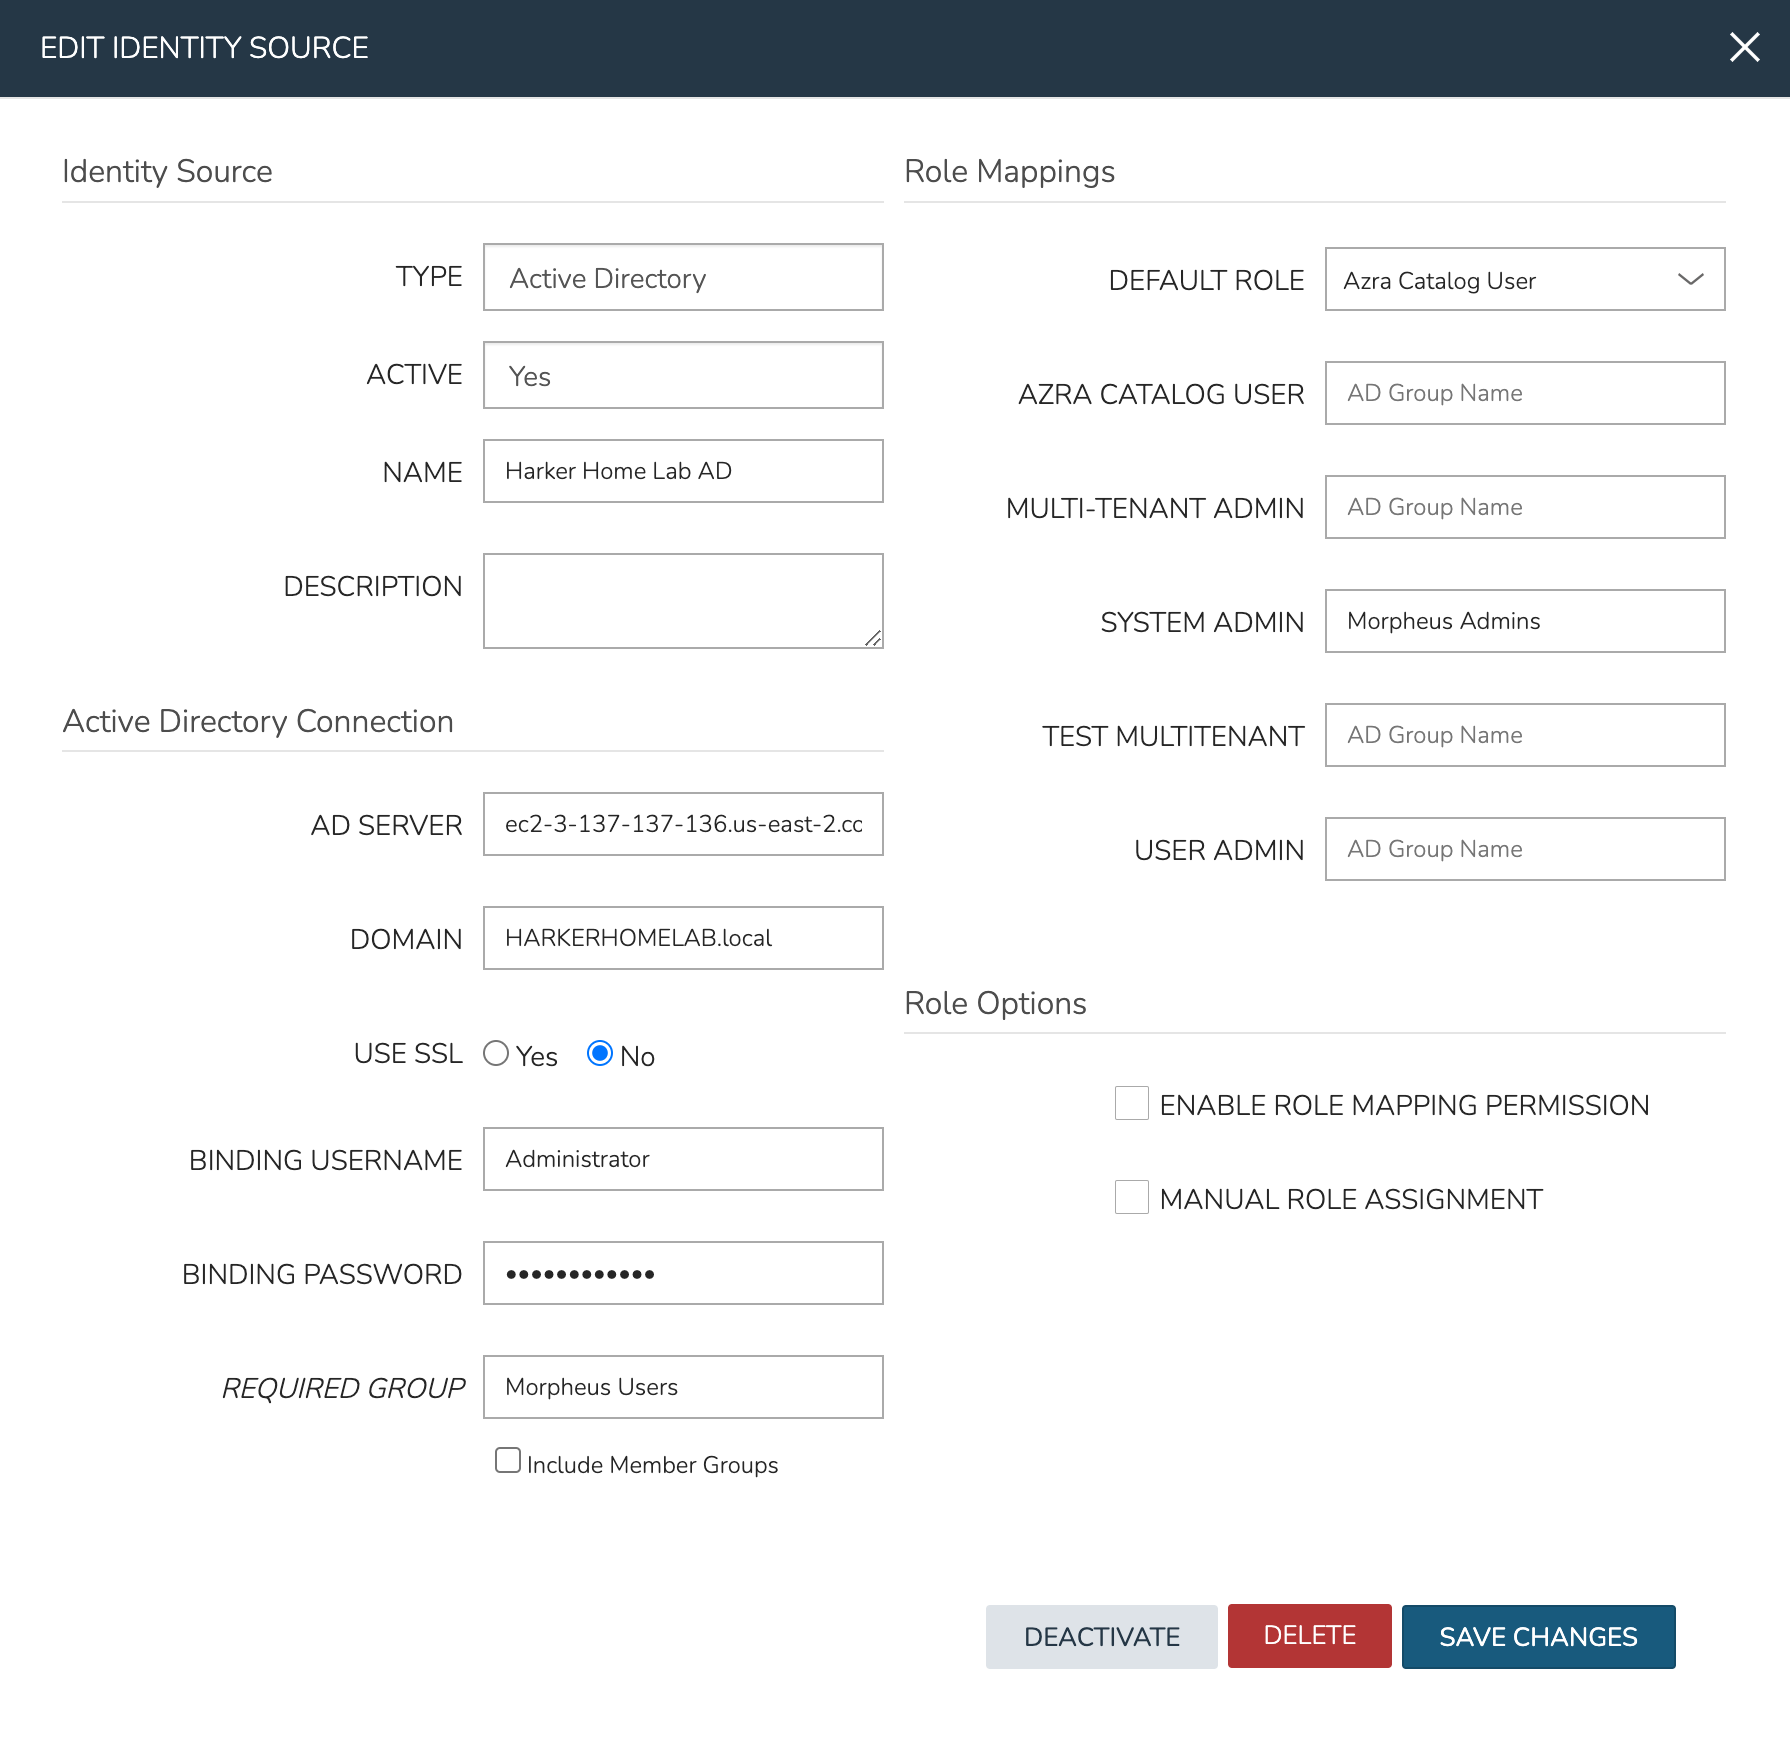
Knowing the AD scheme and the requirements for HPE Morpheus Software user roles, we can begin the process of creating the integration. Identity integrations are specific to each Tenant so begin by navigating to the Tenant detail page (Administration > Tenants > Selected Tenant) and clicking IDENTITY SOURCES. On setting the type to “Active Directory,” the form will update with the needed fields. Note the following basic fields:
AD SERVER: The IP address or hostname for the Active Directory Server
DOMAIN: The AD domain in which the relevant users and groups reside
BINDING USERNAME: A server user which has access to relevant objects on the AD server. In my example, I’ve used the in-built Administrator user which is the easiest option. Other users may be used depending on your organization’s IT security policies but the integration with HPE Morpheus Software will not work properly if the user does not have the needed access
BINDING PASSWORD: The password for the user in the prior field
With the basic configurations completed, the remaining configurations will affect HPE Morpheus Software user and role generation. A REQUIRED GROUP is optional and is a group the user must be in to have any HPE Morpheus Software access. Here we require that users be in the “Morpheus Users” group. A DEFAULT ROLE is required and will be assigned to all users regardless of any additional roles they may be assigned based on their AD group membership. Beyond that, all other HPE Morpheus Software roles will be listed here and an AD group name can be associated with as many as you required. In this example, we are giving users in the “Morpheus Admins” group the HPE Morpheus Software System Admin role. Though we did not use them, it’s worth pointing out that ENABLE ROLE MAPPING PERMISSION will give administrators in the Tenant the ability to update the AD role mappings (though they will not have access to the core integration fields such as AD SERVER, DOMAIN, or binding user details). MANUAL ROLE ASSIGNMENT allows users to manually update HPE Morpheus Software roles outside of the automatic mappings created by the AD integration.
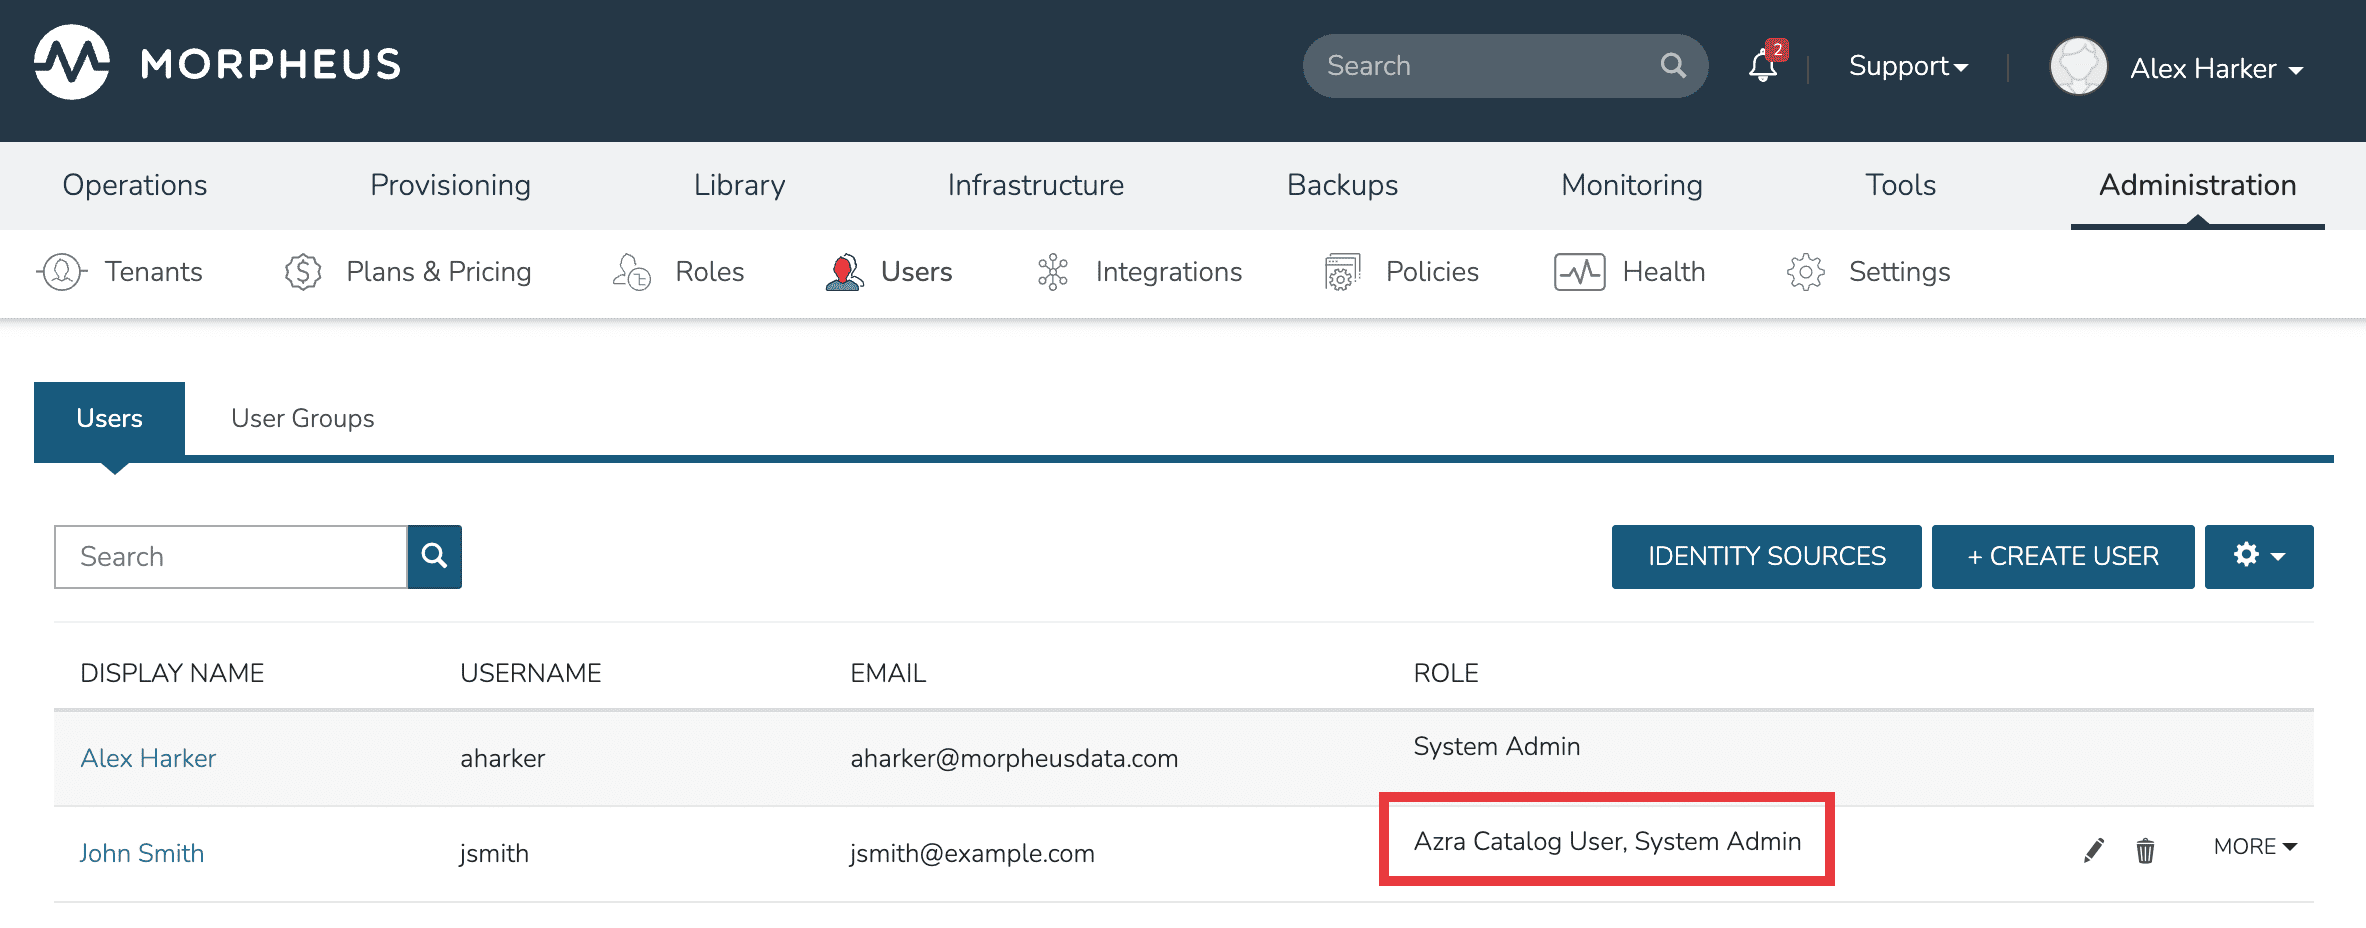
With the above integration steps completed, users can now log into HPE Morpheus Software and a user account with correct roles will automatically be created. In our example case, John Smith has logged in and we can see he is assigned the default role as well as the System Admin role based on his AD group associations. Going forward, HPE Morpheus Software will continue to sync any changes to these users. For example, HPE Morpheus Software roles may be updated based on changing AD groups or user access may be completely revoked by disabling the user in AD.
Restricting Access with Required Group
Important
If the REQUIRED GROUP field is left empty, any user who can authenticate against the Active Directory server will be allowed to log in. A local HPE Morpheus Software user account is automatically created for each user upon first login. To restrict access to only authorized users, you must configure the REQUIRED GROUP field.
The REQUIRED GROUP field is the primary mechanism for controlling which AD users are permitted to access HPE Morpheus Software. It works as follows:
Required Group set: Only users who are members of the specified AD group can log in. Users who authenticate successfully against AD but are not in the required group are denied access and no local user object is created.
Required Group empty: All users who can authenticate against the AD server are allowed to log in. This is the default behavior and is typically not appropriate for enterprise environments.
Include Member Groups: When checked, users in groups nested inside the required group are also granted access.
The Required Group acts as a gatekeeper. Role mappings and the Default Role are only applied after the Required Group check passes. The interaction between these fields is:
User authenticates credentials against AD
HPE Morpheus Software checks if the user is in the Required Group (if configured)
If the user is not in the Required Group, login is denied (no user is created)
If the user passes the Required Group check, HPE Morpheus Software creates or syncs the user account
The Default Role is applied to the user
Any additional role mappings are applied based on the user’s AD group memberships
Note
The Default Role is always applied to users who pass the Required Group check. It is additive—users receive the Default Role in addition to any roles assigned through role mappings. It is not a fallback that only applies when no other mapping matches.
Recommended Configuration for Enterprise Environments:
Always set a Required Group to prevent unauthorized directory users from accessing HPE Morpheus Software
Create a dedicated AD group (e.g., “Morpheus Users”) and add only authorized users
Set the Default Role to the most restrictive role appropriate for general users
Use role mappings to assign elevated roles (e.g., System Admin) to users in specific AD groups
Adding an Active Directory Integration
Navigate to Administration > Tenants
Select a Tenant
Select IDENTITY SOURCES
Select + ADD IDENTITY SOURCE
Set the TYPE to “Active Directory”
Populate the following:
- Name
A friendly name in HPE Morpheus Software for the AD integration
- AD Server
The Hostname or IP address of AD Server
- Domain
The AD domain in which the relevant user and group objects reside
- USE SSL
Indicates whether SSL should be used for communication with the AD server. HPE Morpheus Software will connect over port 389 for non-secure LDAP and port 636 for secure LDAP, ensure HPE Morpheus Software can connect to the AD server over the correct port
- Binding Username
A username for a service account which has access to relevant objects (users, groups, etc.). For ease, the “Administrator” user may be used
- Binding Password
The password for the above account
- Required Group
The AD group users must be in to have access. If left empty, all users who can authenticate against the AD server will be allowed to log in and a local user account will be created automatically. It is strongly recommended to set this field in enterprise environments to restrict access to only authorized users (see the “Restricting Access with Required Group” section above)
- Include Member Groups
When checked, users in groups that are nested inside the required group will also be granted access
- Default Role
The default role applied to all users who pass the Required Group check. This role is always assigned in addition to any roles granted through the role mappings below. Set this to the most restrictive role appropriate for general users
- ENABLE ROLE MAPPING PERMISSION
When selected, Tenant users with appropriate rights to view and edit Roles will have the ability to set role mapping for the Identity Source integration. This allows the Tenant user to edit only the role mappings without viewing or potentially editing the basic Identity Source configuration (AD server, domain, binding user details, etc)
- MANUAL ROLE ASSIGNMENT
When selected, administrators can manually edit Roles for users created through this identity source integration from the user detail page (Administration > Users > Selected user)
Note
For more on Identity Source role mapping permissions, see the associated guide in our KnowledgeBase.
Select SAVE CHANGES.
Now allowed AD users can login to HPE Morpheus Software via their Active Directory credentials and a User will be automatically generated to HPE Morpheus Software with matching metadata and mapped Role permissions.
Troubleshooting
If you’re unable to get the Active Directory integration to work, the following troubleshooting steps may be useful to ensure your appliance can talk to the Active Directory server.
Open firewall ports
Source: HPE Morpheus Software appliance
Destination: AD server’s FQDN or IP address
Non-SSL AD integration: TCP-389
SSL AD integration: TCP-636
Checking open LDAP connections from the HPE Morpheus Software appliance
Connect to a HPE Morpheus Software appliance box and run the following:
$ sudo lsof i- | grep :ldap
Check LDAP connectivity from the HPE Morpheus Software appliance
Connect to a HPE Morpheus Software appliance box and run the following. Be sure to replace the placeholder values in the command with the correct values for your environment:
$ ldapsearch -x -h xx.xx.xx.xx -D "binding-user@acme.com" -W -b "cn=users,dc=acme,dc=com"
Run tcpflow from the HPE Morpheus Software appliance for non-SSL enabled AD identity Integrations
Use tcpflow from the HPE Morpheus Software appliance and then start the identity source configuration once again. Keep in mind this will only work for AD servers which are not SSL enabled:
$ sudo tcpflow -i any -c -v port 389
Check the AD and domain controllers event logs
Check the event logs for LDAP queries from the HPE Morpheus Software appliance to ensure network connectivity.
Azure Active Directory SSO (SAML)
Azure Active Directory Single Sign-on can be added as a Identity Source in HPE Morpheus Software using the SAML Identity Source Type. The Azure AD SSO configuration is slightly different than other SAML providers, and this guide will assist in adding a Azure AD SSO Identity Source.
Create Azure Enterprise Application
Login to the Azure Portal
Navigate to:
Azure Active Directory > Enterprise ApplicationsClick the
+ New applicationbutton at the topClick the
+ Create your own applicationbutton at the topEnsure
Integrate any other application you don't find in the gallery (Non-gallery)is selected and enter a name for the app. Common examples are:MorpheusSSOClick the
Createbutton at the bottom and wait for it to completeOnce created, you’ll be in the
Overviewof the application created. Navigate to theSingle sign-onsection from the left paneChoose
SAMLas the Single sign-on methodCopy both the
Login URLandLogout URLin Step 4, we’ll need these in some of the next stepsBefore we can continue configuring the application, the configuration needs to be generated in HPE Morpheus Software for more data
Create an Azure AD SAML Integration in HPE Morpheus Software
Azure requires inputting the Identifier (Entity ID) and Reply URL (Assertion Consumer Service URL) in the Azure SSO configuration before it provides the Endpoints and Certificate
necessary to add the Integration into HPE Morpheus Software. In order to get the Identifier (Entity ID) and Reply URL (Assertion Consumer Service URL) to input into Azure SSO configuration,
we need to create a Azure AD SAML SSO integration in HPE Morpheus Software first.
To add the integration:
Login to HPE Morpheus Software
Navigate to Administration > Tenants
Click a tenant hyperlink
Click the IDENTITY SOURCES button in the Tenant detail page
Click the + ADD IDENTITY SOURCE button
Select
Azure AD SAML SSOfrom theTYPEdropdownAdd
Name
(Optional) Description
Paste the
Login URLcopied from Azure into theLOGIN REDIRECT URLfieldPaste the
Logout URLcopied from Azure into theSAML LOGOUT REDIRECT URLfield
This is the minimum information needed for now, which will let us generate the details needed from HPE Morpheus Software. We’ll return to this configuration page later to enter more information.
Click the SAVE CHANGES button
Important
Setting SAML REQUEST to “No Signature” and SAML RESPONSE to “Do Not Validate Assertion Signature” is allowed but not recommended for security reasons.
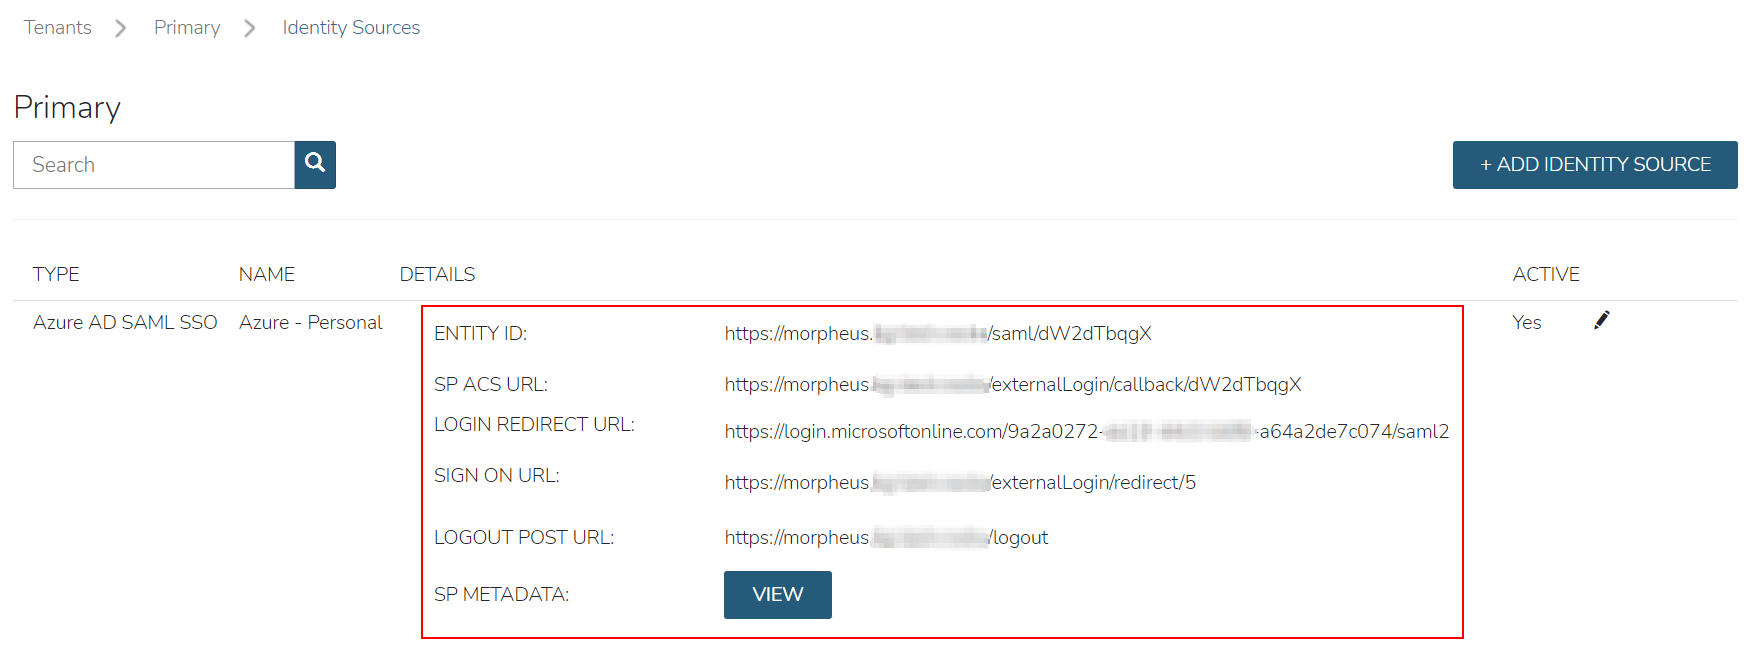
Upon saving, the Entity ID (Identifier (Entity ID)) and SP ACS URL (Reply URL (Assertion Consumer Service URL)) will be provide in the Identity Source list view. Copy these for use in Azure SSO configuration.
Configure Azure Enterprise Application
This guide assumes an Azure AD Enterprise Application has already been created. Please refer to documentation above, if this has not already been configured.
Navigate to:
Azure Active Directory > Enterprise Applications > Single sign-onChoose
SAMLas the Single sign-on methodOn Step 1 (
Basic SAML Configuration), click theEditbutton and enter the following:- Identifier (Entity ID)
Enter the
Entity IDURL from the HPE Morpheus Software Identity Source Integration above
- Reply URL (Assertion Consumer Service URL)
Enter the
SP ACS URLfrom the HPE Morpheus Software Identity Source Integration above
- Logout URL
Enter the following format:
https://yourUrl/login/If this is a sub tenant, the format may instead be the following:https://yourUrl/login/account/1The login URL can be found under IDENTITY SOURCES in the tenant
On Step 2 (
Attributes and Claims), click theEditbuttonClick the
Add a group claimbutton at the topChoose
All groupsand ensureGroup IDis selected for theSource attributedropdownNote
You can also choose
Security groups, which ever makes more sense for the organizationClose the pane and return to the Enterprise Application in the
Single sign-onsectionOn Step 3 (
SAML Certificates), click theDownloadlink next toCertificate (Base64)andFederation Metadata XMLNote
The files will download, keep them available for later configuation in HPE Morpheus Software
Navigate to
Users and Groupsin the left paneClick the
Add user/groupbuttonAdd Azure groups to this application that will be able to login to HPE Morpheus Software
Note
Note the object ID for each of these groups, as they will be used later when configuring HPE Morpheus Software to map the group to roles
Once groups have been added, click the
Assignbutton at the bottom
Configure the Azure AD SAML Integration in HPE Morpheus Software
Login to HPE Morpheus Software using
Username and Password, as usualNavigate to Administration > Tenants
Click a tenant hyperlink
Select IDENTITY SOURCES in the Tenant detail page
Click the pencil (edit) next to the integration created previously
Ensure the
SAML REQUESTfield is set toSelf SignedNote
A custom RSA signature can be used here if needed, if required by the orgnaization
Ensure the
SAML RESPONSEfield is set toValidate Assertion SignatureNote
With this setting, if the assertion signature ever changes in the Azure Enterprise Application, this would need to be updated to match
Edit/view the downloaded
Federation Metadata XML(.xmlextension) file from the previous sectionNote
It is recommended to use
Microsoft Edge, or another browser, to view the contentsIn the
Federation Metadata XMLfile, locate the<X509Certificate> </X509Certificate>under the<Signature>section. Copy the entire contents between the<X509Certificate>and</X509Certificate>, it is very longPaste the value copied from the
Federation Metadata XMLfile into thePublic Key (Optional)box, below theSAML RESPONSEdropdown
Configure Role Mappings
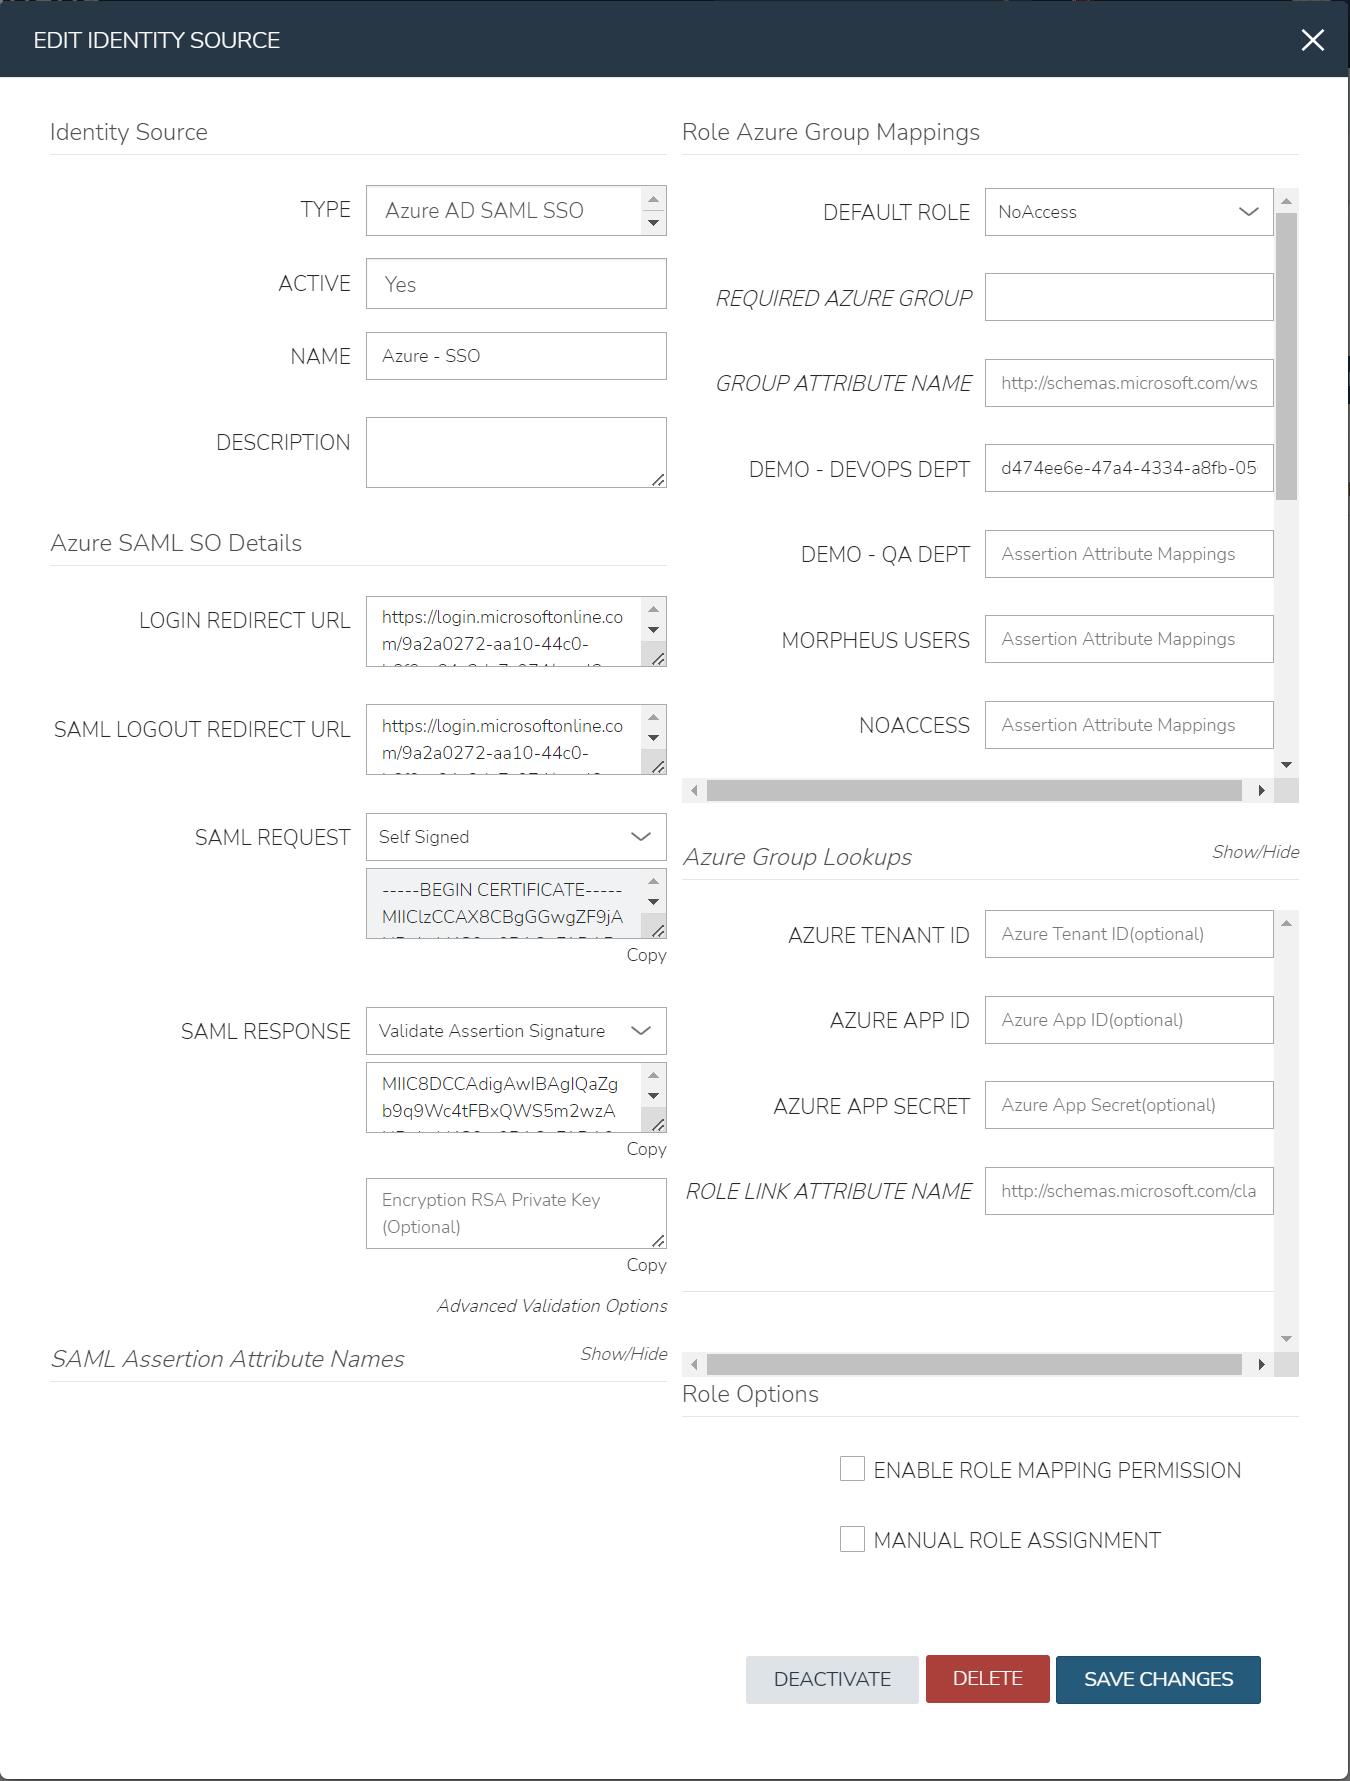
Role mappings will map Azure AD Groups to Morpheus Roles. Azure AD users will be assigned Roles in HPE Morpheus Software upon signing in based on their Group Membership in Azure AD.
Important
Use an Azure Groups Object ID, not Group name, when entering Role Mappings. Example: 7626a4a2-b388-4d9b-a228-72ce9a33bd4b
- DEFAULT ROLE
Role a Azure AD user will be assigned by default upon signing in to HPE Morpheus Software using this Identity Source.
- REQUIRED AZURE AD GROUP OBJECT ID
Object ID of Azure AD Group a user must be a member of to be authorized to sign in to HPE Morpheus Software. Users not belonging to this Group will not be authorized to login to HPE Morpheus Software. This field is optional, and if left blank, any user from the Azure AD App will be able to sign in to HPE Morpheus Software and will be assigned the Default Role if no Role Mappings match AD Group membership.
- GROUP ASSERTION ATTRIBUTE NAME
Enter
http://schemas.microsoft.com/ws/2008/06/identity/claims/groupsfor Azure AD SSO- Additional Role Mappings
The existing Roles in HPE Morpheus Software will be listed. To map a HPE Morpheus Software Role to an Azure AD Group, enter the Object ID of the desired Azure AD Group in the Role Attribute Value field for the corresponding HPE Morpheus Software Role.
Important
Use an Azure Groups Object ID, not Group name, when entering Role Mappings. Example: 7626a4a2-b388-4d9b-a228-72ce9a33bd4b
- ENABLE ROLE MAPPING PERMISSION
When selected, Tenant users with appropriate rights to view and edit Roles will have the ability to set role mapping for the Identity Source integration. This allows the Tenant user to edit only the role mappings without viewing or potentially editing the Identity Source configuration.
- MANUAL ROLE ASSIGNMENT
When selected, administrators can manually edit Roles for users created through this identity source integration from the user detail page (Administration > Users > Selected user).
Note
For more on Identity Source role mapping permissions, see the associated guide in our KnowledgeBase.
Once populated, select SAVE CHANGES and the SAML identity source integration will be added. The Identity Source can be edited anytime to deactivate or change Role Mappings or other values.
Note
If Role mappings are edited after Azure AD SSO users have signed into HPE Morpheus Software, currently logged in users will need to log out of HPE Morpheus Software for the new Role mappings to take effect, when applicable.
Under the
Role Azure Group Mappingssecton, verify theDEFAULT ROLEdropdown has the role in HPE Morpheus Software selected that all users will be assigned by defaultIt is recommended that this role contains no permissions, which ensures that anyone who authenticates gets no access
Under the
Role Azure Group Mappingssecton, you will see role names listed. Next to these are text boxes withAssertion Attribute Mappingsinside. Enter group object IDs from Azure into these text boxes. This will map the Azure AD groups to specific roles in MorpheusFinally, click
Save Changesat the bottom of the page
Here is an example of the configuration above:
Azure Group Lookups
When a user in azure ad has more that 150 group attributes, Azure does not include the group claims in the SAML response, and HPE Morpheus Software is required to query Microsoft Graph to obtain the users group attribute values. When there are users that are members of more that 150 groups, populate the Azure Group Lookups section in order for those users to be able to use the Azure AD SAML SSO integration, otherwise no groups will be obtained and proper role mappings cannot occur.
- AZURE TENANT ID
Add Azure AD Tenant ID if user group membership will exceed 150. See Copy Directory (tenant) and Application (client) IDs for information on obtaining an Azure AD Tenant ID
- AZURE APP ID
Add Azure AD Application (Client) ID if user group membership will exceed 150. See Copy Directory (tenant) and Application (client) IDs for information on obtaining an Azure AD Application (Client) ID
- AZURE APP SECRET
Add Azure Application (Client) Secret if user group membership will exceed 150. See Generate a Client Secret for information on creating an Azure Application (Client) Secret
- ROLE LINK ATTRIBUTE NAME
default: http://schemas.microsoft.com/claims/groups.link. This is not normally changed.
Logging Into HPE Morpheus Software with Azure AD SAML
Navigate to the HPE Morpheus Software URL
A new button will appear to allow sign-in using Azure AD SAML, with the same name as the integration. Click the button
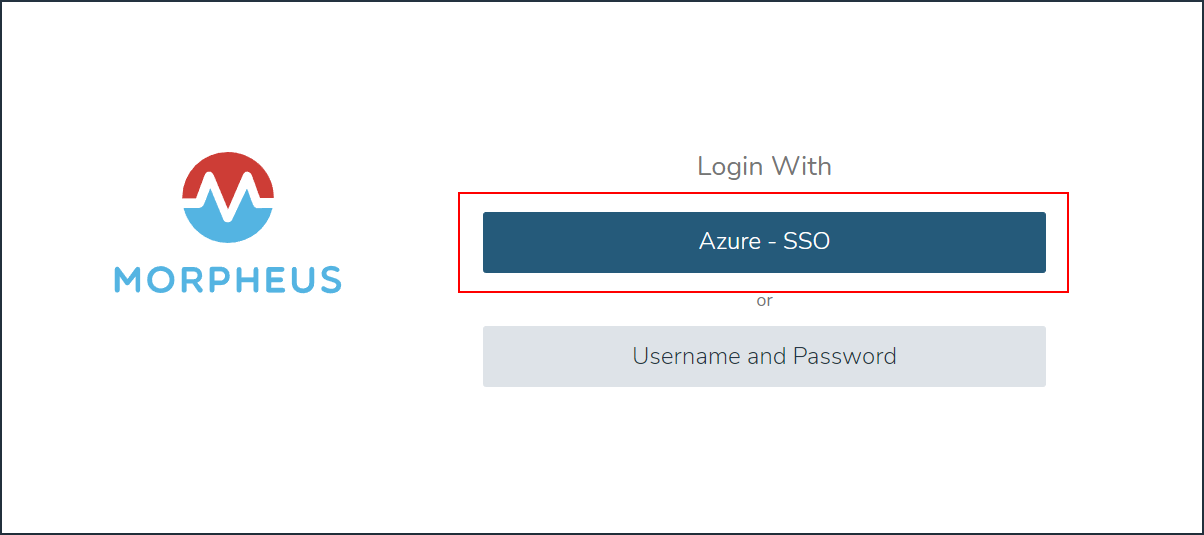
Sign-in with your Microsoft/Azure account

Note
If no local users other than the System Admin have been created, “USERNAME AND PASSWORD” option will not be displayed, only the SAML option.
Okta
Overview
HPE Morpheus Software allows users to integrate an Okta deployment for user management and authentication. In HPE Morpheus Software, identity sources are added on a per-Tenant basis and Morpheus allows you to map Okta user groups to HPE Morpheus Software user groups. User accounts are automatically created with matching metadata and role permissions when users are authenticated.
Adding an Okta Integration
Navigate to Administration > Tenants
Select a Tenant
Select IDENTITY SOURCES
Select + IDENTITY SOURCE
Choose TYPE: “Okta”
Populate the following, then select SAVE CHANGES:
- Name
Unique name for authentication type
- Description
A description for your new Okta Identity Source
- Okta URL
Your Okta URL
- Administrator API Token
Your Okta Administrator API Token
- Required Group
The Okta group that users must be in to have access. If left empty, all Okta users who can authenticate will be allowed to log in and a local user account will be created automatically. It is strongly recommended to set this field in enterprise environments to restrict access to authorized users only.
- Default Role
The default role applied to all users who pass the Required Group check. This role is always assigned in addition to any roles granted through role mappings below.
- ENABLE ROLE MAPPING PERMISSION
When selected, Tenant users with appropriate rights to view and edit Roles will have the ability to set role mapping for the Identity Source integration. This allows the Tenant user to edit only the role mappings without viewing or potentially editing the Identity Source configuration.
- MANUAL ROLE ASSIGNMENT
When selected, administrators can manually edit Roles for users created through this identity source integration from the user detail page (Administration > Users > Selected user).
Note
For more on Identity Source role mapping permissions, see the associated guide in our KnowledgeBase.
Now, allowed Okta users can log into HPE Morpheus Software via their Okta credentials and a user will be automatically generated within HPE Morpheus Software with matching metadata and mapped Role permissions.
For Okta applications using the SAML SSO identity-source type, each configured Role mapping is compared with one complete SAML attribute value. Comma- or space-separated role names inside a single value are not parsed. Emit the group/role attribute as a multi-value SAML attribute, with one exact value for each desired mapping. This limitation applies to SAML attribute mapping; it does not mean that every Okta identity-source mapping mechanism is limited to one Role.
Note
If you’ve created multi-tenant roles, these will also appear here and can be mapped to Okta user groups allowing you to map users to equivalent user groups in HPE Morpheus Software.
OneLogin
By integrating OneLogin with HPE Morpheus Software, users can access HPE Morpheus Software with their existing credentials set up within the OneLogin platform. Additionally, administrators can manage user access including Role assignment and enabling or disabling users from within the OneLogin platform. As employees are onboarded, change positions, or leave the company, additional user management within the HPE Morpheus Software platform is not necessary.
Adding OneLogin Identity Source Integration
To begin, log into OneLogin with an administrator account to gather some needed pieces of information. From the top menu bar, select Administration. From the admin panel, click Developers > API Credentials. Click the button labeled “New Credential”. Provide a name for the new API credentials and select “Manage Users” as the permissions type. Store the credentials somewhere they can be retrieved in the next step.
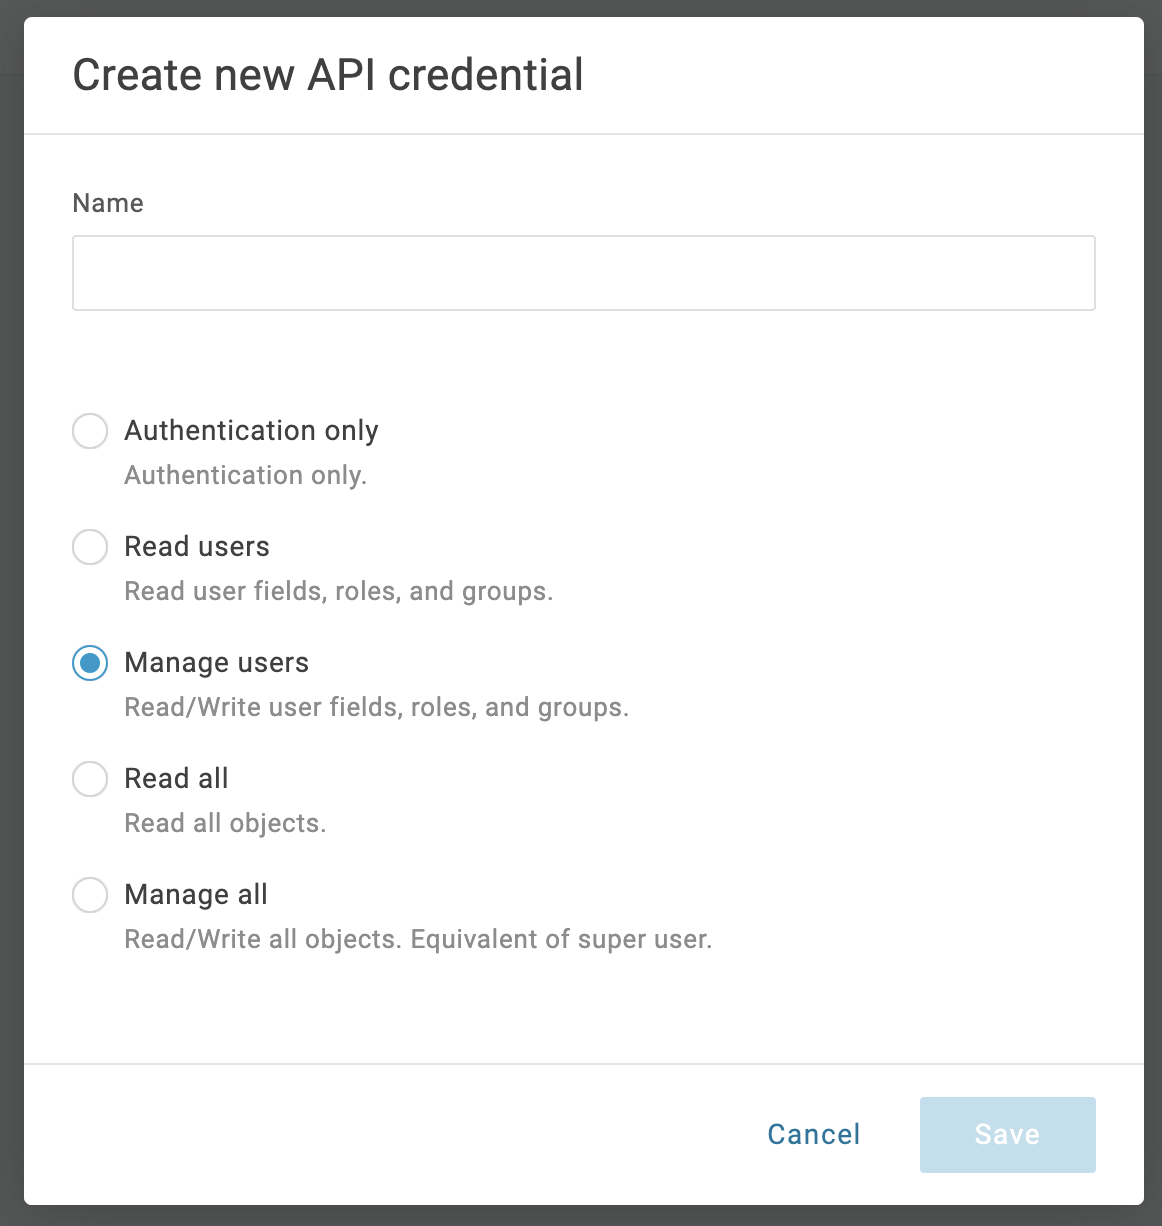
Back in HPE Morpheus Software, navigate to the Tenant which will integrate with OneLogin. Identity providers are integrated on a per-Tenant basis in HPE Morpheus Software. From the selected Tenant, click IDENTITY SOURCES. The list of currently-integrated identity providers is here. Click + ADD IDENTITY SOURCE to start a new integration for OneLogin. Fill in the fields below:
TYPE: OneLogin
NAME: A name for the identity source integration in HPE Morpheus Software
DESCRIPTION: An optional description for the identity source
ONELOGIN SUBDOMAIN: The subdomain from your OneLogin portal URL. For example, “morpheus-dev” if your portal is accessed at morpheus-dev.onelogin.com. Incorrect subdomains will cause login attempts to HPE Morpheus Software to fail
ONELOGIN REGION: Specify US or EU region
API CLIENT SECRET: OneLogin API client secret which was gathered earlier in this walkthrough
API CLIENT ID: OneLogin API client ID which was gathered earlier in this walkthrough
REQUIRED ROLE: Enter a role which OneLogin users logging into HPE Morpheus Software must have to gain access to HPE Morpheus Software. If left empty, all OneLogin users who can authenticate will be allowed to log in and a local user account will be created automatically. It is strongly recommended to set this field in enterprise environments.
DEFAULT ROLE: The default HPE Morpheus Software Role applied to all users who pass the Required Role check. This role is always assigned in addition to any roles granted through role mappings below.
ROLE MAPPINGS: All existing HPE Morpheus Software Roles will be listed with fields to enter OneLogin Roles to create a mapping. Users with OneLogin roles matching the role mappings will be assigned the appropriate Role(s) in HPE Morpheus Software when signing in
ENABLE ROLE MAPPING PERMISSION: When selected, Tenant users with appropriate rights to view and edit Roles will have the ability to set role mapping for the Identity Source integration. This allows the Tenant user to edit only the role mappings without viewing or potentially editing the core integration fields (such as the API keys)
MANUAL ROLE ASSIGNMENT: When selected, administrators can manually edit Roles for users created through this identity source integration from the user detail page (Administration > Users > Selected user).
Select SAVE CHANGES and the OneLogin Integration will be added.
Users can now login to HPE Morpheus Software with OneLogin credentials. The first login will create a user in HPE Morpheus Software matching the username, email and password from OneLogin. If a REQUIRED ROLE is specified in the Identity Source settings, only users with that Role in OneLogin will be able to login to HPE Morpheus Software.
Important
OneLogin users will not authenticate in HPE Morpheus Software if there is an existing HPE Morpheus Software User with matching username or email address.
You can now test the integration by logging in with user credentials which have been configured in OneLogin. On the first login, a new user will be created with the same username, email address, and password as contained in OneLogin. On subsequent logins, HPE Morpheus Software will sync with OneLogin to make sure the user hasn’t been disabled or if its Role(s) have changed in OneLogin which would affect its corresponding Roles in HPE Morpheus Software.
The HPE Morpheus Software identity source integration is interacting with the OneLogin APIs in the list below. This reference may be needed to ensure HPE Morpheus Software is integrating using an API key with sufficient privileges. In a situation where troubleshooting is needed, first confirm these APIs can be accessed using the provided key.
/auth/oauth2/token- Generate Token/api/1/users/$user_id/roles- Get Roles/api/1/login/auth- Create Session/api/1/users/$user_id- Get User/api/1/roles/$role_id- Get Role/api/1/roles?name=$role_name- Find Role
SAML Integration
Overview
The HPE Morpheus Software SAML identity source integration allows customers to add user SSO to HPE Morpheus Software, authenticated by external login SAML providers.
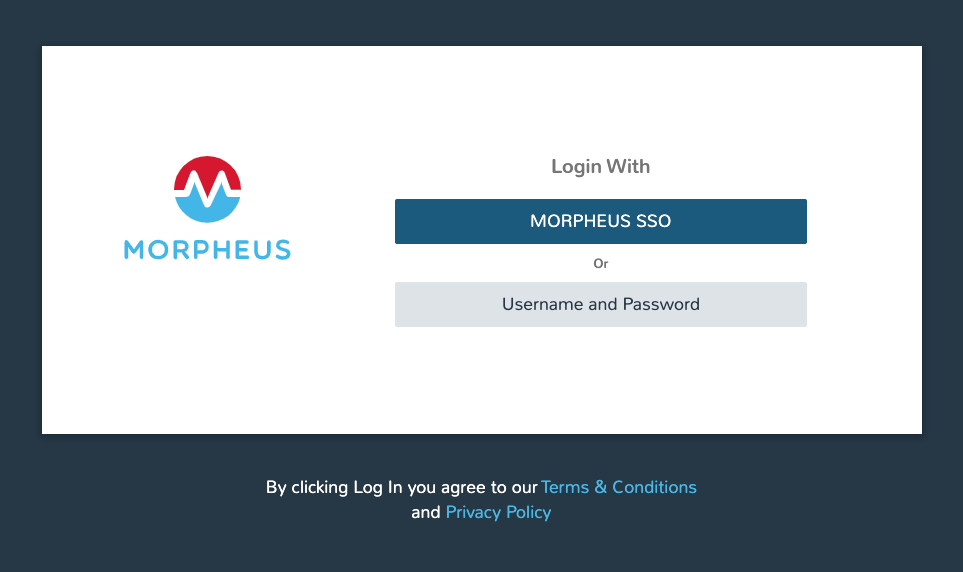
Adding a SAML Integration
To add a SAML integration:
Navigate to Administration > Tenants
Select a tenant.
Select IDENTITY SOURCES in the Tenant detail page
Select + ADD IDENTITY SOURCE.
Select SAML SSO from the TYPE field
Add a Name and optional Description for the SAML integration
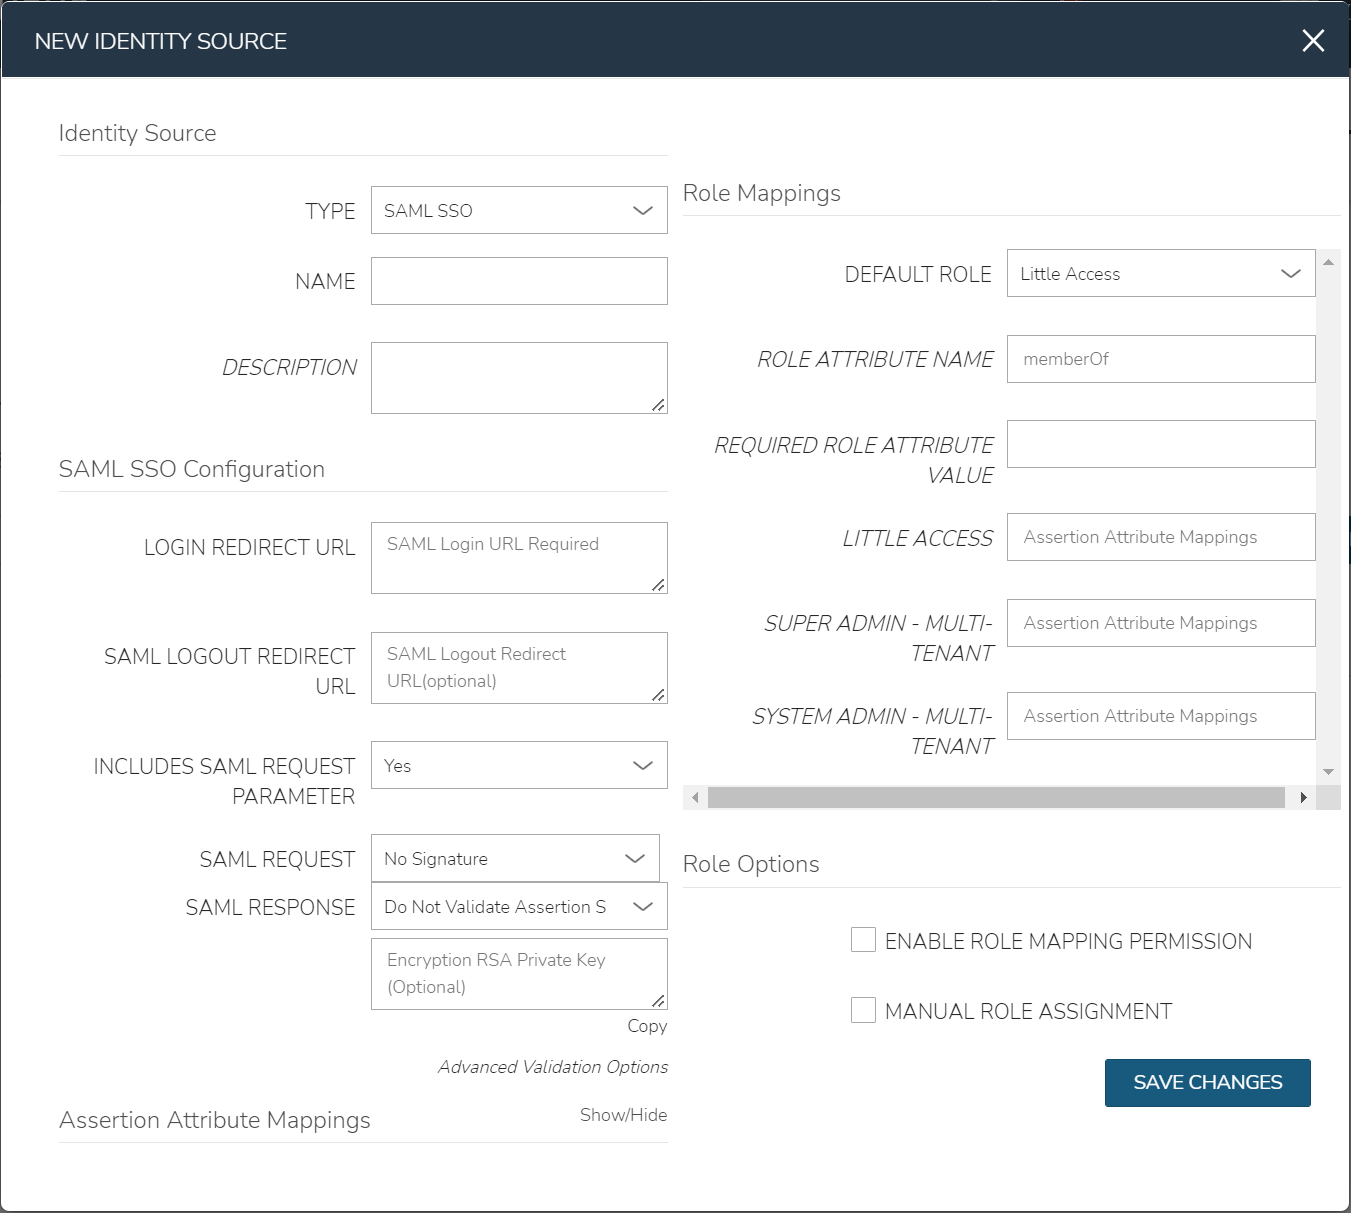
There are 4 sections with fields that need to be populated depending on the desired configuration:
SAML Configuration
Role Mappings
Role Options
Assertion Attribute Mappings
SAML Configuration
- LOGIN REDIRECT URL
This is the SAML endpoint HPE Morpheus Software will redirect to when a user signs into HPE Morpheus Software via SAML
- SAML LOGOUT REDIRECT URL
The URL HPE Morpheus Software will POST to when a SAML user logs out of HPE Morpheus Software
- INCLUDES SAML REQUEST PARAMETER
Yes (recommended) - the AuthN request will be sent via the ?SAMLRequest= parameter in the URL (GET)
No - the AuthN request will be submitted in the body of the request (POST)
Note
The SAML SP documentation should mention which binding to use but GET is most common
- SAML REQUEST
No Signature - No signature is used on the SAML request
Self Signed - A self-signed X.509 Certificate is gentered after clicking SAVE CHANGES. This signature value can be used by the SAML SP to verify the authenticity of the request
Custom RSA Signature - Import a custom RSA Private Key and respective X.509 Certificate. This signature value can be used by the SAML SP to verify the authenticity of the request
- SAML RESPONSE
Do Not Validate Assertion Signature - The SAML response signature from the SAML SP will not be validated
Validate Assertion Signature - The SAML reponse signature from the SAML SP will be validated. Enter the SAML SP X.509 certificate in the Public Key field. This must be in PEM format
Important
Setting SAML REQUEST to “No Signature” and SAML RESPONSE to “Do Not Validate Assertion Signature” is allowed but not recommended for security reasons.
Role Mappings
- DEFAULT ROLE
Role any SAML user will be assigned by default
- ROLE ATTRIBUTE NAME
The name of the attribute/assertion field that will map to HPE Morpheus Software roles, such a MemberOf
- REQUIRED ROLE ATTRIBUTE VALUE
Attribute/assertion value that a user must be assigned/a member of to be authorized, such as group or role in the SAML SP. This is obtained from the attribute/assertion defined in the ROLE ATTRIBUTE NAME field
- <HPE Morpheus Software ROLE NAME>
Additional roles that can be mapped to a user, which will add to the DEFAULT ROLE. Attribute value that a user must be assigned/a member of to be authorized, such as group or role in the SAML SP. This is obtained from the attribute/assertion defined in the ROLE ATTRIBUTE NAME field
Important
Role mapping compares each value supplied for ROLE ATTRIBUTE NAME with a configured mapping using exact value equality. A single assertion value containing comma- or space-separated role names is not split and will not match multiple mappings. To assign multiple mapped Roles, configure the identity provider to emit multiple values for the same SAML attribute, one exact value per mapping. This preserves the provider’s group model but may require changing its assertion configuration. The Default Role remains additive.
Note
For more on Identity Source role mapping permissions, see the associated guide in our KnowledgeBase.
Role Options
- ENABLE ROLE MAPPING PERMISSION
When selected, Tenant users with appropriate rights to view and edit Roles will have the ability to set role mapping for the Identity Source integration. This allows the Tenant user to edit only the role mappings without viewing or potentially editing the Identity Source configuration.
- MANUAL ROLE ASSIGNMENT
When selected, administrators can manually edit Roles for users created through this identity source integration from the user detail page (Administration > Users > Selected user).
Assertion Attribute Mappings
- GIVEN NAME ATTRIBUTE NAME
SAML SP field value to map to HPE Morpheus Software user First Name
- SURNAME ATTRIBUTE NAME
SAML SP field value to map to HPE Morpheus Software user Last Name
- EMAIL ATTRIBUTE
SAML SP field value to map to HPE Morpheus Software user email address
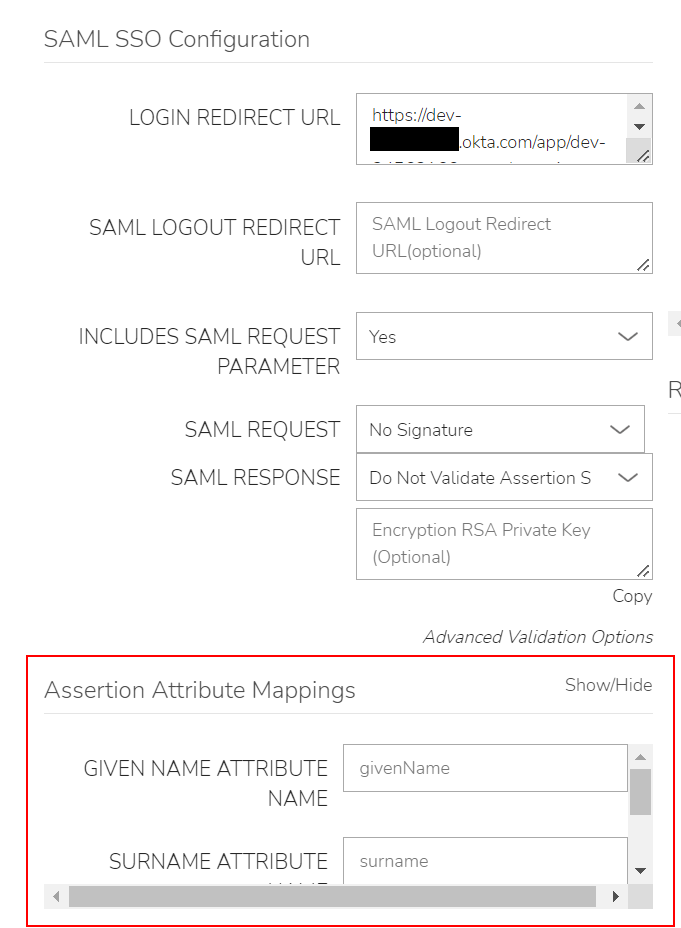
Once populated, select SAVE CHANGES and the SAML identity source integration will be added.
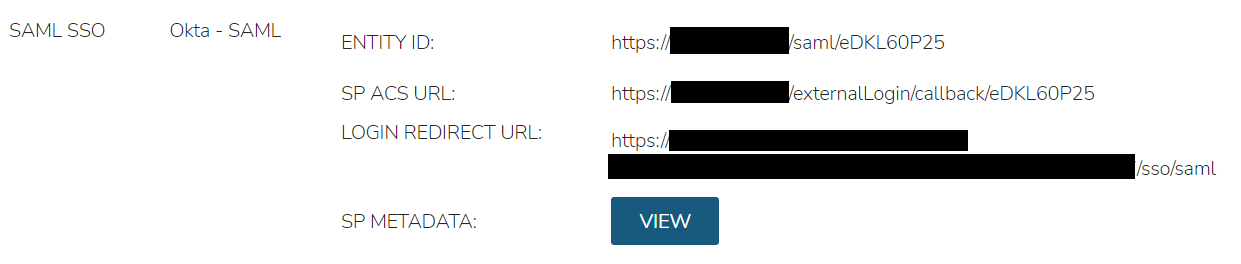
In the Identity Sources section, important information for configuration of the SAML integration is provided. Use the SP ENTITY ID and SP ACS URL for configuration on the external login SAML provider side.
Note
In some cases, the SAML provider may need these values before providing the LOGIN REDIRECT URL and other values. When creating the integration, the NAME and LOGIN REDIRECT URL can contain any values, then selecting SAVE CHANGES will generate the above values. The NAME and LOGIN REDIRECT URL can be edited later, once the SAML configuration is created in the SAML provider.
ENTITY ID
SP ACS URL
LOGIN REDIRECT URL
SP METADATA
Sample Metadata code output:
<?xml version="1.0" encoding="UTF-8" standalone="yes"?><EntityDescriptor entityID="https://someip.com/saml/eDKL60P25" xmlns="urn:oasis:names:tc:SAML:2.0:metadata"><SPSSODescriptor AuthnRequestsSigned="false" WantAssertionsSigned="true" protocolSupportEnumeration="urn:oasis:names:tc:SAML:2.0:protocol"><NameIDFormat>urn:oasis:names:tc:SAML:1.1:nameid-format:unspecified</NameIDFormat><AssertionConsumerService index="0" isDefault="true" Binding="urn:oasis:names:tc:SAML:2.0:bindings:HTTP-POST" Location="https://someip.com/externalLogin/callback/eDKL60P25"/></SPSSODescriptor></EntityDescriptor>
Note
Different SAML providers will have different field names and requirements. An Okta SAML Dev environment was used for the example integration in this article.
Okta SAML SSO
For Okta SAML integration, the following fields are mapped:
LOGIN REDIRECT URL : Identity Provider Single Sign-On URL
ENTITY ID: Audience URI (SP Entity ID)
SP ACS URL: Single sign on URL
Onelogin SAML SSO
For Onelogin SAML integration, the following fields are mapped:
LOGIN REDIRECT URL : SAML 2.0 Endpoint (HTTP)
SAML LOGOUT REDIRECT URL : SLO Endpoint (HTTP)
SIGNING PUBLIC KEY : X.509 Certificate
ENTITY ID: ACS (Consumer) URL Validator
SP ACS URL: ACS (Consumer) URL
JumpCloud Identity Source
Overview
HPE Morpheus Software can integrate with JumpCloud as an identity source, allowing users to authenticate with their JumpCloud credentials. JumpCloud user attributes and roles can be mapped to HPE Morpheus Software roles, providing centralized identity management through the JumpCloud Directory Platform.
Adding a JumpCloud Identity Source
Navigate to Administration > Tenants
Select the Tenant to add the Identity Source Integration
Select IDENTITY SOURCES
Select + IDENTITY SOURCE
Select JumpCloud from the TYPE dropdown
Enter the following:
- NAME
A name for this Identity Source integration in HPE Morpheus Software.
- DESCRIPTION
Optional description of the Identity Source.
- ORGANIZATION ID
The JumpCloud Organization ID. This can be found in the JumpCloud Admin Console under Settings > General > Organization ID.
- BINDING USERNAME
A JumpCloud API user or admin account username used for API authentication. This account is used to validate user credentials and sync group/role data.
- BINDING PASSWORD
The password or API key for the binding account.
- REQUIRED ROLE
(Optional) Enter a JumpCloud group name or role. Only JumpCloud users with this role/group membership will be allowed to authenticate to HPE Morpheus Software. If left empty, all JumpCloud users who can authenticate will be allowed to log in and a local user account is created automatically. It is strongly recommended to set this field in enterprise environments.
- DEFAULT ROLE
The default HPE Morpheus Software Role applied to all users who pass the Required Role check. This role is always assigned in addition to any roles granted through role mappings below.
- ROLE MAPPINGS
Map JumpCloud groups or roles to HPE Morpheus Software roles. Each existing HPE Morpheus Software role is listed with a field to enter the corresponding JumpCloud group name. Users with matching JumpCloud group membership will be assigned the mapped HPE Morpheus Software role at login.
Select SAVE CHANGES
The JumpCloud Identity Source integration is now active.
User Authentication
Once configured, users can log in to HPE Morpheus Software using their JumpCloud credentials:
On first login, a HPE Morpheus Software user account is automatically created matching the JumpCloud username and email
Subsequent logins validate credentials against JumpCloud and update role assignments based on current group membership
If a REQUIRED ROLE is specified, only users with that JumpCloud group/role can authenticate
Important
JumpCloud users will not authenticate in HPE Morpheus Software if there is an existing HPE Morpheus Software user with a matching username or email address that was not created by this identity source.
Role Mapping
Role mappings allow granular control over HPE Morpheus Software permissions based on JumpCloud group membership:
Enter JumpCloud group names in the role mapping fields next to each HPE Morpheus Software role
Users may be assigned multiple HPE Morpheus Software roles based on their JumpCloud group memberships
Role assignments are re-evaluated on each login, reflecting any JumpCloud group changes
If no role mapping matches and no Required Role blocks access, the Default Role is assigned
Tenant Subdomain Login
When an identity source is configured for a Tenant, users can access the Tenant-specific login URL:
The subdomain login URL is shown on the Identity Sources page
Users navigating to this URL will be prompted to authenticate via the configured identity source
This allows direct login without selecting a Tenant first
Removing the Integration
To remove a JumpCloud identity source:
Navigate to Administration > Tenants > (Tenant) > Identity Sources
Click on the JumpCloud identity source
Click DELETE
Confirm the deletion
Warning
Removing an identity source does not delete users that were created through it. Those users will no longer be able to authenticate via JumpCloud but their HPE Morpheus Software accounts remain.
Custom External Identity Source
Overview
The Custom External identity source type allows HPE Morpheus Software to integrate with external Single Sign-On (SSO) systems that are not natively supported through a dedicated identity source type. This integration supports both interactive (browser redirect) and non-interactive (API-based) authentication modes with configurable response encryption.
Adding a Custom External Identity Source
Navigate to Administration > Tenants
Select the Tenant to add the Identity Source Integration
Select IDENTITY SOURCES
Select + IDENTITY SOURCE
Select Custom External from the TYPE dropdown
Enter the following:
- NAME
A name for this Identity Source integration in HPE Morpheus Software.
- DESCRIPTION
Optional description of the Identity Source.
- NONINTERACTIVE
Select the authentication mode:
true — Non-interactive/API mode. The external system authenticates users without browser redirects. HPE Morpheus Software sends credentials directly to the external system’s API.
false — Interactive mode. Users are redirected to the external login URL for authentication, then redirected back to HPE Morpheus Software with an authentication response.
- EXTERNAL LOGIN URL
(Interactive mode only) The URL to which users are redirected for authentication. The external SSO system should redirect back to HPE Morpheus Software after successful authentication with the user identity in the response.
- EXTERNAL LOGOUT URL
(Interactive mode only) The URL to which users are redirected on logout from HPE Morpheus Software. This allows single logout across the SSO environment.
- AUTH RESPONSE ENCRYPTION ALGORITHM
The encryption algorithm used to decrypt the authentication response from the external system:
NONE — No encryption; the response is sent in plaintext
AES — Advanced Encryption Standard
DES — Data Encryption Standard
DESede — Triple DES
HmacSHA1 — HMAC with SHA-1
HmacSHA256 — HMAC with SHA-256
- ENCRYPTION KEY
(Required when an encryption algorithm other than NONE is selected) The shared secret key used to decrypt the authentication response.
- DEFAULT ROLE
The default HPE Morpheus Software Role assigned to users authenticated through this identity source when no other role mapping applies.
- REQUIRED ROLE
(Optional) An external role name that users must possess to be allowed access to HPE Morpheus Software. Leave blank to allow all authenticated users.
- ROLE MAPPINGS
Map external role names to HPE Morpheus Software roles. Each existing HPE Morpheus Software role is listed with a field to enter the corresponding external role identifier. Users whose authentication response includes matching role values are assigned the mapped HPE Morpheus Software role.
Select SAVE CHANGES
Authentication Flow
Interactive Mode
User navigates to the HPE Morpheus Software login page (or Tenant subdomain URL)
User is redirected to the configured External Login URL
User authenticates with the external SSO system
External system redirects back to HPE Morpheus Software with an encrypted (or plaintext) authentication response containing user identity and role information
HPE Morpheus Software decrypts the response (if encrypted), validates the user, and creates/updates the local user account
User is logged into HPE Morpheus Software with the appropriate role assignments
Non-Interactive Mode
User enters credentials on the HPE Morpheus Software login page
HPE Morpheus Software sends credentials to the external system’s authentication endpoint
External system validates credentials and returns user identity and role information
HPE Morpheus Software creates/updates the local user account and logs the user in
Response Format
The external authentication system must return a response that HPE Morpheus Software can parse to extract:
Username — The unique identifier for the user
Email — The user’s email address
Roles — The roles/groups the user belongs to (for role mapping)
The exact format depends on the external system implementation. When encryption is configured, the response payload must be encrypted with the shared key using the configured algorithm before transmission to HPE Morpheus Software.
Security Considerations
Always use HTTPS for the External Login URL and External Logout URL
When using interactive mode, use a strong encryption algorithm (AES or HmacSHA256) to protect the authentication response in transit
Store the Encryption Key securely and rotate it periodically
Use the Required Role field to limit access to authorized users only
The unique identity source code is auto-generated and used in the callback URL—do not modify it after users have authenticated
Important
Custom External identity source users will not authenticate in HPE Morpheus Software if there is an existing HPE Morpheus Software user with a matching username or email address that was not created by this identity source.
Custom IAM API Identity Source
Overview
The Custom IAM API identity source allows HPE Morpheus Software to authenticate users against an external Identity and Access Management (IAM) system through a custom API endpoint. This is useful for organizations with proprietary or uncommon IAM systems that provide a REST or HTTP-based authentication API.
HPE Morpheus Software sends user credentials to the configured endpoint and processes the response to authenticate users and optionally assign roles.
Adding a Custom IAM API Identity Source
Navigate to Administration > Tenants
Select the Tenant to add the Identity Source Integration
Select IDENTITY SOURCES
Select + IDENTITY SOURCE
Select Custom API from the TYPE dropdown
Enter the following:
- NAME
A name for this Identity Source integration in HPE Morpheus Software.
- DESCRIPTION
Optional description of the Identity Source.
- API ENDPOINT
The full URL of the external IAM authentication API endpoint (e.g.,
https://iam.example.com/api/authenticate).- API STYLE
The HTTP method and encoding format for sending credentials to the endpoint:
Form URL Encoded [GET] — Credentials sent as URL query parameters via GET request
Form URL Encoded [POST] — Credentials sent as form-encoded body via POST request
JSON [POST] — Credentials sent as JSON body via POST request
XML [POST] — Credentials sent as XML body via POST request
HTTP Basic [GET] — Credentials sent via HTTP Basic Authentication header on a GET request
- VALUE ENCRYPTION ALGORITHM
(Not available for HTTP Basic style) The algorithm used to encrypt credential values before sending them to the API:
NONE — Credentials sent in plaintext (use only with HTTPS)
AES — Advanced Encryption Standard
DES — Data Encryption Standard
DESede — Triple DES
HmacSHA1 — HMAC with SHA-1
HmacSHA256 — HMAC with SHA-256
- ENCRYPTION KEY
(Required when an encryption algorithm other than NONE is selected) The shared secret key used to encrypt credential values before transmission.
- DEFAULT MORPHEUS ROLE
The default HPE Morpheus Software Role assigned to users authenticated through this identity source. Select NONE to require explicit role mapping for all users.
Select SAVE CHANGES
Authentication Flow
User enters credentials on the HPE Morpheus Software login page
HPE Morpheus Software formats the credentials according to the configured API Style
If encryption is configured, credential values are encrypted with the shared key
HPE Morpheus Software sends the request to the configured API Endpoint
The external IAM system validates credentials and returns a success/failure response
On success, HPE Morpheus Software creates or updates the local user account and logs the user in with the Default Role
On failure, the login is denied with an authentication error
API Response Expectations
The external IAM API endpoint should:
Return an HTTP 200 status code on successful authentication
Return an HTTP 401 or 403 status code on failed authentication
Optionally include user attributes (email, display name) in the success response for user account population
Respond within a reasonable timeout (recommended under 10 seconds)
API Style Details
Form URL Encoded [GET]
Sends credentials as query parameters:
GET https://iam.example.com/api/authenticate?username=user&password=pass
Form URL Encoded [POST]
Sends credentials as form body:
POST https://iam.example.com/api/authenticate
Content-Type: application/x-www-form-urlencoded

username=user&password=pass
JSON [POST]
Sends credentials as JSON:
POST https://iam.example.com/api/authenticate
Content-Type: application/json

{"username": "user", "password": "pass"}
XML [POST]
Sends credentials as XML:
POST https://iam.example.com/api/authenticate
Content-Type: application/xml

<auth><username>user</username><password>pass</password></auth>
HTTP Basic [GET]
Sends credentials in the Authorization header:
GET https://iam.example.com/api/authenticate
Authorization: Basic dXNlcjpwYXNz
Security Considerations
Always use HTTPS for the API Endpoint to protect credentials in transit
Use value encryption (AES or HmacSHA256) as an additional layer when the API requires it
HTTP Basic [GET] mode does not support additional value encryption (credentials are Base64-encoded in the header)
Rotate the encryption key periodically if using value encryption
Ensure the external IAM system implements rate limiting and account lockout to prevent brute-force attacks
Important
Custom IAM API identity source users will not authenticate in HPE Morpheus Software if there is an existing HPE Morpheus Software user with a matching username or email address that was not created by this identity source.